Showing posts with label Outlawz Challenges. Show all posts

Saturday, 24 February 2018

Sunny Flowers For Mother

As well as their usual challenges, Outlawz has a special set of challenges to celebrate it's 7th Birthday. One of them is to make a project using a free image from SheepSki Designs.

DSC_0538(watermarked)
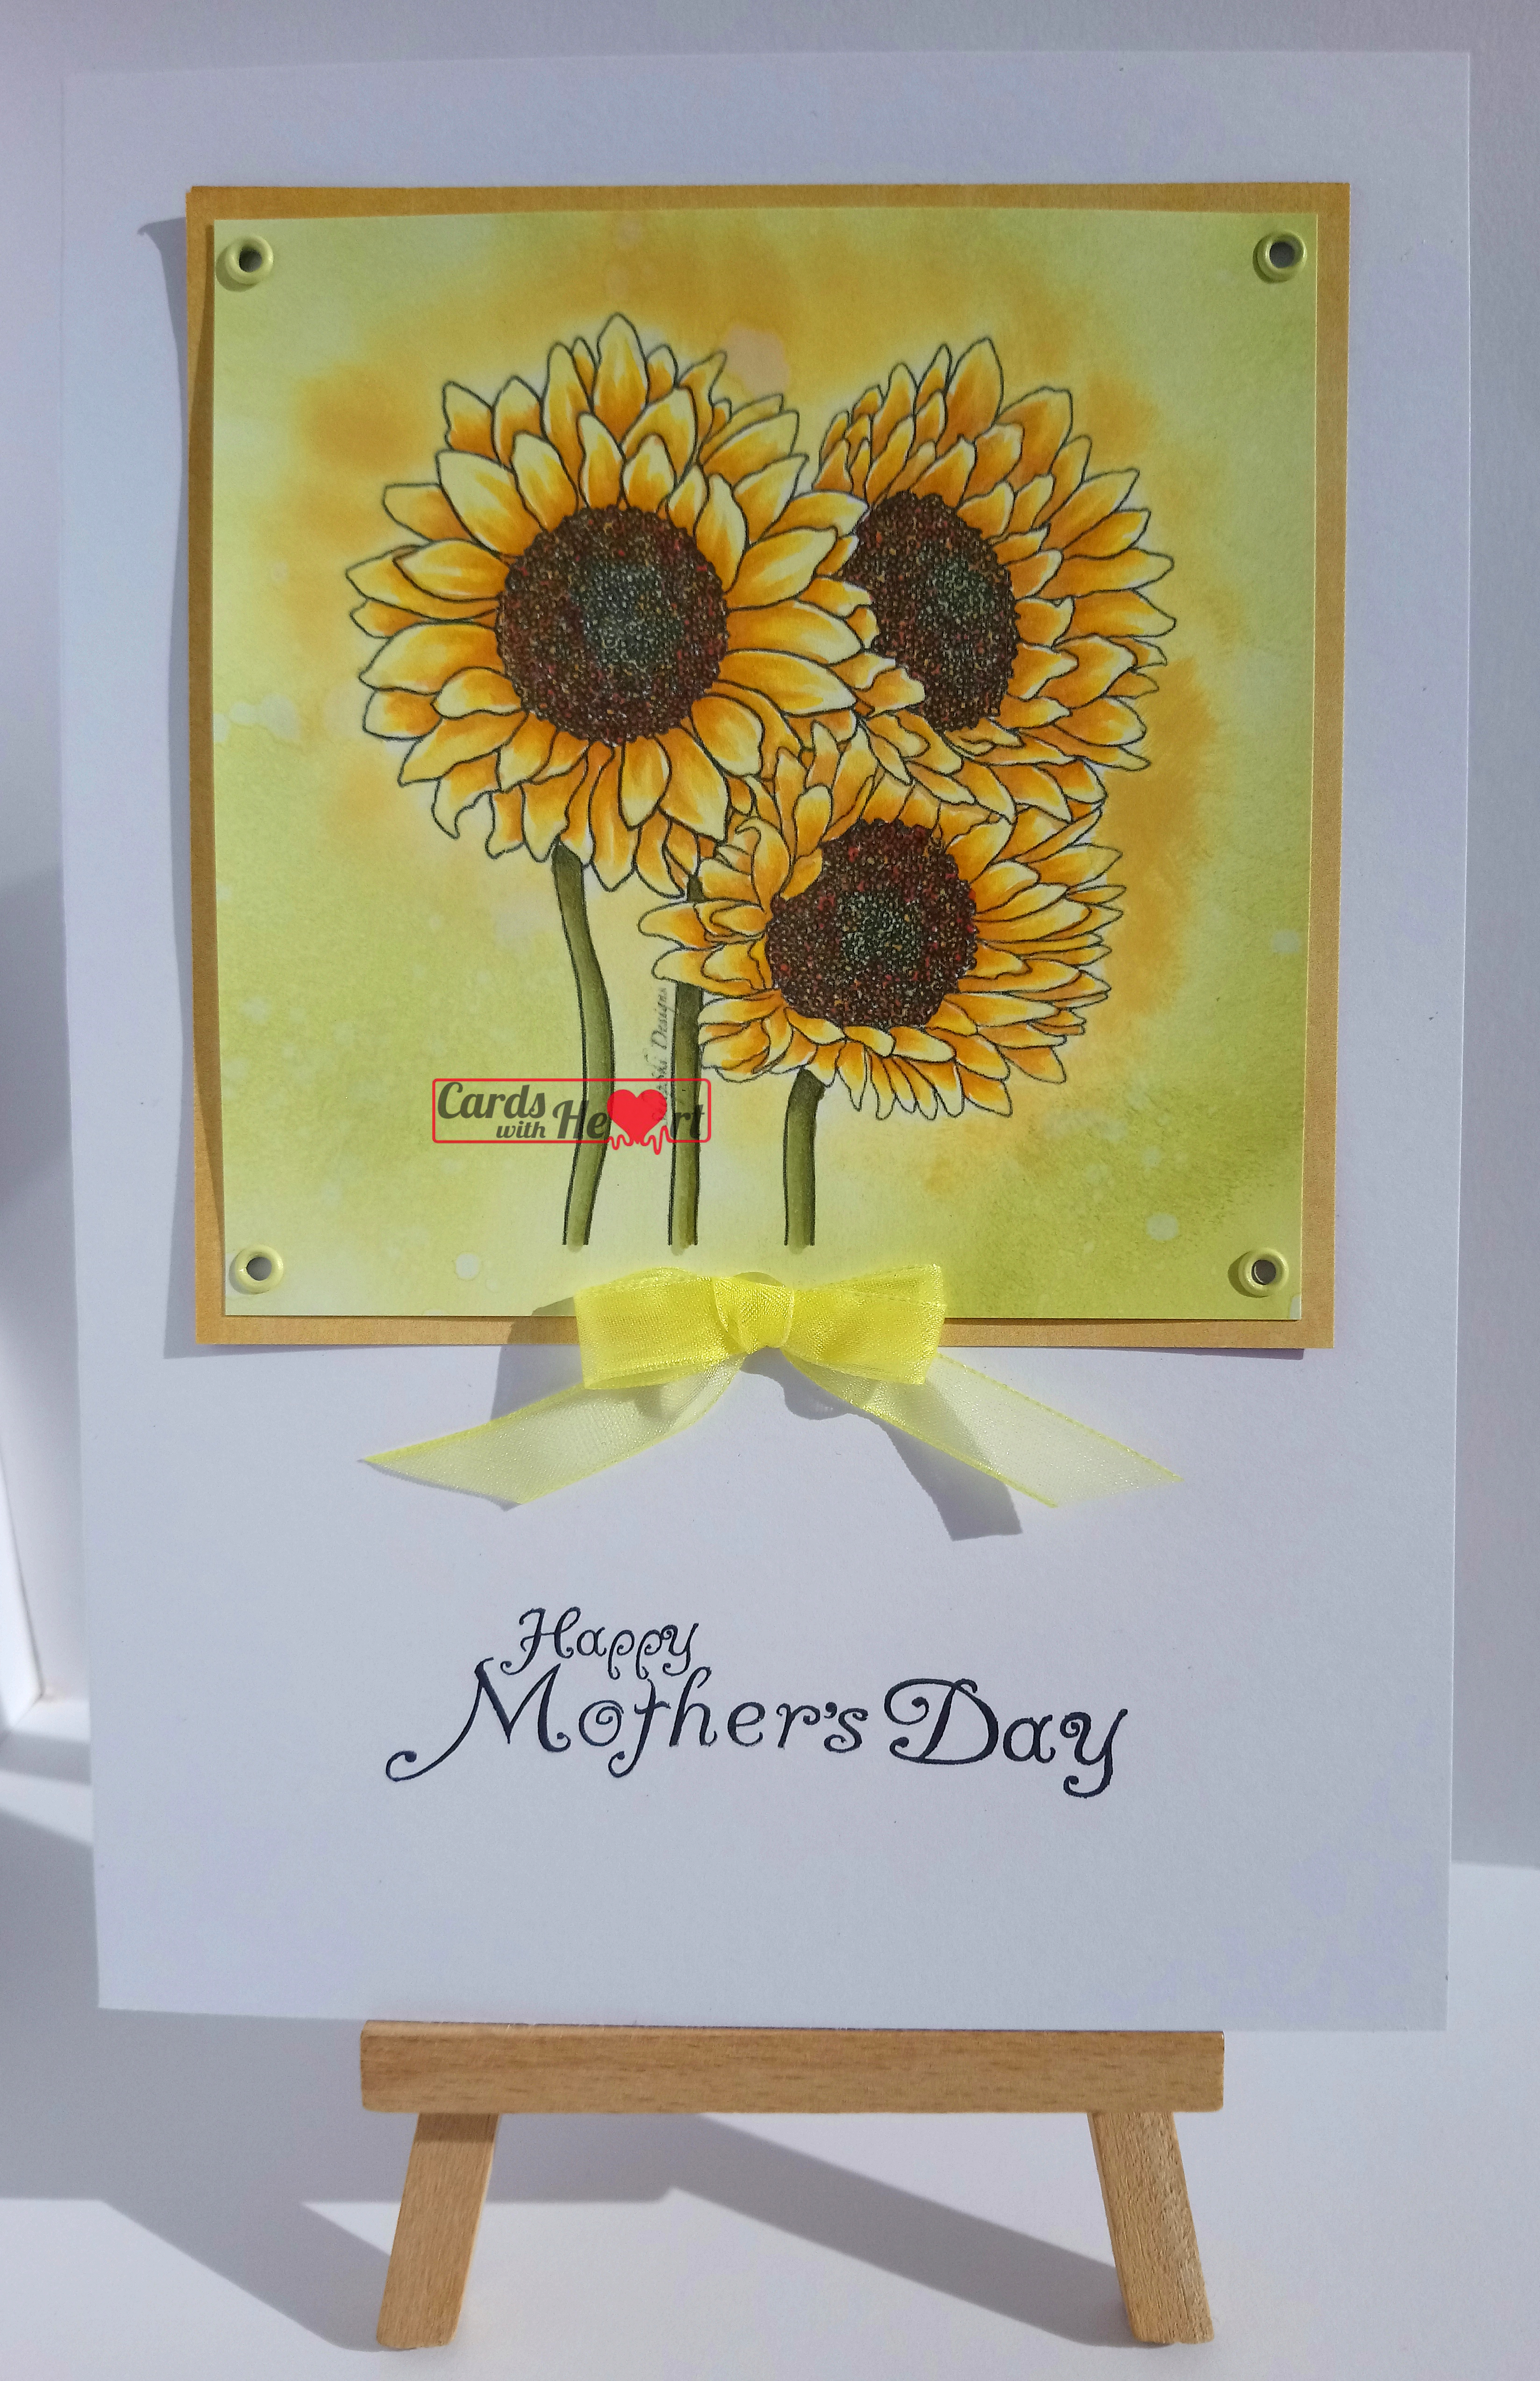
Materials used:Sheepski Designs - Sunflowers (available by email request for members of the Outlawz Challenges)
Clear Impressions Floral Flourish set (from Creative Stamping Magazine)
Graphic 45 - French Country 6x6 pad
Distress Oxide inks - Peeled Paint and Fossilized Amber
X-Press It card
Copic pens
yellow organza ribbon
yellow eyelets
black archival ink pad
A5 card blank


The image is printed on X-Press It card and coloured with Copics. The background is made with the distress oxides applied with a sponge and lightly spritzed. The image is attached to a mat from the Graphic 45 pad with eyelets.

The topper is attached to the card front and the sentiment stamped underneath. Finally the bow is added.

The Outlawz Challenge does not stipulate that you have to create a birthday card so I hope a Mother's Day one is acceptable.

Thank you for dropping in. Take care.

Pippa

Entering the following challenges:
The Outlawz Challenges - Special Birthday Challenge
4 Crafty Chicks #391 - Anything Goes
Polkadoodles Challenge #08 - Anything Goes
Creative Fingers #143 - Anything Goes
Jo's Scrap FFC #222 - Anything Goes
Simply Papercraft #55 - Anything Goes
Crafting With Friends #61 - Anything Goes
My Creative Scoop Colour Inspiration Link Up #31
Inspiration Destination #144 - Anything Goes
A Bit More Time To Craft Extra - February Anything Goes
A Bit More Time To Craft #62 - Anything Goes
Artistic Inspirations #194 - Anything Goes/ Use Flowers
Lil Patch of Crafty Friends #76 - Anything Goes
A Gem Of A Challenge #213 - "Spring Flowers" (Use Any Flowers)

Sunday, 29 November 2015

Deedee's Sponsoring Outlawz

Today Deedee is sponsoring the Outlawz CAS Challenge with the theme the mode of transportation you'd use to travel to see family or friends for the holidays or any occasion. Deedee produced a new set for the occasion.

s175182838839828623_p615_i1_w540

I have always wanted to go for a sleigh ride on snow so choosing which image to use for my sample was easy, and it has penguins too!

I used the precoloured image for my card.

SAM_2416(watermarked)

Materials used:
Deedee's Digi Set - Here Comes Christmas
Bearly Mine Background Papers (out of business)
white A5 card blank
black card
printing card and printing paper
black pen


Method:
Using a graphics programme assemble the background paper with the sleigh and sentiment on top at the required size. Trim and then matt onto black card.

To make the paper ribbon use the graphics programme to produce a line of small sleigh images. Cut into a strip at the size you need and run a black pen along the top and bottom of the strip.

Attach the ribbon and and the matted image onto the front of the card.

If my card has inspired you why not head over to the Outlawz Challenges and have a go yourself.

The weather forecast for the UK is not hopeful for getting snow this winter, but then again forecasters are not always accurate with their predictions.

Thank you for visiting. Take care.

Pippa

Monday, 19 October 2015

Outlawz Progressive Challenge for October

There are still a lot of harvest and pumpkin images about and this month's image for the Outlawz Progressive Challenge is no exception.

Materials used:SAM_2357(watermarked)
Gerda Steiner Digi Stamp - Big Load (available on registration from Outlawz Challenges)
blending card
brown and orange card
white A5 card blank
small gold peel-off letters
Copic pens
Spellbinders labels dies


Method:
I printed out my image and coloured it with the copics before cutting it with the dies. I also cut a larger mat from the brown card. I covered the front of the card blank with a slightly smaller piece of orange card and then added my matted image. Finally I added the letters to spell out the sentiment.

SAM_2358(watermarked)

While I was at it I also made a couple of ATC's.

Thank you for popping in. Take care.

Pippa

I would like to enter my card into the following challenges:
Outlawz Progressive Freebie Challenge - October
Crafting With An Attitude #8
Crafty Girls Creations #6
If You Give A Crafter A Cookie Challenge #29
Art By Mi Ran #43
Crafting With Friends #8
Crafty Catz #297
Creative Fingers #95
Jo's Scrap Shack FFC #110
Simply Papercraft Challenges #15
That's Crafty Challenge Blog - Boys Will Be Boys
Digi Designs Challenge Blog - Too Cute To Spook (Halloween or Harvest Related images/colors)

Friday, 24 July 2015

Outlawz Progressive Challenge

Card makers are often heard to say that making cards for the men and boys is tricky. Most of the images trending at the moment are very feminine characters with the big eyes - not to everyone's taste and especially not suitable for the males of the world! So when this month's Outlawz Progressive Challenge freebie arrived it made a refreshing change.

SAM_1813(watermarked)

Materials used:
Freebie from Outlawz Progressive Challenge - Farmer Fred (I think)
white stamping card
Happy Birthday acrylic stamp
black archival ink pad
core'dinations card stock
designer papers - Papermania: Happy Days
circle die
Adirondack ink pads: stonewashed, meadow
blending brushes
Copic pens


Method:
I printed out the image and coloured it with the pens. I used the Adirondack inks and blending brushes to put in the sky and grass background, then trimmed the image down to the size I wanted and matted it onto some mustard yellow core'dinations card. I stamped out the Happy Birthday sentiment with black ink and cut out the two semi-circles in the middle before attaching to a snippet of the yellow card and cutting with a circle die. I covered the front of a white A5 card blank with two of the designer papers and attached my topper with 3d foam pads. Finally I stuck the greeting onto the card.

The weather here has turned dramatically from the sunshine we have been enjoying for some days now to torrential rain. Although the garden desperately needs water and the pond even more so I do wish it would confine itself to overnight rain! It is so dark that we are having to put lights on - in July! On the other hand the weather does mean that we will not be going anywhere so more time to sort out my craft room between warming cups of tea!

Thanks for dropping in. Take care.

Pippa

I would like to enter my card into:
The Outlawz Challenges - Progressive Freebie
Week 29 -Crafting Challenge at Polkadoodles - 2 or more Patterned Papers
Through the Craft Room Door - Anything goes

Monday, 29 June 2015

Ice cream - yum!

Imagine That's Progressive Challenge for June features a portable ice cream parlour, what more  could you want on a hot summer's day?

Materials used:SAM_1774(watermarked)
Imagine That Digi Set - Ice Cream Parlour
Deedee's Digi Stamp Set - Ice cream truck
white stamping card
black and stripy card
white A4 sheet of card to made card blank
Copic pens


Method:
I printed out the image and the greeting onto the white stamping card along with some extra smaller images and greeting to make into ATC cards. I also printed out a small ice cream image which came from Deedee's Digis DOM for July set. I coloured all the images in with Copics then trimmed the large image and sentiment to the size I wanted before matting onto black card. I also fussy cut the single ice cream cone. Using the white card I made an easel card blank and covered the front and the inside with the stripy card, having first run a black pen along the edges. I stuck the matted image to the top of the card and used the sentiment and ice cream cone inside the card as stoppers.

SAM_1776(watermarked)

With the smaller images, having coloured them I trimmed them down to ATC size and ran a black pen around the edges.

It has been a lovely hot and sunny day in Somerset today, so much so that I think an ice cream is called for right now!

Thanks for visiting. Take care.

Pippa

I would like to enter my card into:
Imagine That Digi of the Month challenge - June
Outlawz Greeting Card Challenge - Anything goes

Word Art Wednesday Challenge 189

Monday, 22 June 2015

Path of Postitivity Challenge - Happiness

At this time of the year in the UK the hedgerows and fields are putting on their summer colours. In amongst the blues, yellows, pinks and whites of our native wild flowers there are also large patches of red appearing as the poppies join the party. I know that the poppy is used by the British Legion to mark Remembrance Day but they bloom in the summer and I think of them as a happy summer flower rather than a sombre late autumn one. I love the splashes of colour on my  journey to school and look out for them every year with even more anticipation than looking for the first snowdrops or the first daffodils. When the poppies come out then the end of the academic year is not too far away! (Now that thought definitely makes me happy.)

It just so happens that this month's image from the Outlawz Progressive Freebie Challenge is a wonderful poppy, and it also fits the bill for my sister-in-laws birthday at the end of the week. We met on the first day of secondary school when we were 11 and have been friends ever since, yet another source of happiness!

Materials used:SAM_1768(Watermarked)
Anne's Digital Art - Framed Poppy (visit the Outlawz site for detail (link below)
Stamping card
Centura Pearl card made into an A5 card blank
snippets of red and glossy black card
black seed beads
Britannia flower die
Copic pens
Happy Birthday acrylic stamp
archival black ink pad
corner rounder punch


Method:
I printed out the image to the size I needed and coloured it in with the copic pens, cut it out along the line of the frame, rounded the corners and edged with black ink. I stamped in the birthday greeting with black ink. I cut the red and black mats and rounded the corners of each before layering them up with the image. Using another snippet of red card I die cut the flowers, cut the tops of the petals with the deckle blade on my paper cutter, drew in the black detail lines with a micron pen and stuck them together to make the poppy flower. Before sticking down the poppies I glued in some black seed beads.

SAM_1769(watermarked)I also printed out some smaller versions of the poppy and made them into ATC's.

I've just thought of another 'happiness' from making the card - colouring. I love colouring, it is so therapeutic and helps with the symptoms of my AF, it's just a shame I cannot colour at night when the thumping heart stops me sleeping!

Thank you for dropping in. Take care.

Pippa

I almost forgot, if you have something that makes you happy why not visit the Path of Positivity and join in with the challenge. There are plenty of different ways you can enter, just have a look at the information on the blog (link below).

I would like to enter my card into:
The Path of Positivity Challenge # 27 Happiness
The Outlawz Monthly Progressive Freebie Challenge - June
Pixie's Snippets Playground Weeks 181 and 182

Wednesday, 27 May 2015

Rudolph Day

I missed last month's Rudolph Day, not sure how but there it is. This month I am being a bit sneaky because the image for the Outlawz Freebie Progressive Challenge is a Christmas Ppinkydolls one so two challenges covered with one card!

Materials used:SAM_1730waatermarked)
PPinky Dolls Digi Stamp - the image came free for taking part in the previous months challenge and I cannot find it in the Ppinkydolls Etsy site. I have added the link to the site so you can go and have a look if you are interested.
white stamping card
Copic pens
gold mirri card
Sizzlits nesting circles dies
Christmas Wishes acrylic stamp - origin unknown
white card to make the card blank


Method:
I printed out the image and coloured it with the pens then used the dies to cut it out along with a gold card mat. From another piece of white card I cut the card blank and turned it into an easel card. I stamped the greeting onto a piece of the left over white card and matted it onto a snippet of the gold card. I mounted it on foam pads inside the card to act as the stopper. Finally I cut a second white scallop edged circle and mounted it onto the front of the card blank before attaching my matted image.

Thanks for dropping in. Take care.

Pippa

I would like to enter my card into:
Rudolph Day Challenge
Outlawz Monthly Progressive Freebie Challenge
Penny's Challenge 229 - Anything goes

Thursday, 30 April 2015

Outlawz Progressive Digi Challenge

This month the digi image for the Outlawz challenge is a cheeky looking frog. Here is my card using that image.
SAM_1657(watermarked)
Materials used:
Free Digi Stamp - Frog (sorry I cannot link it because I am not sure where it is from. If you are interested in getting it pop along to the Outlawz Challenges and they might be able to help)
Derwent Acadamy Sketching paper
Polychromo pencils
White, orange and brown card
circle dies


Method:
I printed out the image onto the Derwent paper and coloured it in with the polychromo pencils. I then cut it with the circle die and also cut two mats, increasing in size, from the orange and brown card. I layered all my circles up. I printed the greeting onto the white card before scoring and folding it into an A5 card blank. Finally I used foam pads to attach my image.

This is my first play with the polychromos so I am still very much at the beginner stage. I deliberately kept the sky and the grass colouring grainy so that the frog would stand out even more. The frog is coloured based on the Strawberry Poison Dart Frog. I had decided to do a tree frog because they have much more colour in them.

Thank you for dropping in. Take care.

Pippa

I would like to enter my card into:
The Outlawz Progressive Freebie Challenge - April

Word Art Wednesday Challenge 181 - Anything goes

Saturday, 18 April 2015

ATC's and Deedee's Digis

This month the ATC swap group I belong to voted to have the theme of April Showers. I used the opportunity to make some ATC's using just Deedee's wonderful images.

Materials used:
Deedee's Digi Stamp sets: Chance of ShowersRainy Day and Rain or Shine
Copic pens
white stamping card
white printing paper


Method:
Really easy! I just printed out the images, papers and sentiments I wanted to use at the size I wanted them to be then coloured them in, cut them out and mounted them onto blank ATC cards cut from white card.

SAM_1591(watermarked) SAM_1592(watermarked) SAM_1593(watermarked) SAM_1594(watermarked) SAM_1595(watermarked)

I think the teddy bear is my favourite.

Thanks for popping in. Take care.

Pippa

I would like to enter my ATC's into
The Outlawz Challenges: Monday Greetings Challenge - April Showers


I would like to enter my ATC's into:

Sunday, 29 March 2015

Rudolph Day 3 Already!

Can you believe it was the third Rudolph Day on Wednesday. I have attempted a completely different style for this month.
SAM_1512 (watermarked)

Materials used:
Deedee's Digi Stamp Sets - Mary's Joy and Krafty Christmas Kit
page from an old book
poinsettia dies
Neenah Dessert Storm card
Kraft card
printing card
Distress Ink pads - aged mahogany, iced spruce, pine needles
blending tool and blending mat
Spectrum Noir pencils
white flower stamen
gold mirri card


Method:
I sized and printed my base images and extra copies of Mary and printed them onto a piece of Neenah Desert Storm card before cutting the panel to the correct size. I coloured the images with the pencils. From the extra copies I cut Mary's dress and another baby. I shaped the pieces and layered them onto the base image using Gel glue.
SAM_1513 (watermarked)I printed a piece of the dotty paper from the Krafty Christmas set and used this to cut a piece slightly smaller than the card base. I matted my topper onto a piece of gold mirri. I attached the lagers to the card blank. Finally I coloured a couple of pages from an old book with the distress inks and cut the layers for my poinsettia from them. I glued the flower parts together, coloured some stamen with yellow ink and threaded them through a hole in the middle before attaching it to my card.


The flower is a new technique for me but I do like the effect, especially on the Kraft card so I may be using it again in the future.

SAMSUNG CAMERA PICTURES

Thank you for popping in. Take care.

Pippa

I would like to enter my card into:
March Rudolph Day
Outlawz Friday Colouring Challenge - Anything goes/Christmas twist

Wednesday, 25 March 2015

Outlawz Challenges

This month's free digi image is a cute little elephant and bird. I have made a couple of cards with it using different techniques.

Material's used:
Elephant and Bird image
balloons stamp
white stamping card
purple card
black card
silver mirri card
gold mirri card
white A5 blank card
white 15cm square card blank
snippets of purple patterned paper
Spectrum Noir pens
Versamark ink pad
Glossy Accents


SAM_1499 (watermarked)Method:
I printed out my images and sentiments on the stamping card then used the pens to colour them in. On the second card I used a little pointillism on the elephant. One image I cut into a square and the other I cut out leaving a narrow white border around the image.

For the square card I matted and layered my image onto black, purple and silver card. I folded the card blank to make an easel card before attaching the topper to it. I matted and layered the sentiment for the front onto black and purple and attached to the card. For the stopper I used the second sentiment also matting and layering it match. I covered the inside of the card with purple paper onto which I had randomly stamped balloon using Versamark ink before attaching the stopper with 3d foam pads.SAM_1498 (watermarked)

On the A5 card I used some purple snippets left from making crackers and made a line down the left side of the card. I used glue gel to attached the cut out image onto black card and then matted it onto gold mirri card. I made up the sentiment to match and printed the rest of it onto the insert so that inside it says ... it's your birthday. Finally I added glossy accents to the balloon.

I have a little pot on my desk which contains a lot of purple diamonds which are the 'waste' from making the box of crackers back in December. I thought using them on the front would get rid a a few, especially as they matched the colours I had used. There are still a lot left but it remains to be seen whether I ever get around to using them!

Thank you for dropping in. Take care.

Pippa

I would like to enter my card into:
The Outlawz Progressive Freebie Challenge

The Outlawz Friday Coloring Challenge
Pixie's Snippets Playground - Week 169

Wednesday, 4 February 2015

Tall Order!

My son-in-law's daughter has a birthday next week and she loves giraffes, so when I saw the 'Laughing Giraffes' image at From the heart stamps I knew I had to use it.

SAM_1379 (watermarked)

Materials used:
From the Heart Stamps - Laughing Giraffes
Animal print digi - Pixel Scrappers
A3 white card
Neenah Desert Storm Kraft colouring card
Spectrum Noir pens
gold capital letter stickers


Method:
I printed the image out on an A4 sheet of Neenah Desert Storm card and coloured it with the Spectrum Noir pens. I used Serif Craft Artist and the animal print digi to make the background paper and printed it on another sheet of Neenah Desert Storm. Using the A3 white card I made a A4 card blank and cut a strip off the right side of the front. I attached a strip of the background paper to the right side of the back flap of the card blank and spelled out Happy Birthday with the letter stickers. I used the spare strip of background paper to edge the top and bottom of the front flap of the card and mounted the trimmed image on top.

SAM_1380 (watermarked)

I have to say I was quite pleased with the way the giraffe coloured up. It was a big image to colour and I was worried that the ink might dry out too quickly to get a decent blend. Also it is the first time I have used the Neenah Desert Storm card on a project, I liked the way it toned down the colours and made them more natural looking. (Not sure why the card looks grey on the photo, in reality it is more of a sandy colour.)

Thanks for stopping by. Take care.

Pippa

I would like to enter my card into the following challenges:
Outlawz Challenges Friday Colouring Challenge - Anything goes
Your Scrapbook Place - Anything Goes/Masculine

Saturday, 31 January 2015

'Tis the season ATC's

Deedee's stamp of the month challenge for January is a fishing penguin and it just so happened that the ATC swap theme for the group I am in is ''Tis the Season'. So I have made a set of 5 ATC's all using Deedee's images.

Images used:
Ice Fishing
Snowman Soup
Dashing Through the Snow
Caroling Snowman
Let it Snow


All the links are for the EU version, those of you who live outside the EU will need to go to the appropriate shop on Deedee's web site.

SAM_1372 (watermarked)

SAM_1373 (watermarked)

SAM_1374 (watermarked)

SAM_1375 (watermarked)

SAM_1376 (watermarked)
Time is running out on me to get this posted before the challenge closes so I am not going to give you an account of how I did them. They are all fairly straight forward, print, cut to size and colour.

Thanks for dropping in. Take care.

Pippa

I would like to enter my ATC's into the following challenges:
Deedee's Digi of the Month- January
Outlawz Friday Colouring

Friday, 30 January 2015

Little Miss Christmas Girl - except she's not!

The stamp for the Outlawz Progressive Challenge this month was All Dressed Up's Little Miss Christmas 3, so I have used her on a winter birthday card!

SAM_1368 (watermarked)

Materials used:
All Dressed Up - 3 Little Christmas Girls
Die'sire Nouveau Stamping Frame
White stamping card
Grey card
A5 white card blank
Aqua card
White Fun Flock
Glitter
Spectrum Noir and Copic pens
Happy Birthday sticker


Method:SAM_1367 (watermarked)
I printed out the image onto stamping card and coloured her in with the pens. I used the white fun flock on her hat and dress and when the glue was dry put glitter on the top.

Using the die I cut the image to size and then cut the frame from the aqua card. I ran the darkest of the blue pens used to colour the image around the edge of the card blank then added a piece of grey card slightly smaller than the blank to leave a blue border. I attacked the matted image. Finally I used the blue pen to colour the sticker and attached it to the card front.

I had every intention of making a more complex card but ran out of time and I really wanted to enter the challenge in order to qualify for next month's free digi.

Thanks for visiting. Take care.

Pippa

I would like to enter this card into the Outlawz Progressive Freebie Challenge

Sunday, 25 January 2015

Little Snowman

From the Heart Stamps have a lovely little snowman as the image for their progressive challenge. This is my take on him.

SAM_1340 (watermarked)

Materials used:
From the Heart Stamps - Little Snowman
Bearly Mine - Winter Swirls 17 (unfortunately no longer in business because of the new EU Vat laws)
Snowflake Die (Spellbinders)
Copic and Spectrum Noir Pens
Stamping card
Printing card and paper
Cosmic Shimmer Diamond Sprinkles
Wink of Stella Shimmer Pen - Clear


Method:
I printed out a panel of the Winter Swirls on the right hand side of piece of card before folding it into an A5 card blank with the printing inside. I cut the front panel down to 11 cms so that when the card is closed part of the printed inside shows. I then printed out two A4 sheets of the same Winter Swirls paper, one I used as an insert and the other as the front panel.

SAM_1337 (watermarked)I printed out the Little Snowman onto stamping card and coloured in with the pens before cutting out the snowman and a small part of the snow under him. I put some wink of stella onto the pom-pom and trim of his hat. Taking the panel of patterned paper for the front I cut a slit along the snow drift long enough to slip the bottom of the snowman into. I inked the edges of the panel with black ink and then stuck it to the card front. The snowman is held in place by the part behind the paper.

Finally I die cut a snowflake from a snippet of paper and covered it with diamond sparkles before attaching it to the card front so that it overlaps the card opening.

When I finished the card I discovered that the front panel matches up to the back quite well, purely by chance. I was not so successful in matching the insert but it is not visible when the card is closed!

Thank you for popping in. Take care.

Pippa

I would like to enter this card into the following challenges:
From the Heart Stamps - stamp of the month challenge
Rudolph Day Challenge
Pixie's Snippets Playground (the snowflake cut from a snippet)
Outlawz Friday Colouring Challenge - Winter Wonderland

Friday, 28 November 2014

Slow down please, I'm not ready

That time of year is rapidly approaching now with Advent just around the corner. Have I made the cards? Have I bought the presents? Am I ready? Don't be daft!

Anyway to take my mind off all the things I have not done, I have been working on anther challenge, this time the monthly one at From the Heart Stamps. Like Deedee's challenge it is another progressive one, if you enter you automatically get sent the image for the following month. The image this month is a lovely simple Christmas one and it fits the bill for a few challenges.

Materials used:SAMSUNG CAMERA PICTURES
From the Heart Stamps - Angel Joy (faithful friends)
Spectrum Noir and Copic pens
Wink of Stella Clear
White stamping card
gold pen
Centura Pearl White card
patterned paper and left over snippets


Method
I used the centura pearl card to make a 14.8 cm square easel card base. I matted a 14.5 cm square piece of patterned paper to a 14.8 cm square of centura pearl card and attached this to the fold on card front. I printed out the image 4 times at the size I wanted then coloured them in with the pens.

[caption id="attachment_835" align="alignleft" width="260"]Close up of angel Close up of angel[/caption]

I cut the base image into a square and ran a pink Spectrum Noir pen around the edges. I used a second image and cut out most of the angel and the top of the large bauble which I stuck over the top of the first image using gel glue. I then stuck the topper to the front of the card. I printed out the sentiment and cut it to size. After running the same pink pen around the edges I matted and layered it onto patterned paper and centura pearl card. I lined the inside base of the card with patterned paper and added the greeting using 3d foam pads as the card stopper.

SAMSUNG CAMERA PICTURES

The remaining two images were cut out and decoupaged then added tothe front of a white A5 card blank which already had the sentiment printed onto it. Both angels then had wink of stella applied to their wings.

I think these two cards will cover a few challenges so off now to check the requirements. I know they fit the bill for Rudolph Day and as it is Sarn's final one I really want to get over there.

I hope your preparations for Christmas are going better than mine! Thanks for taking the time to visit. Take care.

Pippa

I would like to enter my cards into the following challenges:
Easel card: From the Heart Stamps Monthly Challenge
Outlawz Friday Coloring Challenge - Anything goes with optional Christmas twist
A5 card: Less is More Challenge - Week 199 Jingle all the way
Outlawz Monday Greetings Challenge - Anything goes
Both cards: Rudolph Day Challenge

Monday, 10 November 2014

Autumn Colours

Today's card is one I did for the Outlawz Monday Greetings challenge. I was so late getting it done that I had to enter it before I had blogged it! The theme this time was Autumn Colours.

Girl With Kite (watermarked)

Materials used:
girl and kite stamps from Creative Stamping magazine
greeting stamp
A5 white card blank
tuxedo black mememto ink
coloured card
leaf backing paper
white stamping card
spectrum noir pens
black micron pen
copic pens


[caption id="attachment_803" align="alignright" width="221"]Girl  With Kite Close Up (watermarked) Closer view of the girl[/caption]

Method:
I stamped out the girl twice and the kite once. Using copics for the skin and spectrum noir pens for the rest I coloured all the images. I trimmed one image down to make the base then cut out the hat, coat and one boot from the other image and attached them with 3d gel glue. I also cut out the kite.

I matted the main image onto yellow and rust card to make my topper. I stamped the greeting onto white card then matted and layered it with bits of card left from matting the topper.

I used the patterned paper to cover the card blank and then glued my topper and greeting to the front. I attached the kite using gel glue and then drew in the missing string with a black micron pen.

Fortunately America is behind us in time so I did manage to get my entry in before the challenge closed. The new challenge for this week is up now so hopefully I can get that one done quicker!

Thanks for stopping by. Take care.

Pippa