Showing posts with label alcohol ink pens. Show all posts

Saturday, 2 May 2015

National Scrapbook Day Challenge

Firstly apologies that this is late. I had it all typed up and ready to go and then Wordpress lost it when I posted it! This is the second attempt!

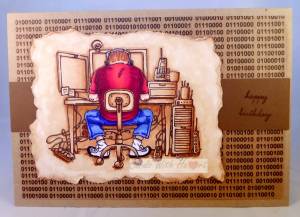
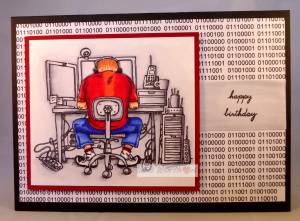
Deedee is celebrating National Scrapbook Day by running an additional challenge you can join in with. Several of the DT Members have made projects especially for the occasion and the idea is that you CASE one of them and produce your own project. You can find all the details on Deedee's blog.

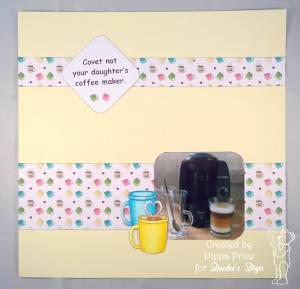
I decided to make a scrapbook page, I used to do a fair amount of scrapbooking but have not done anything for quite some time now. I did enjoy meeting the challenge. I kept my page very CAS which is my preferred style.

Materials used:SAM_1571 (watermarked)
Deedee's digi set - Coffee Cup Greetings
stamping card
printer paper
photo paper
12 x 12 pale yellow cardstock
corner rounder punch
Copic and Spectrum Noir pens


Method:
I printed out the background paper that comes with the set and the two coffee cup images along with the journalling and the photo. I coloured in the coffee cups with the pens and then fussy cut them. I trimmed the photo and journalling to the size I wanted, rounded the corners with a punch and inked the edges. I cut two strips from the sheet of background paper and inked the edges also. I then arranged my elements on the page and when happy with them stuck them down. The front coffee mug is raised on 3d foam pads to add some dimension.SAM_1572 (watermarked)

My daughter found her Tassimo machine at a bargain price last year and I confess that I am just a little envious. It does make wonderful different flavours of drinks, from coffee to chocolate. Yummy!

I hope you will have a go at the challenge, I am looking forward to seeing the different takes on the DT samples. And should you need a little incentive, there are prizes to be won!

Thank you for visiting. Take care.

Pippa

I would like to enter my page into the Your Scrapbook Place Challenge - Anything Goes

Thursday, 9 April 2015

Sailing on

Over at Imagine That Digi's this month the stamp of the month is on a nautical theme. I have recently given into temptation, again!, and bought a new die which makes for an easy pop up card.

[caption id="attachment_1077" align="alignright" width="353"]SAM_1562 (watermarked) Inside view[/caption]

Materials used:
Imagine That digi set - My Sailmate and free papers
Stampendous Pop-up die set
printing paper
stamping card
dark blue card
sentiment stamps and memento Tuxedo Black ink pad
Copic and Spectrum Noir pens


Method:
I printed out the papers and elements onto the different papers depending on type. I used the pens to colour the boy, girl, life belts and wheels. I die cut the bubble paper twice to make the inside pop-up piece.

[caption id="attachment_1078" align="alignleft" width="326"]SAM_1563 (watermarked) Close up of inside[/caption]

I fussy cut my coloured images (cutting out the little bits from the life belts and wheels took a while). I stuck a snippet of left over bubble paper behind the life belts and wheels then attached them to the pop-up tabs before attaching the boy and girl to the larger tabs. I used the blue card to make an A5 card blank and glued my pop-up piece inside making sure not to get glue on the tabs.

[caption id="attachment_1076" align="alignright" width="300"]SAM_1558 (watermarked) Front view[/caption]

For the front of the card I used different elements from the kit to build up the scene then stamped the sentiments on the front. Finally I stamped Happy Birthday inside the card leaving the left hand side clear for writing on.

It is the first time I have had a go at a pop-up card but I don't think it will be the last!

Thanks for popping in. Take care.

Pippa

I would like to enter my card into:
Imagine That DOM challenge
Digitally 'Sweet' Challenge 134 - Sport

Sunday, 29 March 2015

Rudolph Day 3 Already!

Can you believe it was the third Rudolph Day on Wednesday. I have attempted a completely different style for this month.
SAM_1512 (watermarked)

Materials used:
Deedee's Digi Stamp Sets - Mary's Joy and Krafty Christmas Kit
page from an old book
poinsettia dies
Neenah Dessert Storm card
Kraft card
printing card
Distress Ink pads - aged mahogany, iced spruce, pine needles
blending tool and blending mat
Spectrum Noir pencils
white flower stamen
gold mirri card


Method:
I sized and printed my base images and extra copies of Mary and printed them onto a piece of Neenah Desert Storm card before cutting the panel to the correct size. I coloured the images with the pencils. From the extra copies I cut Mary's dress and another baby. I shaped the pieces and layered them onto the base image using Gel glue.
SAM_1513 (watermarked)I printed a piece of the dotty paper from the Krafty Christmas set and used this to cut a piece slightly smaller than the card base. I matted my topper onto a piece of gold mirri. I attached the lagers to the card blank. Finally I coloured a couple of pages from an old book with the distress inks and cut the layers for my poinsettia from them. I glued the flower parts together, coloured some stamen with yellow ink and threaded them through a hole in the middle before attaching it to my card.


The flower is a new technique for me but I do like the effect, especially on the Kraft card so I may be using it again in the future.

SAMSUNG CAMERA PICTURES

Thank you for popping in. Take care.

Pippa

I would like to enter my card into:
March Rudolph Day
Outlawz Friday Colouring Challenge - Anything goes/Christmas twist

Friday, 20 March 2015

Easter is coming

Easter tends to be the forgotten Christian festival. We get so caught up in all the paraphernalia associated with celebrating Christmas that Easter creeps up on us and takes us by surprise. It is a pity because Easter is even more important than Christmas. I am just as guilty as anyone. Despite managing to make hundreds of Christmas cards for friends and family, my Easter cards' on the rare occasion I actually make any at all, tend to number in the teens! So you might think I am about to share an Easter card with you - sorry not yet, it's still a work in progress, but I do have a mini gift bag of eggs!

SAM_1480 (watermarked)

Materials used:
Deedee's Digi sets - Spring Chicks and Uneggspected
scalloped circle dies
We R Memorykeepers Gift Bag Punch Board
snippet of acetate
White blending card
printer paper
Promarkers
white narrow ribbon


Method:
I printed out a sheet of spotty paper from the Spring Chicks set and used the punch board to make my bag. Before sticking it together I cut an aperture in the front and a slightly larger piece of acetate to stick behind it forming a transparent window. I printed out several copies of the chicken SAM_148 (watermarked)1image from the Uneggspected set and coloured them in with Promarkers trying to match the colours of the spots on the egg to those on the bag. I used one image for the base cutting it out with a narrow white border around it and used parts from two other images to add dimension before sticking it to the front of the bag. A length of white ribbon for the handles, some shredded green tissue in the bottom and a few little chocolate eggs finished it off.

The snippet of acetate was from the backing sheet to some acrylic stamps that came with a magazine so if I am quick enough I might just make it over to the Snippets Playground this week.

Thank you for dropping in. Take care.

Pippa

I would like to enter my bag into Pixie's Snippets Playground Week 168

Thursday, 12 March 2015

A little bit of magic

Kit and Clowder have a competition on their Facebook to create a project with a fantasy theme; extra entry if you use a unicorn. So I thought I would share my attempt with you.

SAM_1467 (watermarked)

Materials used:
The Paper Shelter Digi - Princess and her unicorn
white stamping card
watercolour card
Brusho Crystals
A5 white card blank
black card
pearlised card
Spectrum Noir and Copic pens
small alphabet stamps
Stamp-a-ma-jig
black archival ink pad


Method:
I actually found an A5 card blank in my snippets box from a failed project. It had a bit of smudged stamping on the front but as I was going to cover it, it did not matter. I attached a slightly smaller piece of the pearlised card to the front to act as a mat for my background paper. Using the Brushos and watercolour card I made a large piece of coloured card for the background, cut it to size and layered it onto the card front. I printed out the image to the size I wanted, coloured it in with the pens and then cut it out leaving a narrow white border around the edge. I found a piece of already coloured card and some black card in my snippets box and used these to make a mat for my image. I attached the imaged to the mat using 3d foam pads then attached the whole topper to the card. Finally I used the alphabet stamps and a Stamp-a-ma-jig (the most useful gadget I have ever bought) to place them and stamped out the greeting along the bottom of the card.

I really love the effects you can get with the Brusho Crystals and although I have only had a little play with them I certainly plan to make more use of them.

Thank you for dropping in. Take care.

Pippa

I would like to enter my card into Pixie's Snippets Playground Challenge - week 167

Tuesday, 3 March 2015

National Scrapbooking Day Challenge

Today is National Scrapbooking Day and to mark the occasion Deedee's Digi Stamps is running a challenge. Members of the Design Team have made either a card or a scrapbook page for you to lift and produce your own version. So why not give it a go, the challenge runs until May 9th and you will find details at Deedee's Blog. My sample for the challenge is a scrapbook page. It is quite a while since I last did any scrapbooking and I really enjoyed doing it.

Materials used:SAM_1571 (watermarked)
Deedee's Digi Stamp Set Coffee Cup Greetings
12 x 12 sheet of pale yellow card
blending card
printing card
corner rounder punch
Copic and Spectrum Noir pens


Method:
My daughter picked up a Tassimo Coffee Maker at a bargain price last year and I am secretly quite envious of it. It seemed to be a fitting subject to go with Deedee's wonderful Coffee Cup Greetings set.

SAM_1572 (watermarked)
I printed off the photo at the size I wanted along with a sheet of backing paper that comes with the set, two coffee mugs and the sentiment. I cut two strips from the backing paper and edged them with black ink. I trimmed my photo and sentiment and rounded off the corners with a punch and edged them with black ink also. I cut two small mugs from the left overs from the backing paper and glued them to the bottom of the sentiment. I used the pens to colour in the two mugs before cutting them out. I then arranged all my elements on the page and when happy with the placement glued them down, using foam pads to raise the front mug. I kept my page as CAS as I could, that is my preferred style.


Thank you for dropping in. Take care.

Pippa

I would like to enter my page into:
My Scrapbook Place Challenge - Anything Goes

Wednesday, 25 February 2015

Birthday card for a computer mad brother

Cards for men are notoriously tricky, even more so if you want to personalise them in some way.  My youngest brother has one passion in life, just the one, computers. His job is computers and his hobby is computers. So when I found 'Computer Guy' from Mo's Digital Pencil I knew I had to use it.SAM_1444 (watermarked)


Materials  used:
Mo's Digital Pencil digi stamp - Computer guy
Kraft card
snippet of brown card
happy birthday stamp
sepia archival ink pad
stamping card
Spectrum Noir and Copic pens


Method:
I printed out the image onto stamping card and coloured it in with the pens. I then tore around it to make the panel. I printed out repeating binary code for 'happy birthday' on a piece of kraft card and trimmed it slightly smaller than the card blank; also made from kraft card. Using the brown ink I stamped 'happy birthday' on the right hand side of a strip of brown card and attached it across the card front. I then attached the image.SAM_1442 (watermarked)


I actually printed off two copies of the image and made up the other one using black and white background colours.


Thank you for visiting. Take care.

Pippa

I would like to enter this card into:
Outlawz Monday Greetings Challenge - Anything Goes
Your Scrapbook Place February Challenge - Anything Goes

Wednesday, 10 December 2014

Guest designer week 2

Despite the growing popularity of e-readers people still like to give books as presents, especially to children. My second make for Deedee is great to go with a book and has an added bonus!

Materials used:SAM_1088 watermarked
Deedee's Digi Stamp: Little Readers
Spectrum Noir and Copic pens
aqua Hunkydory Adorable Scoreable Card
Die'sire Nouveau Stamping Frame Die
white stamping card


Method:
To make the card blank I first added the reading girl and the sentiment to the right hand side of card, sizing the images to the size I needed. Having printed out the images I made up the card base from the printed card folding it so that the back was 4.7cms longer than the front making the image visible. I then printed out 2 copies of the little girl reader sizing the image to fit in the die frame, and one copy of the quote. I then used the pens to colour in all the images.

I cut the frame from the aqua card with the die then cut my base image to the right size and matted it onto the frame, having first cut around the girls hand where she is holding the book. I then cut out the book from the second image and stuck it under the cut part of her hands with a 3d foam pad underneath to give it dimension. I then cut down the quote and matted it onto aqua card. I then stuck the topper and sentiment to the front of the card.

Now for the added bonus! Finally I ran down the right side of the card with a perforating blade 6cms from the edge so that the small image and sentiment can be torn off and used as a bookmark.

Because of the way the card is folded off centre it will not fit into a standard C5 envelope so I made a plain white one from A3 paper.

SAM_1086 watermarkedI know that not everyone has time or enjoys colouring so I made a second card in exactly the same way using the coloured images of the boy reader, (much quicker than the girl!)

Thank you for visiting. Take care.

Pippa

Wednesday, 3 December 2014

Guest Designer Week 1

So the cat is out of the bag, as some say. I have been asked to be a Guest Designer Team Member for Deedee's Digis during December. My creations will usually be posted on a Wednesday on the website and my plan is to do a post here to coincide with it, allowing for continental time differences!

For my first effort I really pulled out all the stops so please do not be too harsh if the following weeks are not so good!

Materials Used:SAMSUNG CAMERA PICTURES
Deedee's Digi Stamps: Away in a Manger and Beauty of the Season
A3 white card
White stamping card
Gold mirri card
Spectrum Noir pens
Copic Ciao pens
Circle die
Gold glitter
Happy Christmas stamp


Method:
I made up a tri-fold square card using the A3 white card and layered the middle panel with gold mirri card. I printed out the whole of the Poinsettia image and 3 extra copies of just the flowers at the same size. I also printed out multiple copies of the manger line drawing version.

I cut the main poinsettia image to fit the middle panel of the card, slightly smaller than the gold layer then used a circle die to cut out just the part of the circle between the two ends of the line of flowers, I also cut a circle out of the middle panel lining it up with the circle from the image. Having glued the poinsettia panel to the card I was left with a circle going through the middle panel. (I hope all this is making sense, foolishly I forgot to take photos of the stages and describing it is somewhat tricky!) I used the remaining poinsettia images to decoupage the flowers adding some gold glitter to the centres.

Moving onto the manger images I coloured them in with Spectrum Noir and Copic pens. I used one image as the base and mounted it onto the right-hand side panel so that when the panel was folded in the manger image showed through the hole in the middle panel. I then used the other images to cut out and decoupage the bottom layer. I then used a fine black pen to draw in a dashed line around the cut out area and stamped the greeting at the bottom before gluing the two panels together.

SAMSUNG CAMERA PICTURESNearly there now. For the insert I used the same poinsettia image as on the front of the card, just smaller and a greeting from the sets.


Finally I made up an SAMSUNG CAMERA PICTURESenvelobox for the card, printed out the same poinsettia image cut it to size and stuck it to the front of the box. I added a dotty border and heart corners with a fine black pen and put envelop glue on the flap. Phew, all done!


I told you I had pulled all the stops out for this one. Believe me the rest are not nearly so complicated. Of course the beauty of Deedees images, as I think I may have mentioned before, is that they come as digi stamps and as coloured images so you can make your cards as simple or as complicated as you like. My card took quite a while to make and with all the layers needed a box to post it in. You could make it up as a single layer and also instead of colouring in the manger image print that one out already coloured. I chose to combine coloured and digi stamps to show off all the possibilities available (and also because I am not very good at colouring in flowers!)

Thanks for visiting. Take care.

Pippa