Thursday 29 May 2014

Using up some more bits

Time for a visit to the Snippets Playground I think, and I can't go empty handed so here is my offering for this week.

Materials used:
snippets of white and black card
White 6x6 inch card blank
kraft, black and gold card
Memento Tuxedo Black ink
Spectrum Noir pens and pencils
little flower punch
leafy swirl die
circle and scalloped circle dies
silver 'Thank you' peel off
gold pen


Method:20140527102242_SAM_0257
Having coloured some of the white card snippets with purple pens I used them to punch out some flowers and shaped them on an embossing mat. I printed out the image onto another bit of white card and cut with a circle die before colouring the image in with the pens and pencils.

From another snippet of white card I cut the leafy swirl and coloured it with green pens.

Once all my elements were ready I matted and layered as appropriate and stuck to the front of the card. (I used a bit of the image left after being cut with the circle die to make the mat for the greeting). I did not have a gold peel off so I used the gold pen to colour a silver one.

20140527102033_SAM_0255

I made this card specifically for a friend who lives in a wonderful part Medieval and part Tudor house with leaded windows. Covet not!

Thanks for dropping in. I am off now to Pixie's Playground. Take care.

Pippa

Wednesday 28 May 2014

Down the Garden Path

This week the Less is More challenge has to include a die cut.  Here is my take on it and an excuse to play with my new Spectrum Noir Pencils.

Materials Used:
Spellbinders Die D-Lites Frame 1
Stampendous Cottage Path stamp
Happy Birthday stamp
Memento Tuxedo Black ink pad
Adirondack Shell Pink ink pad
White card
Swirls stencil
paper roses
leaves
Spectrum Noir Pencils


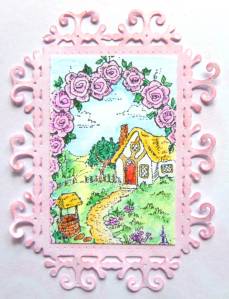
Method:20140528142938_SAM_0273
Using the swirls stencil and Shell Pink ink I dusted ink over the front of an A5 card blank to create a swirly background. I stamped the Cottage Path onto white card with Tuxedo Black and coloured in with the pencils. It is quite hard getting shading in on such a small image but the pencils did help a bit!


SAMSUNG CAMERA PICTURES


I used the die to cut two mats out of white paper and inked them with the Shell Pink ink. I cut the Cottage Path image down to fit inside the frame. The remaining frame I cut and overlapped to make a smaller frame to fit the remaining part of the Cottage Path image.


I then arranged my elements onto the front of the card and stuck them down before adding the birthday greeting.

20140528142753_SAM_0270

Thank you for visiting. Take care.

Pippa

I would like to enter this card into the:
Less is More Challenge
Spectrum Noir Challenge

Addicted to Stamps Make Your Mark Challenge

Sunday 25 May 2014

A bit of a tease!

There has not been a lot of action from the craft room for a while now, apart from the occasional challenge entry.  Most of my crafty time has been spent on a project for  the'Crafter's Inspiration' magazine competition.  It is a big project which has taken a lot of time to make not that I am in anyway desperate to win the fantastic prize on offer (of course I am!)  All I can do now is wait for the results to be announced in July to see if I am a winner or not.  I am not sure what the protocol is concerning competition entries that are not sent via blog links or email so decided not to reveal all until the results come out.  But I think I can get away with a sneaky little look ...

SAMSUNG CAMERA PICTURES

Ok, here's a bigger view, quick while no one is looking.

SAMSUNG CAMERA PICTURES

It's half term this week so I will be out and about quite a bit.  Hopefully by the middle of the week there may be a chance to play in the craft room and maybe find something to blog!

Thanks for visiting.  Take care.

Pippa


Wednesday 21 May 2014

Familiar territory

After my dabble into the vintage quarter I am back on more familiar ground with my card for this weeks Less Is More Challenge - Flowers.   For this one I have combined stamps and dies but used the die to emboss rather than cut.

SAMSUNG CAMERA PICTURES

Materials used:
Tonic Fuchsia Window die and matching stamps
greeting stamp - unknown origin
white and purple card
Memento Tuxedo Black ink pad
Spectrum Noir pens


Method:
I used the die to emboss the white card then stamped the fuchsia and ivy onto the embossed parts. I stamped the greeting into the middle of the panel. Having coloured the fuchsia and ivy I trimmed the white card down to make the topper for my card. I mounted this onto a card blank make from the purple card.

I am off now to Less is More to see what everyone else has been upto!

Thanks for visiting.  Take care.

Pippa

Monday 19 May 2014

Family Celebration

Saturday was my brother-in-laws 70 birthday and some very good friends had organised a small secret get-together to celebrate.  Of course I had to make a card for the occasion!  I decided I did not want to blast his age out, instead went for something very subtle!

Materials used:
stamps from 'Creative Stamping' magazine
papers from Graphic 45 - French country and The Works - Vintage stye
Memento Tuxedo Black ink
Gray and skin tones Spectrum Noir pens
A3 sheet of kraftcard
white card stock
old book page
distress inks- vintage photo and old paper
black card


Method:
I stamped the gentleman onto white card, paper pieced his coat and coloured the rest of the image with the pens. I also stamped the banner and words before cutting everything out.


Using the kraftcard I made an 8 inch square card blank. Using the top hat and cogs stamps I stamped randomly over the the card front. I mounted a 6 inch square piece of backing paper onto a slightly larger piece of black card before adding a panel of paper from an old book which had been distressed with inks first. I then took a piece of black ribbon around the topper before mounting onto the card front.

Finally I attached the gentleman and the banner to the card using foam pads then added card candi in 3 corners, 3 small dotty buttons in the 4th corner and a little bow on the left hand side of the card.

SAMSUNG CAMERA PICTURES


I don't often go for the vintage look but quite liked how this one turned out.

Thanks for visiting.  Take care.

Pippa

I used a few snippets on this one, the paper for his frock coat, the 3 little buttons left from another project and the book page also left from another project.  Think I will pop over the the Playground at Pixie's Crafty Workshop before it rains again.


Monday 12 May 2014

Hamantaschen

No not a swear word - although I did come very close as will be revealed! Hamantaschen are traditional pastries eaten at the celebration of the Jewish festival of Purim.  Now it just happens that I am teaching  my class about Queen Esther and Purim   in RE. I thought it would be a good idea to make some Hamantaschen for them to try in the next lesson, tomorrow afternoon. Anyone who knows me knows that next to sewing, cooking is not on my list of things I like to do!

Undeterred I printed off a recipe from the internet using the word 'easy' in the search engine!  Well I should have know it was not going to be as easy as I hoped because try as I might I could get no further than instruction 2. (Here is a photo - can you do any better?)

SAMSUNG CAMERA PICTURES

After reading it several times I realised that the problem lay not in my ability, or lack of, to decipher 'easy' recipes, rather in the absence of some of the ingredients. Back to the computer and print out number two.  Still the same problem so I wrote them in.

Returning to the kitchen the oven was by now heated up and ready so I got cracking on making up the dough.  With 31 children in the class I doubled the amounts, filled up the Kenwood bowl and set it to mix the dough.  About half way through my 28 year old machine stopped. No bang, no puff of smoke, it just stopped.  Now I am left with a large bowl full of half mixed, very sticky dough. (You can see now why I came close to swearing and I have only just started this cooking adventure!)Time to get stuck in, literally,  and finish off the mixing by hand.  

Some time later I had a dough that I could actually roll out and cut into circles with a cookie cutter.  Things are looking up, I thought. First batch cut, stuffed with jam and sealed into triangles ready for the oven. However the thought of the hot oven must have terrified them and they somehow jumped off the baking tray and onto the floor.

Deep breath and batch 2 very carefully transferred to the oven and cooked successfully. Hurray! On a roll now try batch 3 with a different filling. They cooked beautifully, just one problem all the filling came out leaving empty triangles. (Note to self for next time, if there is a next time after today, honey is not a good filling for Hamanteschen!)

SAMSUNG CAMERA PICTURES

After that things settled down again and the rest of the batches went in the oven, cooked and came out with no misadventure.  All was ok in the end and I had enough for the class and a few to spare.  Think I will put the kettle on now!

SAMSUNG CAMERA PICTURES

As for my poor old Kenwood, a change of fuse did no good so after all those years of faithful service, despite much abuse, I think it is beyond recovery. I shall be sorry to see it go especially as it was a wedding present from Tim's sister Debbie who died of cancer a few years ago.

I would like to dedicate this blog to all those who, like myself, are challenged in the kitchen!

Thanks for visiting. Take care.

Pippa
Sunday 11 May 2014

May at last!

I have been joining in with a Facebook Art Journalling Calendar Challenge this year.  May crept up rather suddenly and with all the busyness of Easter my page was some what late in the creating.  In the end I went for a very quick and simple design.

Materials used:
That special touch leafy mask
various green inks
Docrafts flower die
snippets of coloured paper and card.


Method:
Very simple - I stencilled the leaves using the mask and green inks then stuck on the cut flowers. Job done!

SAMSUNG CAMERA PICTURES


With all the snippets I think I might just pop into the playground at Pixie's place and be an early bird for once!

Thanks for dropping in.  Take care.

Pippa

Wednesday 7 May 2014

Popping up!

Having got carried away with exploding boxes it occurred to me that they are ok if you are actually going to give them to people but not much good for posting.  I have seen examples of these amazing boxes with all sorts of things attached to them but only recently discovered that they flatten down for posting. Anyway, to get to the point, I decided to have a go at one myself and as I needed a card for my niece's birthday it just seemed the right time!

[caption id="attachment_542" align="alignright" width="248"]SAMSUNG CAMERA PICTURES The box closed[/caption]

Materials used:
pink cardstock
snippets of white card and patterned paper
mixture of cake related stamps
Memento Tuxedo Black ink pad
Spectrum Noir pens
Hunkydory greeting


Method:
Once I had found a really good video to guide me, I made the base of the box with the pink card then used various snippets of different papers to cover the panels.

[caption id="attachment_544" align="alignleft" width="291"]The arranged elements The arranged elements[/caption]

I stamped out a selection of cakes and a teapot then coloured them with Spectrum Noir pens before cutting them out.

Finally I arranged my cake elements how I wanted them in the box attaching two small cakes to acetate strips and making sure they all fitted inside when the box was collapsed.

[caption id="attachment_543" align="aligncenter" width="604"]The finished box The finished box[/caption]

For a first attempt I am pleased with the result, and I managed to use up lots of snippets from my overflowing 'bits' drawer. I think I will head on over to Pixie's Snippets Playground  as I have not been there for a while!

Thanks for dropping in. Take care.

Pippa


Thursday 1 May 2014

Box mad!

I think I might become addicted to exploding boxes!  This is actually the project I was working on before getting side-tracked by Rudolph.  It is largely inspired by the fact that our topic this term at school is pirates.  Also the currant 'Crafter's Inspiration Magazine' has a competition to win loads of lovely goodies and all you have to do is to produce something using any of the items that came with the magazine kit.  The pirate in the box is a digi stamp that came on one of the CD Roms, as did all the backing papers.

The box

Materials Used:      
Digi stamp
Spectrum Noir pens
Stamps: anchor, desert island, treasure map
Various distress inks and adirondack inks in blues and yellows
Memento Tuxedo Black
Clarity cloud mask
White printer card (smooth, bright white)


Method:
I printed out the digi stamp and a selection of background papers. Having made up the outer, inner and lid of the box I covered both sides of the larger box and the outer sides of the smaller box and the lid with backing papers having first distressed around the edges. I then assembled the lid.
SAMSUNG CAMERA PICTURESOn the inside of the smaller box I stamped the desert island at the bottom of the four flaps, used the cloud mask and stonewashed ink to make the sky, coloured in the trees with Spectrum Noir pens and added birds with a black pen.
the base of the inside box I coloured with various inks to create sand.


I stamped the anchors and the map onto white before colouring them, and the pirate images, with Spectrum Noir pens, then cut them out. I stuck the anchors, the map and a pirate to the inside flaps of the larger box and folded back a flap on the remaining pirate to attached it to the base.


SAMSUNG CAMERA PICTURES

Thanks for dropping in.  Take care.

Pippa