Monday 29 December 2014

From the Heart

I have just got time to squeeze in with my entry for this month's From the Heart Stamps progressive challenge.

Materials used:SAM_1285 (watermarked)
From the Heart - Christmas spirit Birdbrain
Happy Christmas stamp
rectangle die
Memento Tuxedo Black ink pat
White stamping card
snippets of Christmas design papers
Spectrum Noir pens


Method:
I printed out the image a couple of times onto white card and coloured them in with Spectrum Noir pens. One image I cut with the die. I cut Birdbrain's body from the second image and layered it onto the base image. I matted the topper onto purple paper from an old paper bag, then attached the whole thing to an A5 card blank. I used snippets from 3 designer papers to make rolls in different widths and stuck them to the card in a 'tree'shape. I added a star at the top and a greeting at the bottom.


As far as I know at the moment From the Heart stamps are continuing trading to EU countries which is a blessing. I was beginning to think my dalliance into the world of digi stamping was going to be very short lived as many of my favourite companies are giving up as a result of the new EU vat laws. I am still waiting for a response from my local MP but not really holding out much hope that things will change.

Thank you for visiting.

Pippa

I would like to enter my card into the following challenges:
From the Heart Stamp of the Month
Pixie's Snippets Playground - Week 156 & 157

Saturday 27 December 2014

Best laid plans of mice and (wo)men!

I had a cunning plan for the very last challenge at Deedee's Digis. I even printed out my design and made a start on the colouring. Unfortunately Christmas and the 'dreaded lurgy' caught up with me and everything came to a grinding halt. I do not want to miss the last challenge so plan B has been put into operation, I just hope I have not left it too late.

Materials used:20141227123042_SAM_1283 (watermarked)
Deedee's digi Happy BrrrrDay
printing card
Clarity stamps fir trees stamp
Memento Northern Pine ink pad
Birthday greetings stamp
circle die
A5 white card blank


Method:
This was a really quick make. I printed out my main image arranging the bears so they are holding paws and I also printed out a second image of the bears. I cut the main image out with the circle die and after stamping a ridge of trees onto the card blank, added the topper. Using the second image I cut out the jumpers and added them to the topper with 3d foam pads. Finally I added the greeting. Job done!

Thanks for dropping in. I hope you are still enjoying the Christmas season. Take care.

Pipppa

Wednesday 24 December 2014

Crackers are not just for Christmas!

Last week I shared a get well card with you, this week I have been struck down with a hacking cough - great timing it being Christmas Eve!

This week I want to share my penultimate project for Deedee with you. Some of you may be aware that the new VAT laws for the EU are causing the closure of many small digi stamp companies. Unfortunately Deedee is one and will cease trading with European countries at the end of this month and altogether at the end of January. The irony of this is that my project for this week is a box of crackers, though I am hardly in the mood for celebrating!

Materials used:SAM_1091 (watermarked)
Deedee's Fun and Festive set
Memory Keepers Candy Box Punch Board
white card
white stamping card
Spectrum Noir pens
snowy acetate


Method:
I printed out the glass with balloons motive several times (one for each cracker and one for the box) then coloured them with Spectrum Noir pens.


I priSAM_1097 (watermarked)
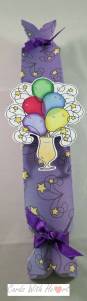
nted out the starry design paper onto A4 card 7 times. I used six sheets to make up the crackers and one sheet to edge the box lid. The box itself is made from two sheets of A3 card, not quite big enough so I had to add extra pieces at the sides. I cut an aperture out of the box lid and lined it with the sheet of snowy acetate. The cracker ends are tied off with matching purple ribbon. At the moment they are empty but I do have snaps, mottoes, gifts and hats ready to finish them off. These are New Year crackers because of the motive I have used but crackers can be made for any occasion at any time of the year.

Thank you for visiting and I hope you have a blessed Christmas and a happy New Year.

Pippa

Wednesday 17 December 2014

Winter flu

Deck the halls with boxes of tissues, fa, la, la, la, la, fa, la, la, la.
'Tis the season for the sniffles, fa, la, la, la, la, fa, la, la, la!

One of the disadvantages of working in a school is the seasonal sniffles. I work with the Reception and YR1 children so runny noses and coughing all over people is the order for the day. With winter being the peak time for colds and flu I decided a 'Get well' card would not be too out of place amidst the Christmas cards for my third design offering at Deedee's Digi Stamps.

Materials used:Sick Duck 1 watermarked
Deedee's Digi set Happy Healing
Spectrum Noir pens
Neenah card
9.5 cm square white easel card blank
coordinating backing paper


Method:
Having arranged the two images how I wanted them I printed them out 3 times, one for the topper base and two to add dimension. I then coloured the images with Spectrum Noir pens before cutting the two extra images up to decoupage. I matted and layered the topper onto the coordinating paper and also added strips of paper to the card front before adding the topper. I used the same papers to cover the inside of the card and to mat the sentiment which is used as the stopper. The thermometer has been glazed with clear embossing powder.

Sck Duck 2  watermarked

Thank you for visiting.

Pippa

Wednesday 10 December 2014

Guest designer week 2

Despite the growing popularity of e-readers people still like to give books as presents, especially to children. My second make for Deedee is great to go with a book and has an added bonus!

Materials used:SAM_1088 watermarked
Deedee's Digi Stamp: Little Readers
Spectrum Noir and Copic pens
aqua Hunkydory Adorable Scoreable Card
Die'sire Nouveau Stamping Frame Die
white stamping card


Method:
To make the card blank I first added the reading girl and the sentiment to the right hand side of card, sizing the images to the size I needed. Having printed out the images I made up the card base from the printed card folding it so that the back was 4.7cms longer than the front making the image visible. I then printed out 2 copies of the little girl reader sizing the image to fit in the die frame, and one copy of the quote. I then used the pens to colour in all the images.

I cut the frame from the aqua card with the die then cut my base image to the right size and matted it onto the frame, having first cut around the girls hand where she is holding the book. I then cut out the book from the second image and stuck it under the cut part of her hands with a 3d foam pad underneath to give it dimension. I then cut down the quote and matted it onto aqua card. I then stuck the topper and sentiment to the front of the card.

Now for the added bonus! Finally I ran down the right side of the card with a perforating blade 6cms from the edge so that the small image and sentiment can be torn off and used as a bookmark.

Because of the way the card is folded off centre it will not fit into a standard C5 envelope so I made a plain white one from A3 paper.

SAM_1086 watermarkedI know that not everyone has time or enjoys colouring so I made a second card in exactly the same way using the coloured images of the boy reader, (much quicker than the girl!)

Thank you for visiting. Take care.

Pippa

Wednesday 3 December 2014

Guest Designer Week 1

So the cat is out of the bag, as some say. I have been asked to be a Guest Designer Team Member for Deedee's Digis during December. My creations will usually be posted on a Wednesday on the website and my plan is to do a post here to coincide with it, allowing for continental time differences!

For my first effort I really pulled out all the stops so please do not be too harsh if the following weeks are not so good!

Materials Used:SAMSUNG CAMERA PICTURES
Deedee's Digi Stamps: Away in a Manger and Beauty of the Season
A3 white card
White stamping card
Gold mirri card
Spectrum Noir pens
Copic Ciao pens
Circle die
Gold glitter
Happy Christmas stamp


Method:
I made up a tri-fold square card using the A3 white card and layered the middle panel with gold mirri card. I printed out the whole of the Poinsettia image and 3 extra copies of just the flowers at the same size. I also printed out multiple copies of the manger line drawing version.

I cut the main poinsettia image to fit the middle panel of the card, slightly smaller than the gold layer then used a circle die to cut out just the part of the circle between the two ends of the line of flowers, I also cut a circle out of the middle panel lining it up with the circle from the image. Having glued the poinsettia panel to the card I was left with a circle going through the middle panel. (I hope all this is making sense, foolishly I forgot to take photos of the stages and describing it is somewhat tricky!) I used the remaining poinsettia images to decoupage the flowers adding some gold glitter to the centres.

Moving onto the manger images I coloured them in with Spectrum Noir and Copic pens. I used one image as the base and mounted it onto the right-hand side panel so that when the panel was folded in the manger image showed through the hole in the middle panel. I then used the other images to cut out and decoupage the bottom layer. I then used a fine black pen to draw in a dashed line around the cut out area and stamped the greeting at the bottom before gluing the two panels together.

SAMSUNG CAMERA PICTURESNearly there now. For the insert I used the same poinsettia image as on the front of the card, just smaller and a greeting from the sets.


Finally I made up an SAMSUNG CAMERA PICTURESenvelobox for the card, printed out the same poinsettia image cut it to size and stuck it to the front of the box. I added a dotty border and heart corners with a fine black pen and put envelop glue on the flap. Phew, all done!


I told you I had pulled all the stops out for this one. Believe me the rest are not nearly so complicated. Of course the beauty of Deedees images, as I think I may have mentioned before, is that they come as digi stamps and as coloured images so you can make your cards as simple or as complicated as you like. My card took quite a while to make and with all the layers needed a box to post it in. You could make it up as a single layer and also instead of colouring in the manger image print that one out already coloured. I chose to combine coloured and digi stamps to show off all the possibilities available (and also because I am not very good at colouring in flowers!)

Thanks for visiting. Take care.

Pippa