Friday 27 February 2015

Raiding the snippets box for Rudolph day

Most crafters have a box of snippets around the place, and most crafters remember they have it and use it regularly. But then I am not most crafters and my overflowing snippets box is sadly neglected, buried under a pile of 'work to do' boxes.  So as I had a relatively free day today I decided to raid it and create a card or two for Rudolph Day at the same time.

SAM_1450 (watermarked)

SAM_1451 (watermarked)


Materials used:
Snippets of various sizes and flavours!
X-cut and Spellbinders snowflake dies
Let it snow . . . acrylic stamp

Method:
I took all my snippets and arranged them into a card! There is not much else to say really. The penguins, complete with googly eyes were from some crackers we had at Christmas, the backing paper you might recognise left over from a previous project, even the shaped card was already made up and abandoned in the box. So both cards were completely made up from snippets.

With all those snippets I feel a trip to the Snippets Playground is called for. Maybe I will see you there?

Thank you for popping in. Take care.

Pippa

I would like to enter my card(s) into these challenges:
Rudolph Day February 2015
Snippets Playground Week 165

Wednesday 25 February 2015

Birthday card for a computer mad brother

Cards for men are notoriously tricky, even more so if you want to personalise them in some way.  My youngest brother has one passion in life, just the one, computers. His job is computers and his hobby is computers. So when I found 'Computer Guy' from Mo's Digital Pencil I knew I had to use it.SAM_1444 (watermarked)


Materials  used:
Mo's Digital Pencil digi stamp - Computer guy
Kraft card
snippet of brown card
happy birthday stamp
sepia archival ink pad
stamping card
Spectrum Noir and Copic pens


Method:
I printed out the image onto stamping card and coloured it in with the pens. I then tore around it to make the panel. I printed out repeating binary code for 'happy birthday' on a piece of kraft card and trimmed it slightly smaller than the card blank; also made from kraft card. Using the brown ink I stamped 'happy birthday' on the right hand side of a strip of brown card and attached it across the card front. I then attached the image.SAM_1442 (watermarked)


I actually printed off two copies of the image and made up the other one using black and white background colours.


Thank you for visiting. Take care.

Pippa

I would like to enter this card into:
Outlawz Monday Greetings Challenge - Anything Goes
Your Scrapbook Place February Challenge - Anything Goes

Thursday 19 February 2015

Postman cat?

Imagine That monthly challenge featured a lovely image of a couple of playful kittens in a mail box. Here is my take on it.

SAM_1419 (watermarked)

Materials used:
Imagine That Mailbox Kitties digi stamp
white stamping card
white and yellow card
Spectrum Noir pens
sentiment stamps
cream paper rose
skeleton leaves
cutting dies


Method:
I printed out the design and coloured it with the pens before cutting it with the die. I cut a slightly larger rectangle out of the yellow card. I attached both rectangles to the front of an A5 white card blank making them off set. I used a pen to colour the edges of the rose then attached it to the bottom left corner of the image along with two leaves. Finally I used two sentiment stamps to make up the greeting and stamped it at the bottom right of the card blank.

Thank you for dropping in. Take care.

Pippa

I would like to enter my card into the Imagine That Stamp of the Month Challenge

Wednesday 18 February 2015

Love struck Birdbrain

The image for the From the Heart Stamp of the Month Challenge features one of their characters, Birdbrain. I decided this time to colour her brown so that the flower would be the colour focus.

SAM_1409 (watermarked)

Materials used:
white stamping/blending crd
snippets of green, white and purple card
Spectrum Noir and Copic pens
Liquid Pearls
Spellbinders dies Labels 23
Heartfelt Creations die Leafy Swirl from Cut Mat Create 1B
Flower die - unknown origin


Method:
I printed out the Birdbrain image on the stamping card at the required size and coloured with the pens before cutting out using the labels die. I also cut printed and cut out the sentiment. I matted both of these onto purple paper, from an old shop bag.
I cut two leafy swirls from green card, a snippet left over from another project, and several flowers from snippets of white which I then coloured with the pens. I then assembled three flowers. I arranged all my elements on the card front before sticking them down. Finally I added Liquid Pearls to Birdbrains necklace.


Thank you for stopping by. Take care.

Pippa

I would like to enter my card into the following challenges:
From the Heart Stamps - Stamp of the Month Challenge: February
Sir Stamp Alot - Stamping Sensations Challenge - Anything Goes
Digi Galore Challenge - Anything Goes
Pixie's Snippets Playground - Week 164

Saturday 14 February 2015

At Peace

This month's progressive freebie challenge at Deedee's Digi Stamps is a lovely set of images featuring tigers and sentiments based on friendship. I have decided to go with the more traditional look to my tigers!

SAM_1399 (watermarked)

Materials used:
Deedee's Digis - Forever Friends
Sheena Douglas - India sets
Spectrum Noir Pens
Brushos
Stamp-a-majig
Watercolour paper
Stamping card
Black card
Brown card
A5 white card blank
Clarity Stamps Moon Mask
Woodgrain embossing folder
Black archival ink pad


Method:
I printed out my image onto the stamping card and coloured it in with the Spectrum Noir pens before cutting it out. I used the brushos, watercolour paper and moon mask to create the background. I used the brown card in the embossing folder to make the log for the tigers to sit on. Using the Stamp-a-majig tool I positioned and stamped the sentiment onto the painted background. I layered this onto black card and then onto the card base leaving a border around each time. I used 3d glue gel to attach the log at the bottom of the card and then attached my tigers to make them look as if they were sitting on the log, gazing at the sunset.

I have a confession, I painted the background three times and finally quit! I could not get it exactly as I pictured it in my mind and each of the three attempts had different problems. However having settled on going with the third one it is growing on me!

Thank you for visiting. Take care.

Pippa

I would like to enter my card into:
Deedee's Digis Stamp of the Month Challenge February

Wednesday 11 February 2015

Love is in the air

You either love it or hate it - Valentines Day, that is. I fall into the first category even though I am not a 'mushy, slushy' person! At a local craft fair last month I came across a couple of Doo Lally Pip stamp sets, one of which is very apt in light of my last post and being a Pippa! You'll see what I mean from the photo.

Materials used:SAM_1392 (watermarked)
Doo Lally Pip - My fragile heart
A4 white blending card
A4 white card
A4 100gsm white paper
Snippets of patterned paper and gold mirri card
Spectrum Noir pens and pencils
Copic pens
Versamark ink pad
Memento Tuxedo Black ink pad
Detail Gold embossing powder
Glossy Accents


MethodSAM_1390 (watermarked):
I stamped out Doo Lally Pip a couple of times on the blending card and also stamped the sentiment and embossed with the gold embossing powder. I coloured the images using the Spectrum Noir and Copic pens. i then trimmed one of the images to the required size and matted it onto gold mirri card. I did the same with the sentiment. I cut the dress from the second image and layered it onto the base image with 3d gel glue. When the glue was dry I covered the heart with glossy accents.

I folded and trimmed the white card to make an A5 card blank with the front flap shorter than the back. I stamped, embossed and coloured in the hearts down the right side of the card. I attached a strip of patterned paper to the front of the card and added my image and sentiment.SAM_1395 (watermarked)

Using the white paper I made and insert and stamped and embossed aheart and greeting on it. I coloured the heart with the Spectrum Noir pencils.

So all I need to do now to be ready for Saturday is to write in it and hide it away!

Thank you for dropping in. Take care.

Pippa

I would like to enter my card into the following challenges:
Stamping Sensations February Challenge - Anything goes

Snippets Playground - week 163

Sunday 8 February 2015

Challenging times

I am waiting to go into hospital  to have some sense shocked back into my heart - again. Sometimes I think they would be better trying it out on my head! Anyway I have discovered another reason why I love colouring so much, it makes over-active, out-of-rhythm hearts slow down a bit, and that has got to be better than filling up with chemicals!

With this excuse in hand I have spent most of my 'free' time in the past two days surrounded by pens and away with the fairies. The result is the card I am going to share with you today which I think I can scrape into four challenges - I think that might be a record for me!
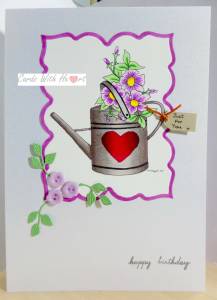
SAM_1387 (watermarked)

Materials used:
Watering can digi stamp - Sandi's Samples (Outlawz Progressive Freebie stamp of the month)
Happy Birthday acrylic stamp
Neenah white card
Centura Pearl Snow White card
Spellbinders Labels 23
Britannia Dies - Leaf Strip
Mini Label punch
Copic and Spectrum Noir pens
small flower buttons


Method:
I printed the image out on the Neenah card and coloured it in with the pens. I then cut it out using the labels die and cut a length of green card using the leaf strip. I embossed the label and ran a purple pen along the embossed edge. I punched out a small label from a scrap of Neenah Kraft card (left over from the giraffe), wrote the greeting on, poked a small hole in the top and threaded through a length of brown paper twine. I cut a couple of slits in the image, one each side of the watering can handle, threaded the twine through and tied it off in a knot before trimming the ends. I then attached the image to the front of an A5 card made from the Centura Pearl. I arranged my buttons in the corner and added some leaves before sticking them down. Finally I stamped 'happy birthday' at the bottom of the card.

There are three challenges over at the Outlawz Challenges that I think this card is eligible for, so I am going to give them a try. Also there are a few snippets on it so I may just head over to Pixie's Playground again, hopefully it will be warmer there than it is here today!

Thank you for visiting. Take care.

Pippa

I would like to enter my card into the following challenges:
Outlawz Progressive Freebie - February
Outlawz Monday Greetings Challenge - It's a twine thing
Outlawz Friday Colouring Challenge - Card for a friend
Pixie's Snippets Playground - Week 163


Thanks to Di from the Snippets Playground who says my card is also eligible for the Cuttlebug Mania Challenge - I{heart} you

Wednesday 4 February 2015

Tall Order!

My son-in-law's daughter has a birthday next week and she loves giraffes, so when I saw the 'Laughing Giraffes' image at From the heart stamps I knew I had to use it.

SAM_1379 (watermarked)

Materials used:
From the Heart Stamps - Laughing Giraffes
Animal print digi - Pixel Scrappers
A3 white card
Neenah Desert Storm Kraft colouring card
Spectrum Noir pens
gold capital letter stickers


Method:
I printed the image out on an A4 sheet of Neenah Desert Storm card and coloured it with the Spectrum Noir pens. I used Serif Craft Artist and the animal print digi to make the background paper and printed it on another sheet of Neenah Desert Storm. Using the A3 white card I made a A4 card blank and cut a strip off the right side of the front. I attached a strip of the background paper to the right side of the back flap of the card blank and spelled out Happy Birthday with the letter stickers. I used the spare strip of background paper to edge the top and bottom of the front flap of the card and mounted the trimmed image on top.

SAM_1380 (watermarked)

I have to say I was quite pleased with the way the giraffe coloured up. It was a big image to colour and I was worried that the ink might dry out too quickly to get a decent blend. Also it is the first time I have used the Neenah Desert Storm card on a project, I liked the way it toned down the colours and made them more natural looking. (Not sure why the card looks grey on the photo, in reality it is more of a sandy colour.)

Thanks for stopping by. Take care.

Pippa

I would like to enter my card into the following challenges:
Outlawz Challenges Friday Colouring Challenge - Anything goes
Your Scrapbook Place - Anything Goes/Masculine