Monday 30 March 2015

Not a pen in sight!

A new stamp for the monthly challenge is released today at Deedee's Digis. I have used it to make a Mothering Sunday card for my mum (she was sworn to secrecy about it until the official release!)
SAM_1470 (watermarked)
Materials used:
Deedee's Stamp of the month - Blooming Blessings
printing card


Method:
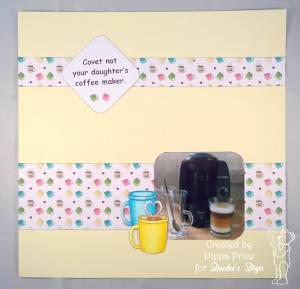
I used Word to size and layer up my images and alter the wording in the circle. I printed the whole of the base image onto an A4 sheet of white card and also printed out an extra copy of the circle and flower images to the same size. Using a craft knife I cut out all the diamonds from the lattice. I cut out some of the flowers and a second circle from the extra image and layered them up for a 3d effect.

This would have been a quick card but it took ages cutting out the lattice work! However I am glad I persevered because I liked the end result. This is a very versatile set and can be used for just about any occasion. If your entered Deedee's challenge last month you will get Blooming Blessings as a freebie to play along this month. If you didn't than you can buy it at Deedee's shop and enter for April. Each time you enter you get the next month's image free. What's not to like about that!

Thank you for popping in. Take care.

Pippa

Sunday 29 March 2015

Rudolph Day 3 Already!

Can you believe it was the third Rudolph Day on Wednesday. I have attempted a completely different style for this month.
SAM_1512 (watermarked)

Materials used:
Deedee's Digi Stamp Sets - Mary's Joy and Krafty Christmas Kit
page from an old book
poinsettia dies
Neenah Dessert Storm card
Kraft card
printing card
Distress Ink pads - aged mahogany, iced spruce, pine needles
blending tool and blending mat
Spectrum Noir pencils
white flower stamen
gold mirri card


Method:
I sized and printed my base images and extra copies of Mary and printed them onto a piece of Neenah Desert Storm card before cutting the panel to the correct size. I coloured the images with the pencils. From the extra copies I cut Mary's dress and another baby. I shaped the pieces and layered them onto the base image using Gel glue.
SAM_1513 (watermarked)I printed a piece of the dotty paper from the Krafty Christmas set and used this to cut a piece slightly smaller than the card base. I matted my topper onto a piece of gold mirri. I attached the lagers to the card blank. Finally I coloured a couple of pages from an old book with the distress inks and cut the layers for my poinsettia from them. I glued the flower parts together, coloured some stamen with yellow ink and threaded them through a hole in the middle before attaching it to my card.


The flower is a new technique for me but I do like the effect, especially on the Kraft card so I may be using it again in the future.

SAMSUNG CAMERA PICTURES

Thank you for popping in. Take care.

Pippa

I would like to enter my card into:
March Rudolph Day
Outlawz Friday Colouring Challenge - Anything goes/Christmas twist

Wednesday 25 March 2015

Outlawz Challenges

This month's free digi image is a cute little elephant and bird. I have made a couple of cards with it using different techniques.

Material's used:
Elephant and Bird image
balloons stamp
white stamping card
purple card
black card
silver mirri card
gold mirri card
white A5 blank card
white 15cm square card blank
snippets of purple patterned paper
Spectrum Noir pens
Versamark ink pad
Glossy Accents


SAM_1499 (watermarked)Method:
I printed out my images and sentiments on the stamping card then used the pens to colour them in. On the second card I used a little pointillism on the elephant. One image I cut into a square and the other I cut out leaving a narrow white border around the image.

For the square card I matted and layered my image onto black, purple and silver card. I folded the card blank to make an easel card before attaching the topper to it. I matted and layered the sentiment for the front onto black and purple and attached to the card. For the stopper I used the second sentiment also matting and layering it match. I covered the inside of the card with purple paper onto which I had randomly stamped balloon using Versamark ink before attaching the stopper with 3d foam pads.SAM_1498 (watermarked)

On the A5 card I used some purple snippets left from making crackers and made a line down the left side of the card. I used glue gel to attached the cut out image onto black card and then matted it onto gold mirri card. I made up the sentiment to match and printed the rest of it onto the insert so that inside it says ... it's your birthday. Finally I added glossy accents to the balloon.

I have a little pot on my desk which contains a lot of purple diamonds which are the 'waste' from making the box of crackers back in December. I thought using them on the front would get rid a a few, especially as they matched the colours I had used. There are still a lot left but it remains to be seen whether I ever get around to using them!

Thank you for dropping in. Take care.

Pippa

I would like to enter my card into:
The Outlawz Progressive Freebie Challenge

The Outlawz Friday Coloring Challenge
Pixie's Snippets Playground - Week 169

Sunday 22 March 2015

Spring fever

The image of the month for the From the Heart challenge features some lovely little spring tiles. The theme for the month in an ATC swap group I belong to is inchies. Well the two just went together!

SAM_1478 (watermarked)

Materials used:
From the Heart Stamps Image of the Month - Easter Trio
white ATC blanks
spring greeting acrylic stamps from Creative Stamping magazine
Spectrum Noir pens
black ink pad
1 inch square punch


Method:
I printed out the image to the size I needed to make inchies from the tiles then coloured them in with the pens. Using the black ink I stamped Warm Spring Wishes on the right hand side of the ATC blank. I used the punch to punch out my inches then inked the edges and the edges of the ATC with black ink. Finally I stuck my inches to the left side of the ATC.

Although we had too much cloud cover to get a good view of Friday's solar eclipse the weather has definitely improved the past few days. The sky is bluer, the grass is greener and the sun has shone through. There is colour returning to the gardens and hedgerows, spring has arrived.

Thank you for visiting. Take care.

Pippa

I would like to enter my card into:
From the Heart Stamp of the Month Challenge
Your Scrapbook Place - Anything Goes

Friday 20 March 2015

Easter is coming

Easter tends to be the forgotten Christian festival. We get so caught up in all the paraphernalia associated with celebrating Christmas that Easter creeps up on us and takes us by surprise. It is a pity because Easter is even more important than Christmas. I am just as guilty as anyone. Despite managing to make hundreds of Christmas cards for friends and family, my Easter cards' on the rare occasion I actually make any at all, tend to number in the teens! So you might think I am about to share an Easter card with you - sorry not yet, it's still a work in progress, but I do have a mini gift bag of eggs!

SAM_1480 (watermarked)

Materials used:
Deedee's Digi sets - Spring Chicks and Uneggspected
scalloped circle dies
We R Memorykeepers Gift Bag Punch Board
snippet of acetate
White blending card
printer paper
Promarkers
white narrow ribbon


Method:
I printed out a sheet of spotty paper from the Spring Chicks set and used the punch board to make my bag. Before sticking it together I cut an aperture in the front and a slightly larger piece of acetate to stick behind it forming a transparent window. I printed out several copies of the chicken SAM_148 (watermarked)1image from the Uneggspected set and coloured them in with Promarkers trying to match the colours of the spots on the egg to those on the bag. I used one image for the base cutting it out with a narrow white border around it and used parts from two other images to add dimension before sticking it to the front of the bag. A length of white ribbon for the handles, some shredded green tissue in the bottom and a few little chocolate eggs finished it off.

The snippet of acetate was from the backing sheet to some acrylic stamps that came with a magazine so if I am quick enough I might just make it over to the Snippets Playground this week.

Thank you for dropping in. Take care.

Pippa

I would like to enter my bag into Pixie's Snippets Playground Week 168

Thursday 19 March 2015

Peacock Parade

This month's digi stamp set for the Imagine That Progressive Challenge featured some fine peacocks. The set included pre-coloured images as well as line drawings so I set myself a challenge colouring in a line drawing.

SAM_1466 (watermarked)

Materials used:
Imagine That digi stamp set - Pretty Peacocks with free extra sets
Spectrum Noir pens
blending card
printer card
A5 white card blank
Spellbinders Dies - Labels 23
feather stamp
birthday greeting stamp
Memento Tuxedo Black ink pad


Method:
I printed out my image on the blending card and coloured it in with the pens before cutting it out with a die. I also printed out a sheet of the coordinating backing paper, stamped the feather over it and cut out a mat with a larger die. I layered my topper onto the paper than attached to the front of the card blank. Finally I added the sentiment.

I have come to the conclusion that I am a CAS girl! Looking back nearly all my cards are plain and simple, not a great deal of embellishment. I do admire those who can embellish a card and make it look stunning, when I try it just looks like a jumbled mess!

Thank you for popping in. Take care.

Pippa

I would like to enter my card into the Imagine That Stamp of the Month Challenge

Monday 16 March 2015

Never too old!

My husband is a great train fanatic, steam trains of course, and particularly the Somerset and Dorset line. This scenic route fell victim to Beeching in the notorious culling of many of our branch lines and little remains of it now. When the image of the month came through from Deedee's Digis I knew who it was meant for!

SAM_1474 (watermarked)

Materials used:
Deedee's Digi Set - Right on track
blending card
white card
purple paper
steel grey card
Spectrum Noir pens


Method:
I printed out the images picking out the carriages I wanted to use and adding the sentiments to the sides of the trucks. I coloured it in with the pens.
Using a sheet of A4 white card I folded it in halves down the long side to make the card blank. I had envelopes to fit that I picked up from a craft show earlier in the year. I layered a piece of purple paper to the front of the card leaving a narrow white border. I cut down the image to the size I wanted and matted it onto steel grey card having first scored a line under the wheels to look like a track. I then attached the topper to the card. I generated an insert on the computer with the greeting 'You are never too old to play with trains! Happy Birthday' on it.


Now all I need to do is to keep it under wraps until his birthday at the end of the month. It's a good job he does not read my blog!

Thank you for visiting. Take care.

Pippa

Thursday 12 March 2015

A little bit of magic

Kit and Clowder have a competition on their Facebook to create a project with a fantasy theme; extra entry if you use a unicorn. So I thought I would share my attempt with you.

SAM_1467 (watermarked)

Materials used:
The Paper Shelter Digi - Princess and her unicorn
white stamping card
watercolour card
Brusho Crystals
A5 white card blank
black card
pearlised card
Spectrum Noir and Copic pens
small alphabet stamps
Stamp-a-ma-jig
black archival ink pad


Method:
I actually found an A5 card blank in my snippets box from a failed project. It had a bit of smudged stamping on the front but as I was going to cover it, it did not matter. I attached a slightly smaller piece of the pearlised card to the front to act as a mat for my background paper. Using the Brushos and watercolour card I made a large piece of coloured card for the background, cut it to size and layered it onto the card front. I printed out the image to the size I wanted, coloured it in with the pens and then cut it out leaving a narrow white border around the edge. I found a piece of already coloured card and some black card in my snippets box and used these to make a mat for my image. I attached the imaged to the mat using 3d foam pads then attached the whole topper to the card. Finally I used the alphabet stamps and a Stamp-a-ma-jig (the most useful gadget I have ever bought) to place them and stamped out the greeting along the bottom of the card.

I really love the effects you can get with the Brusho Crystals and although I have only had a little play with them I certainly plan to make more use of them.

Thank you for dropping in. Take care.

Pippa

I would like to enter my card into Pixie's Snippets Playground Challenge - week 167

Tuesday 10 March 2015

Not a good weekend

It has been a trying time lately and on Sunday we lost another good friend so another sympathy card was called for.

SAM_1464 (watermarked)

Materials used:
Deedee's Digi Stamp sets: Easter Lilies; Endless Beginnings
White DL card blank
stamping card
black card
Copic and Spectrum Noir pens


Method:
I arranged and printed out my design on the stamping card and then coloured in the image using the Copic and Spectrum Noir pens. I cut the image down to the required size and then matted it onto black card before attaching to the card blank leaving a thin border each time.

I am hoping that is the last sympathy card I will need for a while. Of course this image would work just as well as an Easter Card. Over at Fan-Tastic Tuesday the challenge is 'White on white', why not pop over there and join the fun.

Thank you for dropping in. Take care.

Pippa

Saturday 7 March 2015

Not quite what I had in mind

I am now officially on the DT for Deedee's Digi Stamps and had an idea for my first sample. However circumstances have led to a change of plan. On the same day that I had the good news I also heard that a friend of mine had lost her father. So I set to and have made a couple of cards, one for my friend and one for her mum.

Materials used:SAM_1461 (watermarked)
Deedee's Digi Stamps - Endless Beginnings and Framed Comfort
silver mirri board
White printer card and paper
embossing pen
detail silver embossing powder
rectangle die
Couture Creations A4 embossing folder - leaves


SAM_1463 (watermarked)

Method Card 1:
I arranged my elements on a graphics programme and printed them out on printer card. Using the embossing pen and silver embossing powder I embossed the oval frame. I cut the front panel to size before matting it onto silver mirri board and then attached it to an A5 card blank. I cut out different sections of another 3SAM_1462 (watermarked) of the doves and used them to 3d decoupage the image. I also used the graphics programme to create and insert for the cardusing the same images and another sentiment.

SAM_1459 (watermarked)


Method Card 2:
I used the embossing folder to emboss an A4 sheet of white card and folded into the shaped blank. I printed out the elements I wanted to use and then fussy cut the sentiment and die cut and embossed the dove image. I cut out a second image of the dove without the back wing and stuck it to the base image with gel glue to give a little dimension. I stuck both panels to the inside of the card blank. I SAM_1460 (watermarked)printed out a sentiment panel and attached it to the back of the card.

I am sure I have said it before but Deedee's images are fantastic if you want a quick make with stunning results. I do not often use the pre-coloured images as I just love colouring, but when I have used them I have never been disappointed.

So what had I planned for my first sample, well you will just have to wait because it is now relegated to 3rd place!

Thank you for stopping in. Take care.

Pippa

Tuesday 3 March 2015

National Scrapbooking Day Challenge

Today is National Scrapbooking Day and to mark the occasion Deedee's Digi Stamps is running a challenge. Members of the Design Team have made either a card or a scrapbook page for you to lift and produce your own version. So why not give it a go, the challenge runs until May 9th and you will find details at Deedee's Blog. My sample for the challenge is a scrapbook page. It is quite a while since I last did any scrapbooking and I really enjoyed doing it.

Materials used:SAM_1571 (watermarked)
Deedee's Digi Stamp Set Coffee Cup Greetings
12 x 12 sheet of pale yellow card
blending card
printing card
corner rounder punch
Copic and Spectrum Noir pens


Method:
My daughter picked up a Tassimo Coffee Maker at a bargain price last year and I am secretly quite envious of it. It seemed to be a fitting subject to go with Deedee's wonderful Coffee Cup Greetings set.

SAM_1572 (watermarked)
I printed off the photo at the size I wanted along with a sheet of backing paper that comes with the set, two coffee mugs and the sentiment. I cut two strips from the backing paper and edged them with black ink. I trimmed my photo and sentiment and rounded off the corners with a punch and edged them with black ink also. I cut two small mugs from the left overs from the backing paper and glued them to the bottom of the sentiment. I used the pens to colour in the two mugs before cutting them out. I then arranged all my elements on the page and when happy with the placement glued them down, using foam pads to raise the front mug. I kept my page as CAS as I could, that is my preferred style.


Thank you for dropping in. Take care.

Pippa

I would like to enter my page into:
My Scrapbook Place Challenge - Anything Goes

Sunday 1 March 2015

Away with the fairies

Kit and Clowder have a competition this week on their Facebook page to colour in a fairy or fantasy image from Scrappers Delight and as I have run out of ATC's for my swap group I thought I might be able to kill two birds with one stone. Not that I advocate or would consider participating in bird killing, but you know what I mean!

SAM_1453 (wtermarked)

Materials used:
Digital image from Scrappers Delight - Rose Petal
Digital image from Aurora Wings - Fuchsia Sprite
White blending card
Derwent Studio colouring pencils
Spectrum Noir Pens
Clarity Letterbox stamp set
Memento Rose Bud ink pad


Method:
Having decided I did not want to print out the images and then cut them out to glue to an ATC I made up a table using Word, sized the cells to ATC size and then put the images in the cells. It worked quite well. Having printed them out I then cut them into individual ATC's. I coloured Rose Petal with the pencils and Fuchsia Sprite with Spectrum Noir pens. I then used the Letterbox set to stamp Rose in pink down the side.

I have had my Derwent pencils for longer than I care to remember and used to use them a lot more. Since discovering alcohol ink markers I have been concentrating on them. I am at the start of a course with Kit and Clowder and have used applied what I have learned so far to the pencil colouring. (That will be the next course!) If you want to advance your colouring skills or just do a single project it is worth visiting Kit and Clowder and taking a look at the classes there. Alyce is very good and provides helpful and encouraging feedback as you go along.

Thank you for popping in. Take care.

Pippa