Showing posts with label Spectrum Noir Pens. Show all posts

Thursday, 9 April 2015

Sailing on

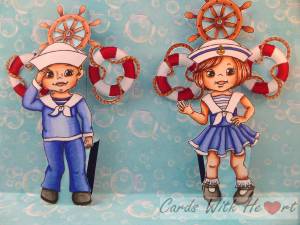
Over at Imagine That Digi's this month the stamp of the month is on a nautical theme. I have recently given into temptation, again!, and bought a new die which makes for an easy pop up card.

[caption id="attachment_1077" align="alignright" width="353"]SAM_1562 (watermarked) Inside view[/caption]

Materials used:
Imagine That digi set - My Sailmate and free papers
Stampendous Pop-up die set
printing paper
stamping card
dark blue card
sentiment stamps and memento Tuxedo Black ink pad
Copic and Spectrum Noir pens


Method:
I printed out the papers and elements onto the different papers depending on type. I used the pens to colour the boy, girl, life belts and wheels. I die cut the bubble paper twice to make the inside pop-up piece.

[caption id="attachment_1078" align="alignleft" width="326"]SAM_1563 (watermarked) Close up of inside[/caption]

I fussy cut my coloured images (cutting out the little bits from the life belts and wheels took a while). I stuck a snippet of left over bubble paper behind the life belts and wheels then attached them to the pop-up tabs before attaching the boy and girl to the larger tabs. I used the blue card to make an A5 card blank and glued my pop-up piece inside making sure not to get glue on the tabs.

[caption id="attachment_1076" align="alignright" width="300"]SAM_1558 (watermarked) Front view[/caption]

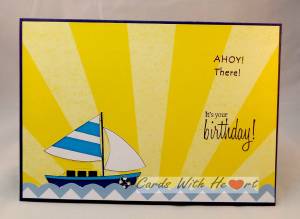
For the front of the card I used different elements from the kit to build up the scene then stamped the sentiments on the front. Finally I stamped Happy Birthday inside the card leaving the left hand side clear for writing on.

It is the first time I have had a go at a pop-up card but I don't think it will be the last!

Thanks for popping in. Take care.

Pippa

I would like to enter my card into:
Imagine That DOM challenge
Digitally 'Sweet' Challenge 134 - Sport
Monday, 16 March 2015

Never too old!

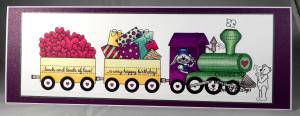
My husband is a great train fanatic, steam trains of course, and particularly the Somerset and Dorset line. This scenic route fell victim to Beeching in the notorious culling of many of our branch lines and little remains of it now. When the image of the month came through from Deedee's Digis I knew who it was meant for!

SAM_1474 (watermarked)

Materials used:
Deedee's Digi Set - Right on track
blending card
white card
purple paper
steel grey card
Spectrum Noir pens


Method:
I printed out the images picking out the carriages I wanted to use and adding the sentiments to the sides of the trucks. I coloured it in with the pens.
Using a sheet of A4 white card I folded it in halves down the long side to make the card blank. I had envelopes to fit that I picked up from a craft show earlier in the year. I layered a piece of purple paper to the front of the card leaving a narrow white border. I cut down the image to the size I wanted and matted it onto steel grey card having first scored a line under the wheels to look like a track. I then attached the topper to the card. I generated an insert on the computer with the greeting 'You are never too old to play with trains! Happy Birthday' on it.


Now all I need to do is to keep it under wraps until his birthday at the end of the month. It's a good job he does not read my blog!

Thank you for visiting. Take care.

Pippa

Sunday, 27 July 2014

Did it before the end of the month!

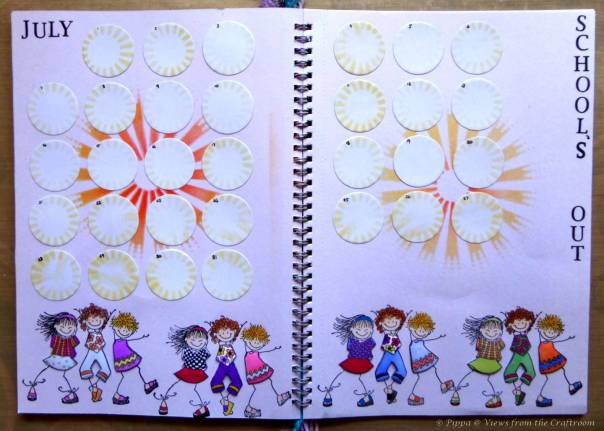
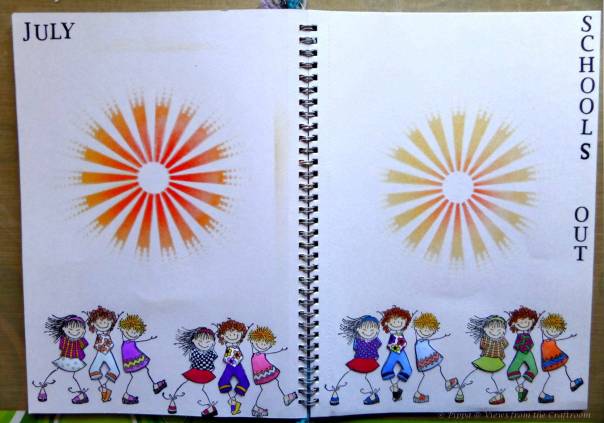
Having failed dramatically to meet the deadline for June's calendar page I was determined to do better this month.  OK it may not be that much better but at least the month as not actually ended this time!

Working in a school the only theme that I could do really for July is the fact that the academic year is over - as much a joy to teachers as it is to the children!

July Page 2 Copyrighted
Materials used:
Distress Inks: Ripe Persimmon, Dried Marigold
Adirondack Inks: Butterscotch, Lemonade
Memento Ink: Tuxedo Black
Circle Die
Spectrum Noir pens and pencils
Clarity Sunburst stencil
Clarity Letterbox stamps
Penny Black Girls Rock stamp


Method:
Working directly onto the pages I used the yellow and orange inks to stencil the sunburst in the middle of each page. I punched 31 circles out of white paper and used the yellow inks and stencil to form the pattern around the edges before numbering them with a black pen. I stamped the children along the bottom of the page then again onto paper. I coloured in the skin, hair, shoes and hairbands of the children on the page with pencils and the clothes of the images stamped onto paper with pens. I cut out the coloured clothes and stuck them onto the children with 3d glue gel then arranged the circles and stuck them in place. Finally I added the words using the Letterbox stamps.

July Page 1 Copyrighted

This year the sun did not stop shining as soon as we broke up, in fact it has been glorious all week. I will probably get shot down in flames for this but I think it is just a tad too hot and as it has been very dry some overnight rain would be good for the pond and the garden!

I hope you are having a good summer wherever you are, or maybe a good winter. In the international community that is the internet you just never know who might be popping in or where they come from! So whoever you are and wherever you are thanks for dropping in. Take care.

Pippa

Monday, 7 April 2014

Flutterby

After a few days of sunshine, more warmth and less rain we are back to wet and windy again.  So to cheer up a dismal dark and damp day here are some bright butterflies and a hint of sunshine in the background.

DSCF9009


Materials Used:
white and yellow card
Clarity butterfly stamp
Clarity sunshine stencil
Spectrum Noir pens
Adirodack inks - lemonade, butterscotch
Distress ink - scattered straw


Method:
I made a 19cm square card base and distressed the edges with scattered straw. On a piece of the Clarity gelli plate card I used the sunshine stencil and the yellow inks to stencil the background, darker in the middle and lighter on the edges. With what ink was left on the bush I swept around the sun to lightly ink the white card. I then matted this onto piece of yellow card, and then attached to the card base.

Using the butterscotch ink I then stamped the butterflies around the card in a circle and anther set of butterflies on another piece of white card. This second set of butterflies I coloured in with the Spectrum Noir pens before cutting out and attaching on top of the card using 3d foam pads and raising the wings slightly to add some dimension.

This card fulfils the criteria for both the Clarity challenge this month, which is monochrome, and the Butterfly challenge which is yellow so I shall be heading off to both shortly to link my little offering.

Thanks for popping in. Have a good day and take care.

Pippa

I would like to enter this card into the following challenges:
Clarity Challenge 14
Butterfly Challenge Spring Time At Last


Thursday, 20 March 2014

Just go for it!

Big question - do I wait until I have finished my Spectrum Noir Colourist Course before entering the Spectrum Noir Challenge or do I just go for it?  I think I'll just go for it especially as I have just the card for the job.

The criteria for this month is that there must be some green somewhere.

DSCF9038

Materials used:                                                                                                                                                            Doo Lally Pip Arabella stamp                                                                                                                                       black Memento ink pad                                                                                                                                                   white Neenah card                                                                                                                                                             green card in two shades                                                                                                                                                 A5 white card blank                                                                                                                                                         piece of green ribbon from a Christmas chocolate box                                                                                   Spectrum Noir Pens

I stamped Arabella onto an  A5 piece of the Neenah card and onto a piece of scrap Neenah card.  Using the pens I coloured in the whole of the image on the A5 card and just the dress on the other image.  I trimmed the green card and stuck together leaving a small border .  I also trimmed the white card but before mounting it on the green wrapped a piece of green ribbon around the bottom.  The sentiment was stamped onto Neenah trimmed and double mounted on the green card before sticking onto the base card.  I then cut out the dress on the second image and decoupaged it on top of the card image using gel glue.  

I do apologise for the quality of the photograph, I am having trouble with the camera today, not to mention the lack of light!

My  youngest daughter is always dancing so I think this card will eventually be heading her way.

Thanks for popping in.  Take care.

Pippa

I would like to enter this card into the Spectrum Noir Challenge                       

Sunday, 16 March 2014

A Bit Potty!


The excitement and enthusiasm after my Spectrum Noir workshop is still alive and thriving! So much, in fact, that I have taken the practising to extremes! I think I might have become a bit obsessive but as work calls tomorrow I have made the most of the weekend as you will see.

So we were sent away on Wednesday to work on blending to achieve dimension and then colour in the flower pot on the accreditation test. The first thing I did was to make some practice sheets up so I could print them out onto Neenah card.


  This is the result of lots of practice. On the course we were issued with selected sets of pens which restricted the blends a little. These are all done using pens from the browns set. (Sorry about the bleed through at the bottom, my pots were far too big to start with so I turned the card over and printed the smaller ones on the other side.)


These are my favourites. For the middle pot I used some of my older pens with the newer ones.


Having practised a lot of pots I moved on to other shapes. I found the cylinders the easiest to do. The spheres, on the other hand, still need a lot of practice!
        

               I really like the way the gray one turned out.


It took me a while to work it out but the gray one reminds me of an ultra sound scan!


Thanks for popping in. Take care.

Pippa