Showing posts with label stencilling. Show all posts

Friday, 26 October 2018

Be Thankful AT Crafting With Dragonflies

I was fortunate enough to be chosen as a winner of a recent Crafting With Dragonflies challenge and part of the prize is a guest designer slot so this is it. I had thought of calling this post 'Back to My Roots' because I have had the 'real' stamps out along with inks, dies and stencils. It felt really good to be back using techniques that I started with years ago.
The theme for Crafting With Dragonflies Challenge #116 is Be Thankful.

DSC_0089(watermarked)

Materials used: 
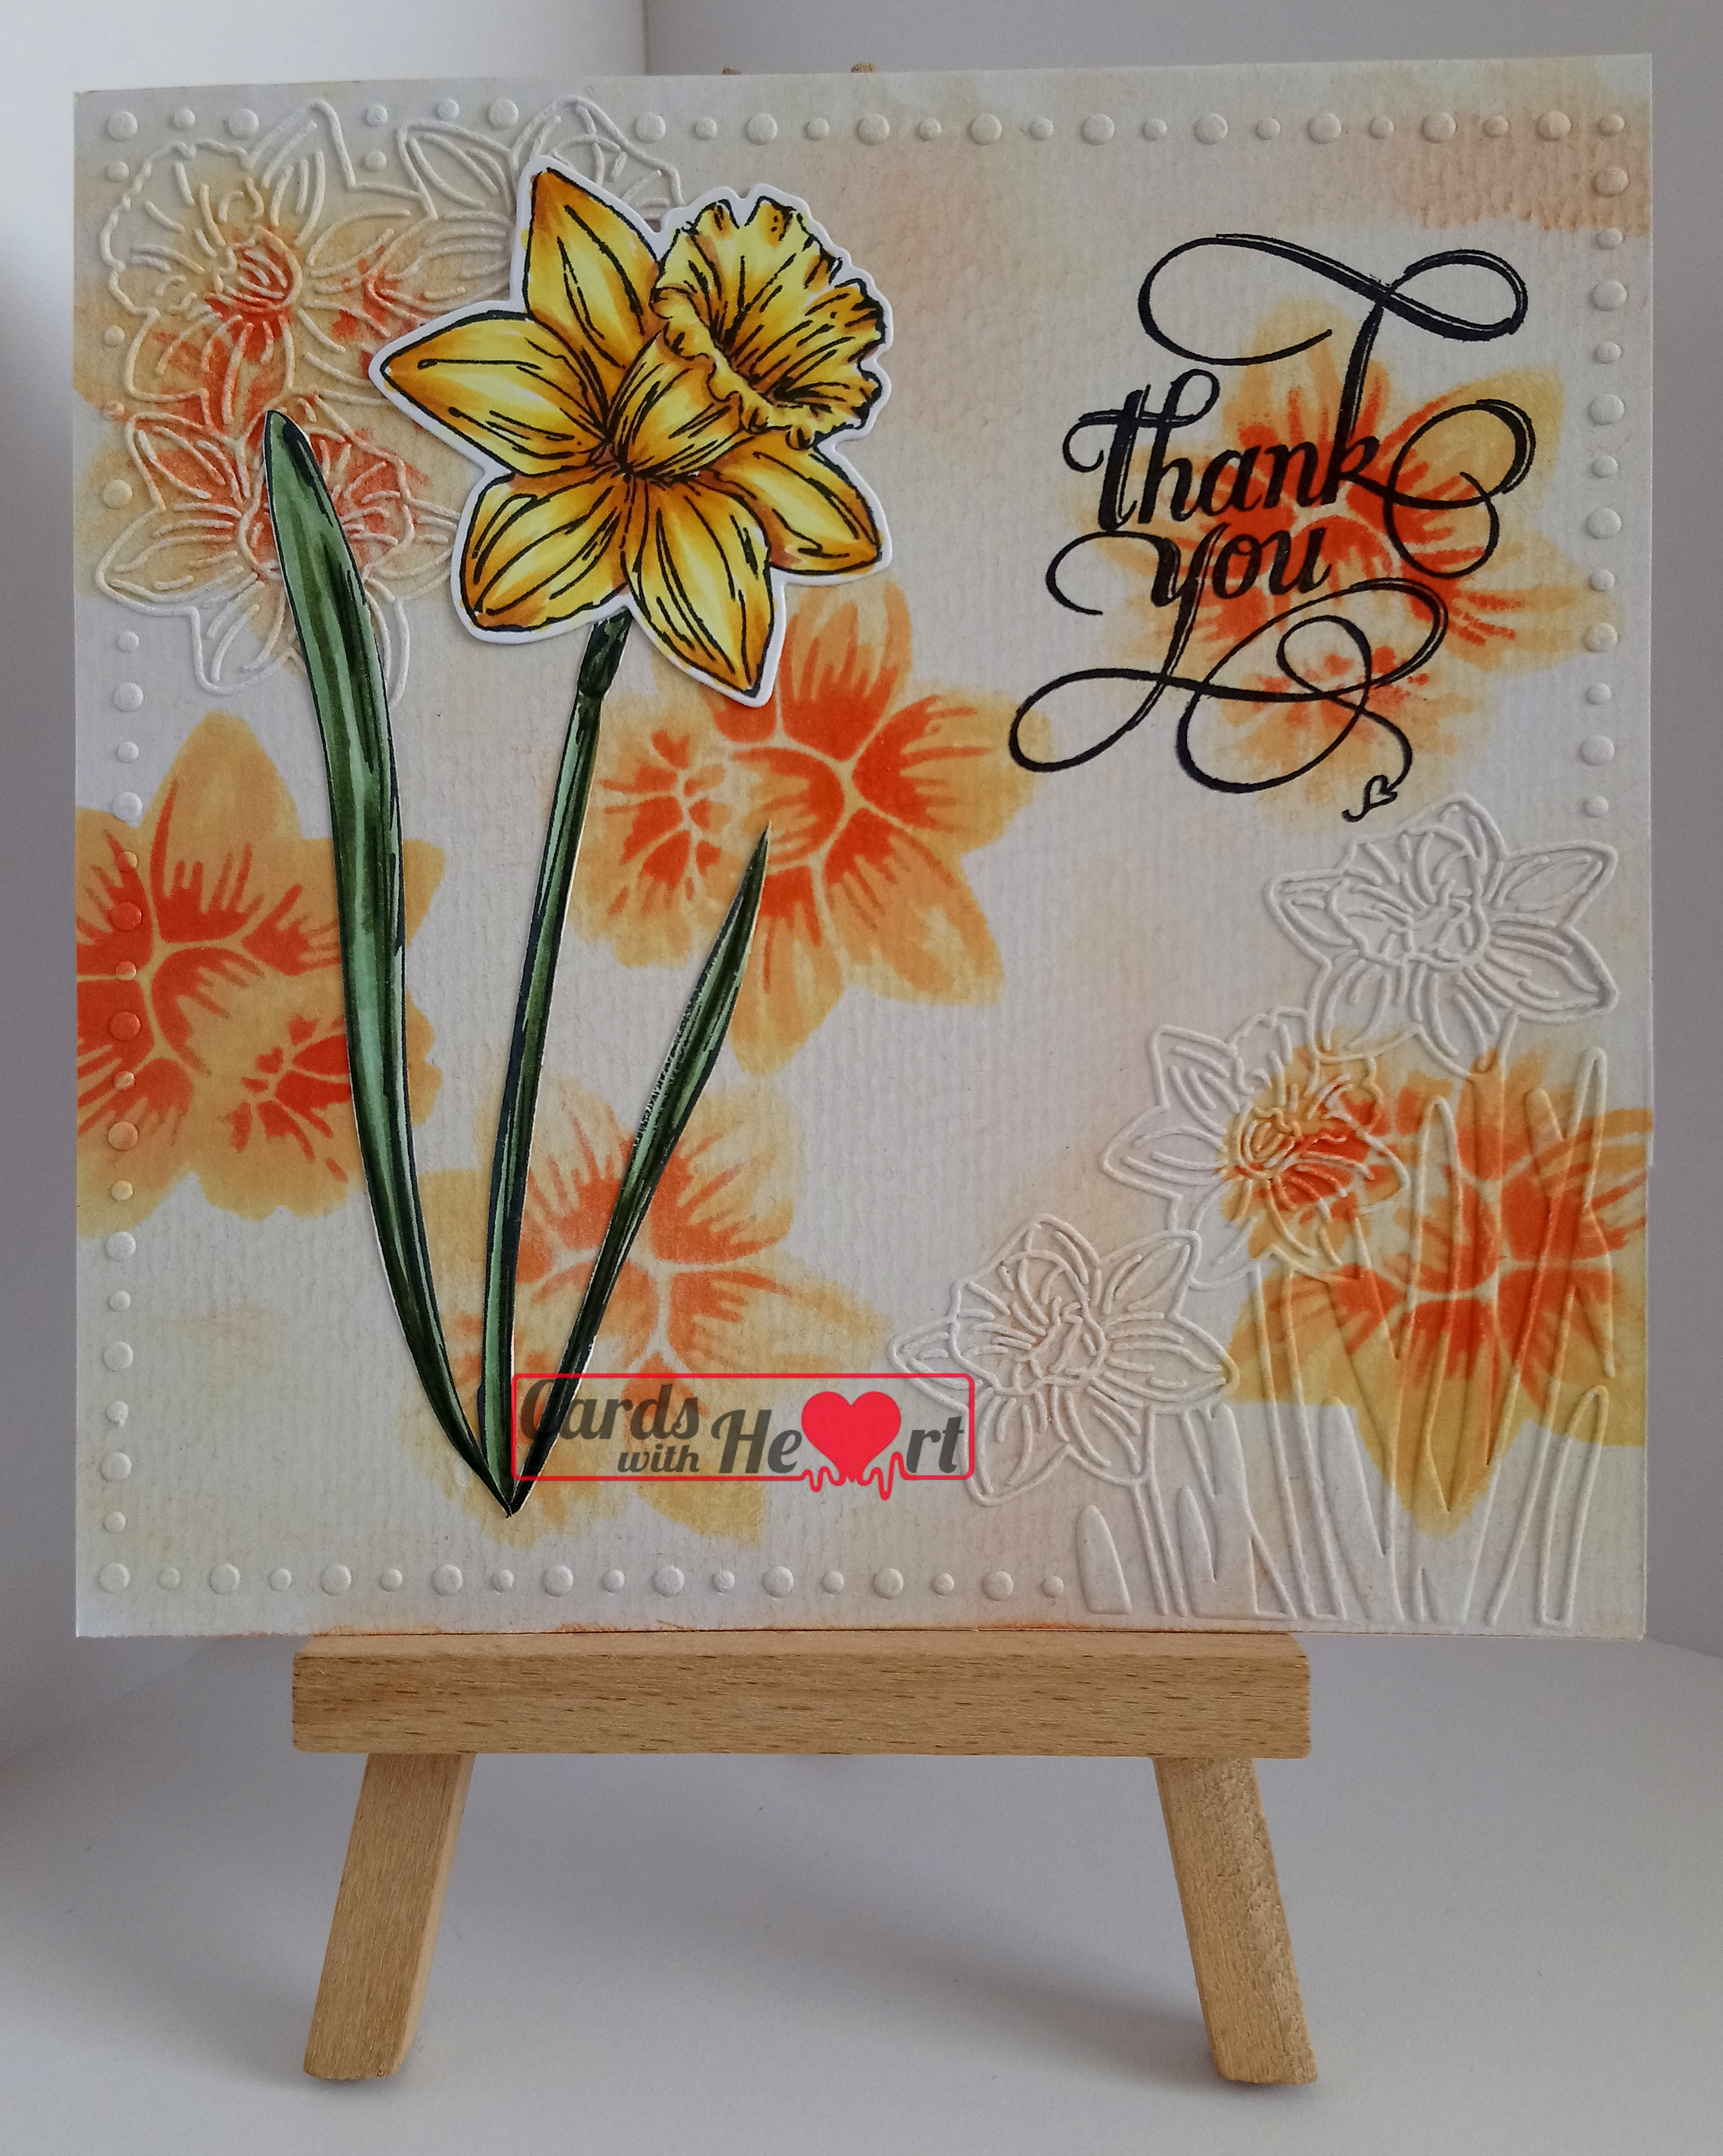
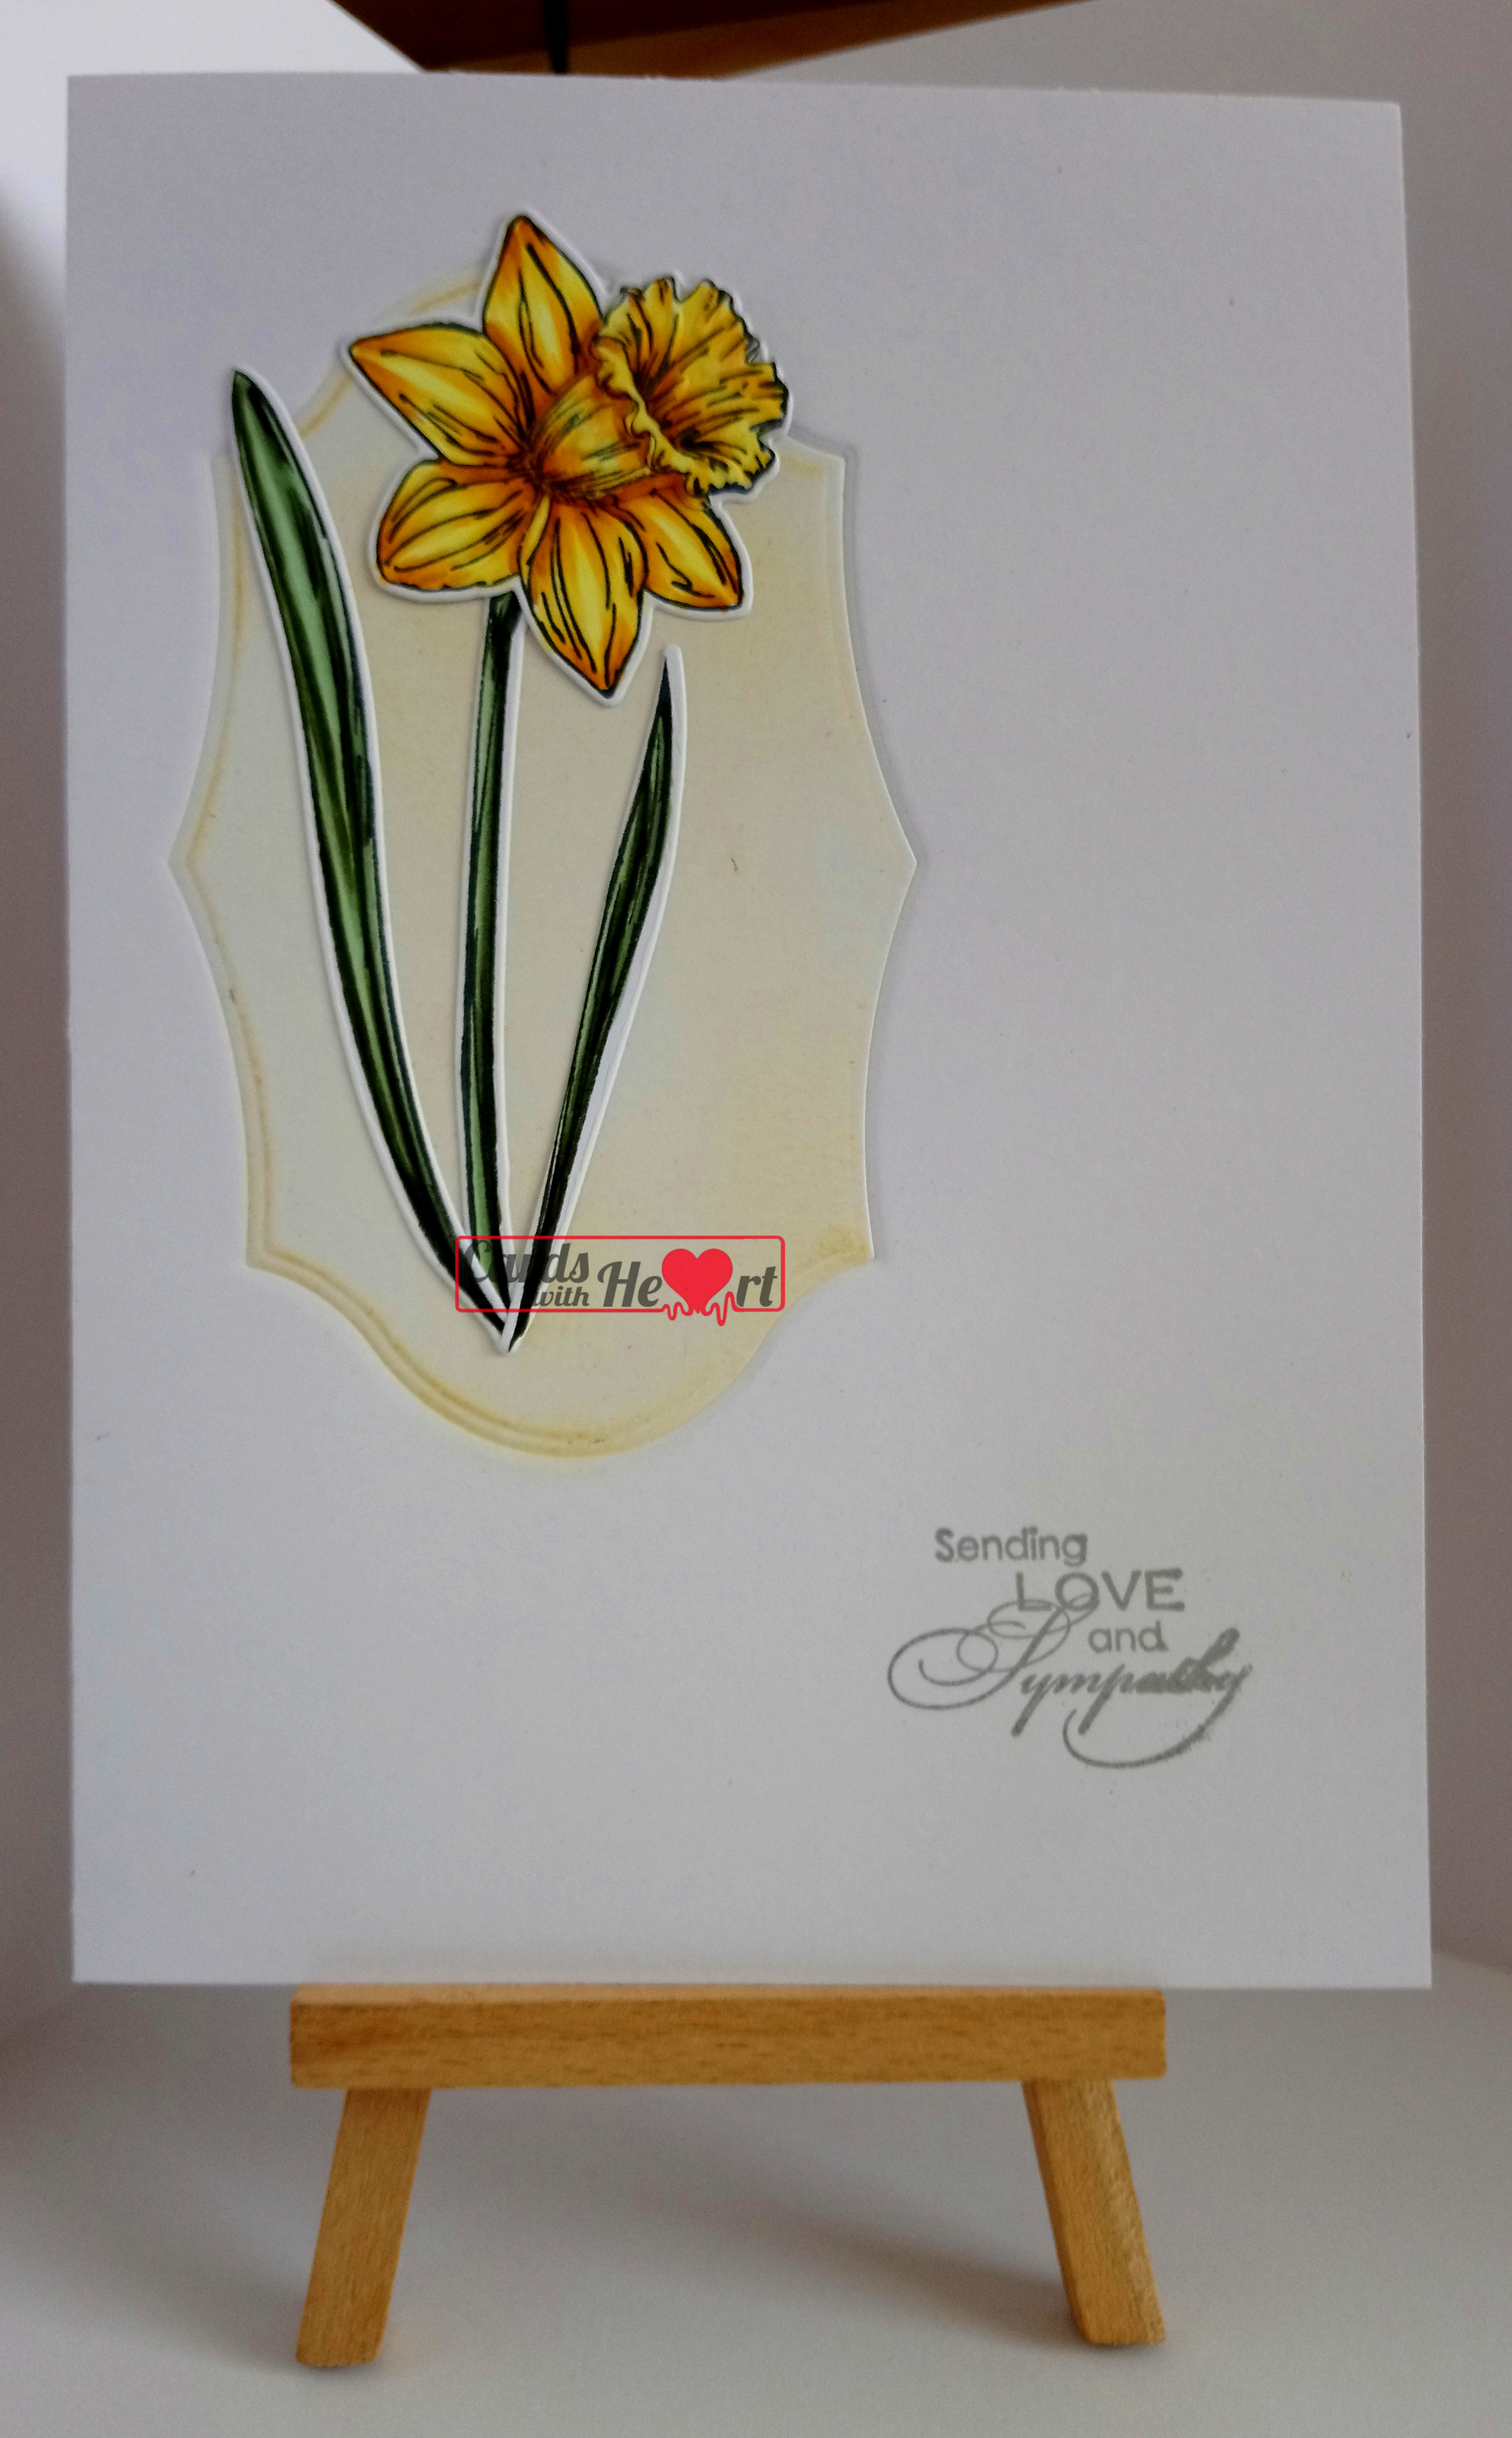
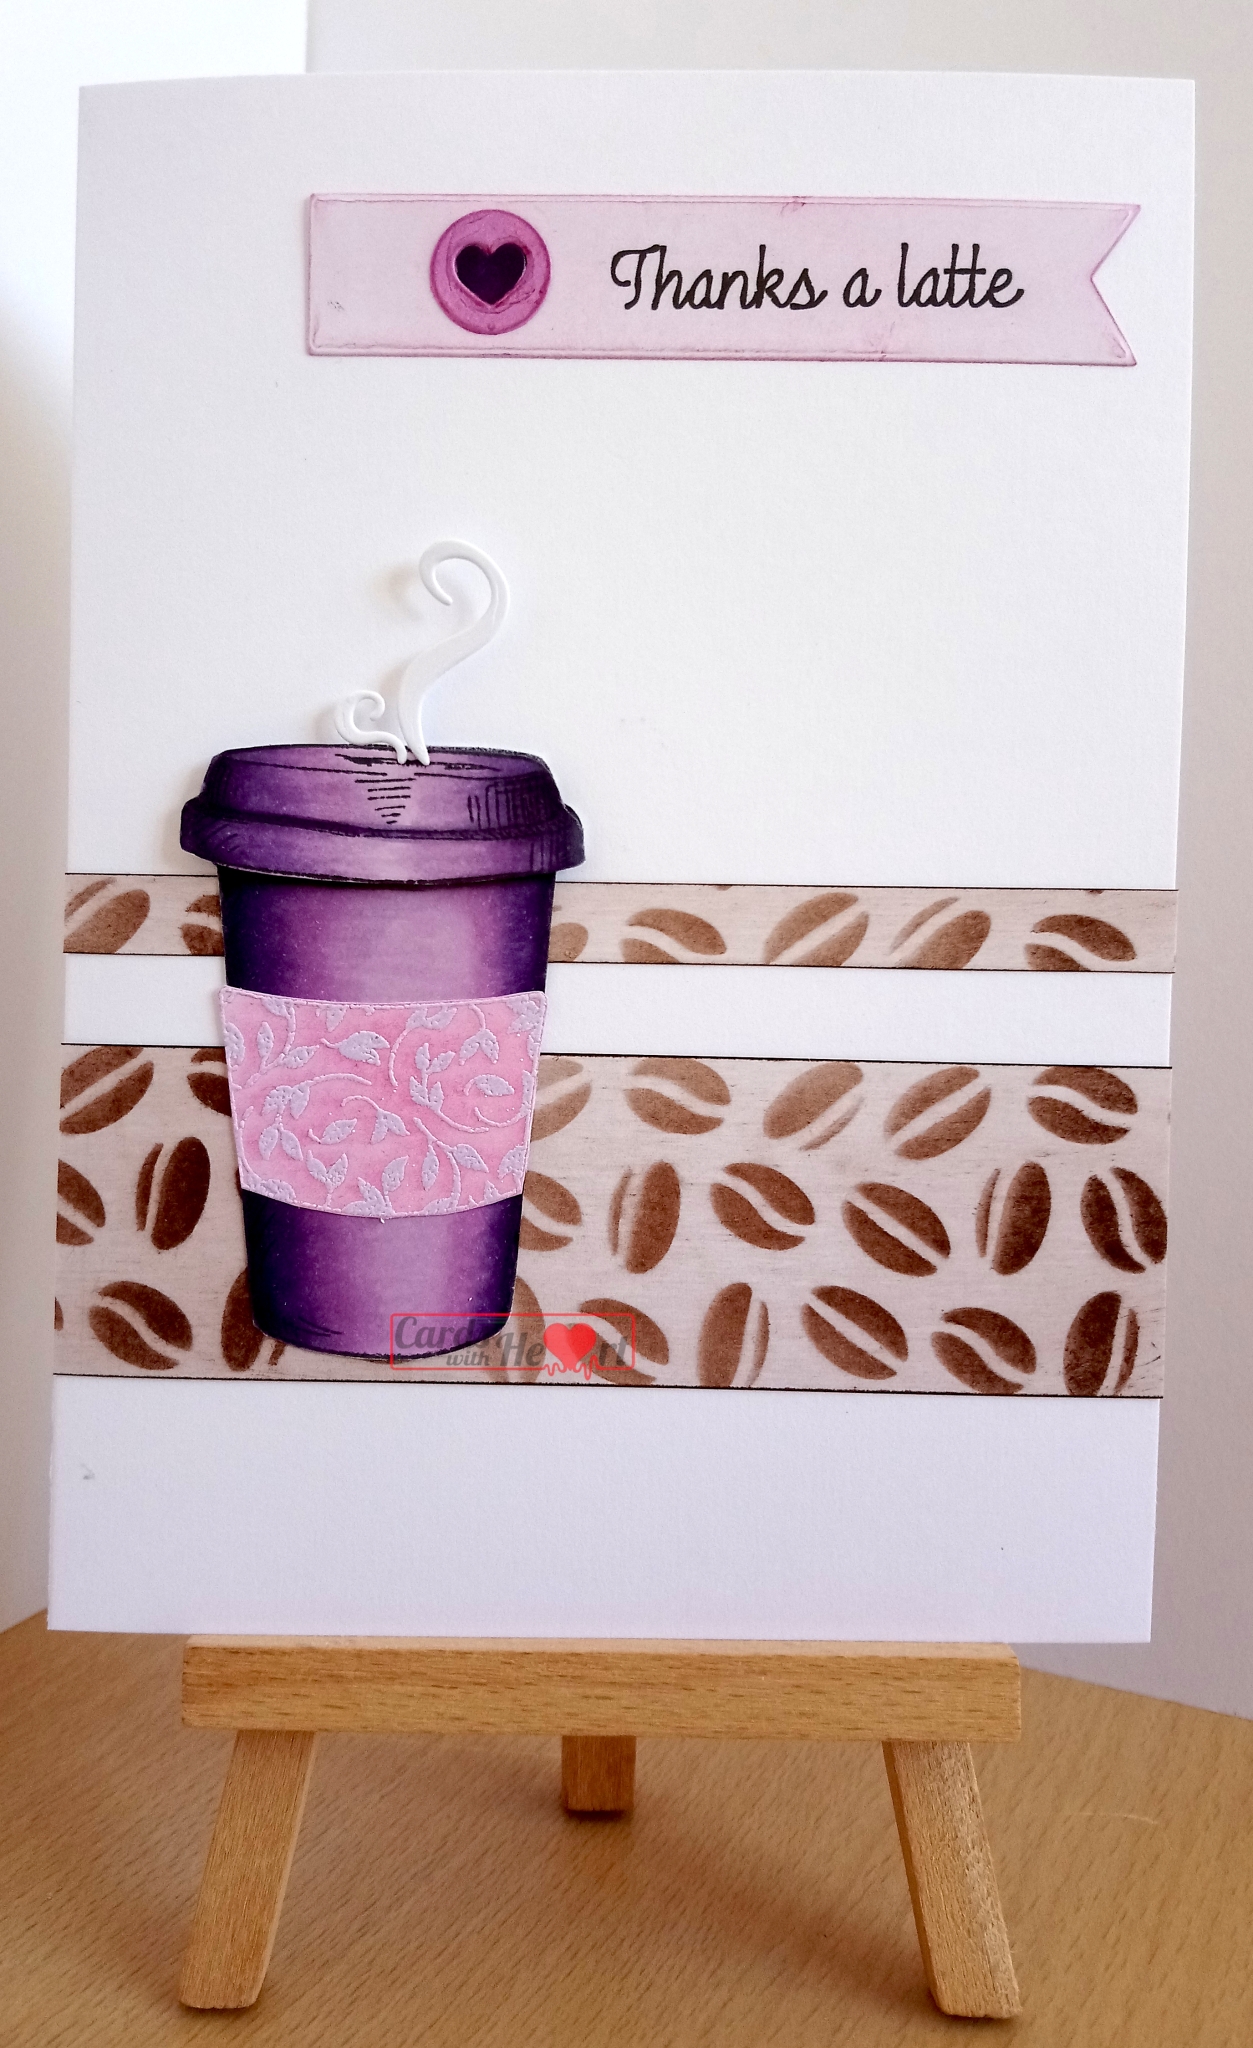
Free Stamps, Dies and Stencil set from Simply Cards and Papercraft #177
banner die from stash
X-Press It card
Personal Impressions embossing powder - Pastel Lilac
Versamark ink pad
Adirondak Espresso ink pad
Memento Lilac Posies ink pad
stencil brush
Copic pens:
V01, V12, V15, V17, V09

The sentiment is computer generated and cut with a banner die. The cup cuff has been embossed with the Pastel Lilac powder and coloured with a Copic pen. The coffee bean paper is made using the sencil from the set and Espresso ink. I used the inky brush over the whole piece at the end to tone down the white background.

The cup cuff, steam and little heart embellishment were all cut from the  bits of card left over from fussy cutting the cup and a second lid.

The second lid has been attached to the cup with foam pads for dimension.

I hope my card has inspired you to maybe go along to Crafting With Dragonflies and have a go at the challenge yourself. With Christmas around the corner it is a good incentive to lay the Christmas cards aside for a short time and make up some Thank You cards!

Thanks for dropping by. Take care.

Pippa

Entering the following challenges:
Lemon Shortbread #79 - Anything Goes
Papercraft Challenges #23 - Inspired by a Song (Your the cream in my coffee)
Crafty Creations #377 - Anything Goes
Creative Moments #155 - Anything Goes
Penny's Paper-Crafty Challenge #403 - Anything Goes
Back to Basics and Beyond #14 - Stencils or Masks 
Crafting With An Attitute #44 - Anything Goes
Jo's Scrap Shack FFC #257 - Anything Goes
Creative Fingers #153 - Anything Goes
Sweet Stampin' Challenge - Humour
Less Is More #383 - Dimension
A Gem of A Challenge #230 - Anything Goes 

Thursday, 15 March 2018

Bunny Hopping With Scribbles Designs

Another challenge at Scribbles Designs and this time the theme is Bunny Hop. You need to use a bunny or rabbit as the main focus of your project.

DSC_0659(watermarked)

Materials used:Scribbles Designs: #406 B Bunny
Imagine That Digistamp: Flamingo Dress Up
Claritystamp: Clouds Stencil
X-Press It card
white glossy card
Adirondak ink pads: Stonewashed and Meadow
silver peel-off greeting
stencil brush
A5 card blank
sharpie pens
Copic pens: Brown Bunny: E11, E13, E15, E18   paw pads: E49  nose: E50  ear middle: E50, E51, E53
Grey Bunny: C0, C1, C3, C5  inner ears: E000, E00, R11
Tooth: Y26, YR23, YR24


The rabbit was printed out twice with one image flipped. Rabbits and balloons were coloured then fussy cut.

The background was made using Adirondak inks on glossy card. The little flower heads are hand drawn using sharpie pens. The balloon strings are added with a black micron pen.

I have decided to list the colours I have used just in case anyone is interested. If you have better colour combinations that you used I would love to hear. I am still very much learning about Copic blends as I go along and am restricted to the colours I have which while quite a few now still has gaps.

The challenge at Scribbles Designs lasts for a month and it would be lovely to see you there. All the details are on the blog.

In case you missed the post on the Scribbles Designs blog here is the winner of the image from my blog in the Birthday Party Blowout celebrations.

TERRI you have won

Brrrnard Party Hat

To claim your prize, please send a message to Lisa at decossesdynamitedoodles [at] yahoo [dot] ca (don't forget to replace 'at' and 'dot' with the appropriate symbols), with the subject heading, "SD 5th Bday Image Winner". Be sure to let me know your name and the image that you hav e won.

Thanks for popping in. Take care.

Pippa

Entering the following challenges:
Artistic Inspirations #195 - Anything Goes
PIP Challenge #1810 - Anything Goes
Lemon Shortbread #63 - Anything Goes
A Snowflakes Promise #49 - Anything Goes
Crafty Creation #362 - Anything Goes
Inspiration Destination #146 - Anything Goes
Penny's Paper-Crafty Challenge #371 - Anything Goes
Creative Moments #138 - Anything Goes
Your Scrapbook Place - March Anything Goes
A Bit More Time To Craft #64 - Anything Goes
A Bit More Time To Craft Extra - March Anything Goes
Lil Patch Of Crafty Friends #77 - Anything Goes
Simply Papercraft #55 - Anything Goes
Creative Inspirations March - Any Occasion

Tuesday, 27 February 2018

Playing With My Prize!

A couple of weeks ago I was fortunate in winning the CraftStash prize on their live Facebook show. I won the first three months of the complete sets of the Flower of the Month series by Apple Blossom. I started with the March flower which is the daffodil.

DSC_0547(watermarked)
Materials used:
Apple Blossom - 12 Months of Flowers March Daffodil Complete Set
watercolour paper
X-Press It card
Copic pens
Distress Inks: Scattered Straw, Dried Marigold, Ripe Persimmon
Rubber Stampede - Elegant Thank You
black archival ink pad


The flowers, leaves and stems all come as individual stamps so that you can build up your flower how you want. I used the die to cut out the flower head but fussy cut the leaves and stem.

The background is made from watercolour paper which has had the daffodil heads stenciled on using the various distress inks. Having stencilled in the flowers I used the ink left on the brushes to put some colour on the surrounding area. The finished paper was then embossed with the stencil from the set and cut to fit the front of a 15cm square card blank.

The flower is arranged on the front of the card and the greeting stamped in.

It was fun trying out all the elements in the set and trying something completely different. The stencil makes it so easy to put in the flower details as it comes with three different parts that layer up. I probably wouldn't use all the elements every time but it was a good way to play around a bit, especially as stencils and embossing is something I do not do very often.

I made a simpler card with the left over bits.

DSC_0550(watermarked)

Thanks for dropping in. Take care.

Pippa

Entering the following challenges:
Sweet Stamping Challenge - Spring Has Sprung
Crafty Friends #78 - Springtime
PIP Challenge #1808 - Anything Goes
Crafting From The Heart #196 - Anything Goes
Through The Craftroom Door 27th Feb - Anything Goes
Lemon Shortbread #51 - Anything Goes
Artistic Inspirations #194 - Anything Goes/ optional Use Flowers
My Creative Scoop Colour Inspiration Link Up #31
Crafty Cardmakers #206 - Floral Delight
Stamping Sensations February - Anything With Flowers
Inspiration Destination #144 - Anything Goes/Real Stamp
Lil Patch of Crafty Friends #76 - Anything Goes
A Bit More Time To Craft Extra - February Anything Goes
A Bit More Time To Craft #62 - Anything Goes
A Gem Of A Challenge #213 - Spring Flowers (use any flower)

Thursday, 13 November 2014

Making decisions

I have discovered a whole wealth of crafty challenges out there that I would love to participate in but unfortunately this week and the next couple of weeks are just too full and busy already. It is a shame because I have some ideas I would love to try. Hopefully it will calm down a bit, although with the all too rapid approach of Christmas I somehow doubt it!  I have decided that there are a couple of my favourites that I just have to keep going, no matter what, and Less is More is one of them. This week the theme is 'Starry, starry night' (I have been humming 'Vincent' all week!) The added challenge is that it is one layer. So here goes.

Bauble 2 watermarked

Materials used:
pine branch stamp: Dimension stamps
star and sentiment stamps: Creative Crafting magazine
nativity stamp: Clarity
bauble die: Spellbinders
memento ink: rich cocoa, northern pine
adirondack ink: pitch black, denim, archival black
versamark pad
clear embossing powder
stencil brushes


[caption id="attachment_815" align="alignright" width="300"]Bauble watermarked A closer look[/caption]

Method:
I stamped the pine branch at the top of an A5 white card blank using northern pine and rich cocoa. I then made an aperture mask of the bauble and used it to stamp the stars through with versamark and emboss with clear powder. Keeping the mask in place I then used denim and pitch black to stencil in the sky and ground. I stamped the nativity with archival black then darkened the bottom tip of the bauble with pitch black to make it look like a continuation of the stamp. I then stamped the sentiment at the bottom with black archival ink. Finally I added the hanger with a black miron pen and buffed up the stars with a tissue.

DSCF9060The design is a variation of one I used a couple of years ago for our Christmas card. In fact I have used both the pine branch and the little nativity a number of times now. The pine branch stamped on brown parcel wrapping paper along with the pine cone from the set makes great wrapping paper.

I am off now to see what wonderful cards have already been submitted for the Less is More challenge.

Thank you for visiting. Take care.

Pippa

I would like to enter my card into Less is More One Layer Week - Starry, starry night! week 197

Wednesday, 22 October 2014

Little critters

It's Less is More challenge time again and this time the theme is 'Little Creatures'. Just lately my life has been full of little creatures; the annual fly invasion has just finished and now the spiders are moving in and at school I have just done minibeasts with the children in science. I never cease to be amazed at the transformation of the humble caterpillar into a beautiful butterfly so have used that idea for my card.

SAM_0867.jpg with watermark

Materials used:
white stamping card
white card
snippet of gold mirri card
Memento tuxedo black ink pad
Adirondack meadow ink pad
set of 'educational' butterfly life cycle stamps (not exactly the best quality of stamp!)
Clarity 'Dream' stamp
circle dies
leafy swirl die
white gelli roll pen
Spectrum Noir pens


Method:
I used an A4 piece of white card to make the card blank, folding it so that the back was wider than the front. I cut swirly leaf out of the middle of a scrap piece of card to use as a stencil then stencilled down the right hand side of the card using the meadow ink.

On the stamped the butterfly and the caterpillar onto the stamping card with the black ink and coloured them in using the Spectrum Noir pens, highlighting the white spots on the butterfly with a white gelli roll pen and drawing in a stem for the caterpillar by hand. The butterfly stamp does not produce a crisp image so I went over it with a black Spectrum Noir pen.

I fussy cut the butterfly and used a circle die to cut the caterpiller, and a slightly larger circle die to cut a mat from the snippet of gold mirri card.

I matted the caterpillar image and stuck it at the bottom left of the card blank using 3d foam pads. I glued the body of the caterpillar at the top right of the front flap so the wings are dimensional. Finally I stamped 'Dream' across the middle of the card using the black ink.

The weather has started getting cooler now with the approach of winter so the minibeasts will all be hiding away somewhere warm soon!

Thank you for visiting. Take care.

Pippa

I would like to enter this card into the following challenges:
Less is More - Little Creatures
Outlawz Monday Greetings - Use your circles
Pixies Snippets Playground - week 147

Clear it out challenge - Orange/Black

Sunday, 27 July 2014

Did it before the end of the month!

Having failed dramatically to meet the deadline for June's calendar page I was determined to do better this month.  OK it may not be that much better but at least the month as not actually ended this time!

Working in a school the only theme that I could do really for July is the fact that the academic year is over - as much a joy to teachers as it is to the children!

July Page 2 Copyrighted
Materials used:
Distress Inks: Ripe Persimmon, Dried Marigold
Adirondack Inks: Butterscotch, Lemonade
Memento Ink: Tuxedo Black
Circle Die
Spectrum Noir pens and pencils
Clarity Sunburst stencil
Clarity Letterbox stamps
Penny Black Girls Rock stamp


Method:
Working directly onto the pages I used the yellow and orange inks to stencil the sunburst in the middle of each page. I punched 31 circles out of white paper and used the yellow inks and stencil to form the pattern around the edges before numbering them with a black pen. I stamped the children along the bottom of the page then again onto paper. I coloured in the skin, hair, shoes and hairbands of the children on the page with pencils and the clothes of the images stamped onto paper with pens. I cut out the coloured clothes and stuck them onto the children with 3d glue gel then arranged the circles and stuck them in place. Finally I added the words using the Letterbox stamps.

July Page 1 Copyrighted

This year the sun did not stop shining as soon as we broke up, in fact it has been glorious all week. I will probably get shot down in flames for this but I think it is just a tad too hot and as it has been very dry some overnight rain would be good for the pond and the garden!

I hope you are having a good summer wherever you are, or maybe a good winter. In the international community that is the internet you just never know who might be popping in or where they come from! So whoever you are and wherever you are thanks for dropping in. Take care.

Pippa

Wednesday, 28 May 2014

Down the Garden Path

This week the Less is More challenge has to include a die cut.  Here is my take on it and an excuse to play with my new Spectrum Noir Pencils.

Materials Used:
Spellbinders Die D-Lites Frame 1
Stampendous Cottage Path stamp
Happy Birthday stamp
Memento Tuxedo Black ink pad
Adirondack Shell Pink ink pad
White card
Swirls stencil
paper roses
leaves
Spectrum Noir Pencils


Method:20140528142938_SAM_0273
Using the swirls stencil and Shell Pink ink I dusted ink over the front of an A5 card blank to create a swirly background. I stamped the Cottage Path onto white card with Tuxedo Black and coloured in with the pencils. It is quite hard getting shading in on such a small image but the pencils did help a bit!


SAMSUNG CAMERA PICTURES


I used the die to cut two mats out of white paper and inked them with the Shell Pink ink. I cut the Cottage Path image down to fit inside the frame. The remaining frame I cut and overlapped to make a smaller frame to fit the remaining part of the Cottage Path image.


I then arranged my elements onto the front of the card and stuck them down before adding the birthday greeting.

20140528142753_SAM_0270

Thank you for visiting. Take care.

Pippa

I would like to enter this card into the:
Less is More Challenge
Spectrum Noir Challenge

Addicted to Stamps Make Your Mark Challenge

Tuesday, 8 April 2014

A bit late, but at least it is still April!

I have been taking part in a journalling challenge this year and had thoughts on what to do for my April pages right back at the beginning of March!  The problem is these thoughts are no good until they come out of my head and actually materialize as said pages.  So here they are at last!

Materials Used:
Clarity stamps - various and letterbox set
Clarity clouds stencil
Hills and mountains stencil
Adirondack inks - lake mist, slate and juniper
Archival black
Distress ink - black soot


Method:
Using juniper, lake mist, slate, black soot, and the stencils I created the background.
DSCF9007


I then used a variety of Clarity stamps and black archival ink to create a little scene on each page. (The left hand page is now mostly covered with the journalling rain drops but there is some visible on the right hand page.)
DSCF9023

Finally I printed out the tear drop shapes from the computer, distressed them slightly with the same inks used for the background, cut them out and arranged them on the page. Pages done!
DSCF9022

Thanks for dropping in. Take care.

Pippa

OK, new feature, that is what I did, now for what I should have done!
1. Put the hills higher up and make them further apart so the fields are bigger.
2. Worked out the positioning of the rain drops before stamping.
3. Started earlier!

Monday, 7 April 2014

Flutterby

After a few days of sunshine, more warmth and less rain we are back to wet and windy again.  So to cheer up a dismal dark and damp day here are some bright butterflies and a hint of sunshine in the background.

DSCF9009


Materials Used:
white and yellow card
Clarity butterfly stamp
Clarity sunshine stencil
Spectrum Noir pens
Adirodack inks - lemonade, butterscotch
Distress ink - scattered straw


Method:
I made a 19cm square card base and distressed the edges with scattered straw. On a piece of the Clarity gelli plate card I used the sunshine stencil and the yellow inks to stencil the background, darker in the middle and lighter on the edges. With what ink was left on the bush I swept around the sun to lightly ink the white card. I then matted this onto piece of yellow card, and then attached to the card base.

Using the butterscotch ink I then stamped the butterflies around the card in a circle and anther set of butterflies on another piece of white card. This second set of butterflies I coloured in with the Spectrum Noir pens before cutting out and attaching on top of the card using 3d foam pads and raising the wings slightly to add some dimension.

This card fulfils the criteria for both the Clarity challenge this month, which is monochrome, and the Butterfly challenge which is yellow so I shall be heading off to both shortly to link my little offering.

Thanks for popping in. Have a good day and take care.

Pippa

I would like to enter this card into the following challenges:
Clarity Challenge 14
Butterfly Challenge Spring Time At Last


Thursday, 3 April 2014

Going round in circles

Over at Less is More this week the challenge is 'Round and Round'. One of the little ATC Clarity stamps I was fortunate enough to win a while back is the small version of the honeysuckle clever corner so I decided to have a play with it.

DSCF9006

Materials Used:
Clarity small honeysuckle corner
small flowerhead stamp
small greeting stamp
Clarity dotty stencil
Distress inks: Barn Door, tattered rose
Memento ink: Rosebud, Cottage Ivy
White A5 card blank


Method:
Using the stencil and changing position after each colour I used the pink inks to create the dotty background in the middle of the card.
I then used the honeysuckle corner stamp and cottage ivy ink to build up the pattern in the centre first then extended it out, I also stamped in the corners of the card.
Finally with the rosebud ink I added the little flower heads and the greeting in the corner.


Sorry about the picture quality, still having camera issues!

Thanks for visiting. Take care.

Pippa

I would like to enter this card into the Less is More challenge 'Round and Round'.

Monday, 24 March 2014

Austrian Memories

I love Austria, the peace, the clean streets, the invigorating air, the mountains, what is there not to love?  So when the Clarity New Design Club stamp arrived earlier this month and it was an Edelweiss it immediately sparked fond memories of past visits there.  So in homage to Austria here is my Edelweiss card.


Materials used:
Clarity Design Club Edelweiss stamp
Clarity Leafy Swirl stencil
Theuva card
Black card
Adirondack inks: Cloudy Blue, Lettuce
clear embossing powder
embossing pen
Spectrum Noir pens


Method:
Firstly I made a 15cm square easel card base with Theuva card and a separate square for the panel.


[caption id="attachment_412" align="alignleft" width="159"]Single flower Single flower[/caption]


I then stamped the Edelweiss onto left over bits of Theuva card; 1 single flower, 2 stem to stem and 2 flower heads only.


[caption id="attachment_410" align="alignright" width="300"]Stem to stem flowers Stem to stem flowers with added flower heads[/caption]


I printed the Edelweiss song words onto the panel before laying the leafy swirl stencil on and brushing cloudy blue ink through.                         


[caption id="413" align="alignright" width="300"]Detail of stencilled background. Detail of stencilled background[/caption]


I used Spectrum Noir pens to colour the stem, leaves and centres of the flowers before embossing the petals with clear embossing powder. I then brushed on some lettuce and cloudy blue ink to give a hint of grass and sky.


I cut the single flower and the stem to stem flowers into panels then matted them and the card panel onto black card.


Inside the card blank I used the leafy swirl stencil and cloudy blue ink to match the front panel.


I then used 3D foam pads to attach the flower panels to the card. I cut out the separate flower heads and stuck them to the flower panel inside the card.


[caption id="411" align="aligncenter" width="604"]The finished card The finished card[/caption]


The  Clarity  challenge this month is Flower Power so I think I will head over there and enter this one.  Nothing ventured nothing gained.


Thank you for visiting, come again soon.  Take care.


Pippa


I would like to enter this card into the Clarity Challenge