Monday 29 June 2015

Ice cream - yum!

Imagine That's Progressive Challenge for June features a portable ice cream parlour, what more  could you want on a hot summer's day?

Materials used:SAM_1774(watermarked)
Imagine That Digi Set - Ice Cream Parlour
Deedee's Digi Stamp Set - Ice cream truck
white stamping card
black and stripy card
white A4 sheet of card to made card blank
Copic pens


Method:
I printed out the image and the greeting onto the white stamping card along with some extra smaller images and greeting to make into ATC cards. I also printed out a small ice cream image which came from Deedee's Digis DOM for July set. I coloured all the images in with Copics then trimmed the large image and sentiment to the size I wanted before matting onto black card. I also fussy cut the single ice cream cone. Using the white card I made an easel card blank and covered the front and the inside with the stripy card, having first run a black pen along the edges. I stuck the matted image to the top of the card and used the sentiment and ice cream cone inside the card as stoppers.

SAM_1776(watermarked)

With the smaller images, having coloured them I trimmed them down to ATC size and ran a black pen around the edges.

It has been a lovely hot and sunny day in Somerset today, so much so that I think an ice cream is called for right now!

Thanks for visiting. Take care.

Pippa

I would like to enter my card into:
Imagine That Digi of the Month challenge - June
Outlawz Greeting Card Challenge - Anything goes

Word Art Wednesday Challenge 189

Saturday 27 June 2015

Celebrating new life

On Thursday I became a Great Aunty when Imogen Rose entered the world. So of course a card was needed and it just so happened that the current {PIN}spirational Challenge theme is Everything is better in pink.

Materials used:SAM_1777_1(watermarked)
Imagine That Digi Stamp set - Mama and baby
white blending card
scallop edged die
pink grossgrain ribbon
white organza ribbon
pink button
acrylic greetings stamps
versamark ink pad
Distress ink - Spun Sugar
detail silver embossing powder
Copic pens


Method:SAM_1780(watermarked)
I printed out two images, one large one for the card and a smaller one to make an ACT with. I coloured both images with Copics then trimmed the smaller image to ATC size. I ran a pink pen around the edges of the ACT.

Back with the big image, I cut it out and embossed it with the die then used a blending tool to add a little Spun Sugar distress ink around the edges. I folded an A4 sheet of white card to make my card blank and heat embossed the greeting with silver embossing powder before attaching the grossgrain ribbon. (I cut a small slit in the folded edge of the card to insert the end of the ribbon through so I could attach it inside the card. The ribbon ends will be covered up by the insert.) I attached my image using foam pads to add some dimension to the card. I used the same dark pink pen that I had used to colour the image to colour the white ribbon then threaded it through the button and tying it in a knot. I cut the ends into a fish tail and attached it to the card.

I was thinking today about why I feel comfortable with CAS cards despite having a lot of embellishments hidden away in my stash. I came to the conclusion that it was a colour problem. I am not confident with colours, which colours go and which don't. Quite often I think something works while others are getting headaches from the colour clash! Even my wardrobe has a lot of black and denim in it - black goes with any colour so no chance of a colour crash! Maybe it is time I ventured out of my comfort zone and tried adding the odd embellishment here and there.

Thanks for dropping in. Take care.

Pippa

I would like to enter my card into:
{PIN}spriational Challenge 143- Everything is better in pink

Friday 26 June 2015

Bubbles Bria

The image from ArtbyMiran Facebook Challenge is a gorgeous girl having fun blowing bubbles. I love bubbles so I had to have a go at getting a card made, in fact I managed to make two!

Materials used:SAM_1761(watermarked)
Artbymiran digi stamp - Bubbles Brea
Bugaboo - Polkadot flowers
stamping card and printer card
silver mirri card
A5 and DL card blanks
black sticker Happy Birthday
Copic pens
snippet of purple ribbon


SAM_1765(watermarked)Method:
I printed out the images to the size I required and a sheet of backing paper. I coloured the images with Copics and trimmed to size before matting onto silver mirri card. I cut a piece of the backing paper to fit the front of the A5 card blank leaving a small border all around the edge. From the trimmed off piece I cut out some of the bubbles and stuck to the front of the DL card blank. I then attached my matted images, the ribbon bow and the sticker sentiment.

If the weather is good next week I might see if I can sneak my class outside to blow bubbles. We have plenty of bubble mix, I checked, and wands of all sizes and shapes. Unfortunately it is raining at the moment so I cannot go out to practice my technique!

Thanks for visiting. Take care.

Pippa

I would like to enter my card into:
ArtbyMiran Progressive Freebie Challenge - June
Little Claire's Digi-Stamp Monthly Challenge #6 - Ribbon and Twine
Creative Fingers Challenge #85 - Anything goes
Penny,s Challenge 233 - Anything Goes
Word Art Wednesday Challenge 189 - Anything goes/Family Friendly
Inspiration Destination Challenge - Anything goes

Thursday 25 June 2015

From the Heart Stamp of the Month Challenge

The end of June is just around the corner and once again I am rushing to get all the progressive challenges done! This month at From the Heart the image is a lovely little hedgehog called Prickles, very appropriate since I work in the Hedgehog class!

Materials used:SAM_1771(watermarked)
From the Heart digi set - Prickles says Hello
Crafts Too Die - Presscut Frame It
stamping card
dotty card - Hunkydory
paper rose
Copic pens

Method:
I printed out a large version to fit my frame and a smaller version to use up the card. I coloured both images in with Copic pens. The large image I trimmed down to fit the frame. I cut the frame from the Hunkydory dotty card left over from one of their card kits and also cut the front of the card blank making sure that I did not cut the top fold. I glued the dotty frame ontop of the the cut card blank and then mounted the picture behind. Inside the card I used the insert to hide the back of the picture. Finally I attached a paper rose the front. I decided not to add a sentiment so that the card could be used for any occasion.


SAM_1772(watermarked)

The second smaller image I turned into a pillow box.

Thank you for visiting. Take care.

Pippa

I would like to enter my card into:
From the Heart Digital Stamp of the Month Challenge - June
If you give a crafter a cookie #21 - Picture Inspiration
Polkadoodles Crafting Challenge Week 25 - Frame It
Word Art Wednesday Challenge 189 - Anything goes/Family Friendly
Creative Card Crew 90 - CAS

Monday 22 June 2015

Path of Postitivity Challenge - Happiness

At this time of the year in the UK the hedgerows and fields are putting on their summer colours. In amongst the blues, yellows, pinks and whites of our native wild flowers there are also large patches of red appearing as the poppies join the party. I know that the poppy is used by the British Legion to mark Remembrance Day but they bloom in the summer and I think of them as a happy summer flower rather than a sombre late autumn one. I love the splashes of colour on my  journey to school and look out for them every year with even more anticipation than looking for the first snowdrops or the first daffodils. When the poppies come out then the end of the academic year is not too far away! (Now that thought definitely makes me happy.)

It just so happens that this month's image from the Outlawz Progressive Freebie Challenge is a wonderful poppy, and it also fits the bill for my sister-in-laws birthday at the end of the week. We met on the first day of secondary school when we were 11 and have been friends ever since, yet another source of happiness!

Materials used:SAM_1768(Watermarked)
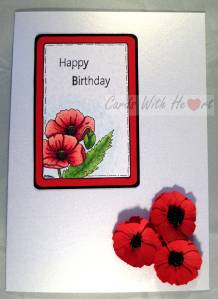
Anne's Digital Art - Framed Poppy (visit the Outlawz site for detail (link below)
Stamping card
Centura Pearl card made into an A5 card blank
snippets of red and glossy black card
black seed beads
Britannia flower die
Copic pens
Happy Birthday acrylic stamp
archival black ink pad
corner rounder punch


Method:
I printed out the image to the size I needed and coloured it in with the copic pens, cut it out along the line of the frame, rounded the corners and edged with black ink. I stamped in the birthday greeting with black ink. I cut the red and black mats and rounded the corners of each before layering them up with the image. Using another snippet of red card I die cut the flowers, cut the tops of the petals with the deckle blade on my paper cutter, drew in the black detail lines with a micron pen and stuck them together to make the poppy flower. Before sticking down the poppies I glued in some black seed beads.

SAM_1769(watermarked)I also printed out some smaller versions of the poppy and made them into ATC's.

I've just thought of another 'happiness' from making the card - colouring. I love colouring, it is so therapeutic and helps with the symptoms of my AF, it's just a shame I cannot colour at night when the thumping heart stops me sleeping!

Thank you for dropping in. Take care.

Pippa

I almost forgot, if you have something that makes you happy why not visit the Path of Positivity and join in with the challenge. There are plenty of different ways you can enter, just have a look at the information on the blog (link below).

I would like to enter my card into:
The Path of Positivity Challenge # 27 Happiness
The Outlawz Monthly Progressive Freebie Challenge - June
Pixie's Snippets Playground Weeks 181 and 182

Thursday 18 June 2015

Let's get digital!

A colleague at school will be joining the illustrious 50s club this week. As well as teaching and manning the office she also cleans part of the school. When I came across this image by Polka Doodles I knew I had to use it. (Two digital cards in a row! Don't tell my Copics!)

Materials used:SAM_1766(watermarked)
Polkadoodles Work and Play collection 6 CD
A5 white card blank
printing card
foam pads
tuxedo black memento ink pad


Method:
I printed out the main image 3 times, the duster (made larger) and a sheet of backing paper. I trimmed my base image to size and used the other images to layer up different parts of the image. I fussy cut the large duster. The sentiment was created on my computer,printed out and trimmed to size. I trimmed a piece of the backing paper slightly smaller than the front of the card. Before sticking all the elements onto the card I edged them with the black ink. I used a clipart image to make a small 50 badge and stuck it to her apron.

I decided to go digital for this one mainly because I had a senior moment and thought the birthday was next month! Luckily I spotted my error before it was too late but I did not have time to colour in three images. Precoloured digi images are great when you are in a hurry.

I actually made two cards for the same person. This one is a personal one from me, the other is for all the staff at school to sign. I may get around to blogging that one as well.

Thank you for dropping in. Take care.

Pippa

I would like to enter this card into:
Inspiration Destination Anything Goes Challenge 38

Sunday 14 June 2015

Something completely different

Of late most of my cards have involved colouring in an image, however when it came to making a birthday card for my sister-in-law I ran out of time so I used a coloured image from The Paper Shelter instead.

Materials used:SAM_1721.(watermarked)jpg
Paper Shelter - Vintage Seamstress
Kraft card, light brown and dark brown card
Printer paper
Happy Birthday acrylic stamp
grey ink pad
ivory lace
two old buttons


Method:
I printed out two copies of the image, one I trimmed to size for the topper base and from the other I fussy cut the girl and her sewing machine. Using the grey ink I stamped the sentiment into the top right of the card where the background was lightest. I matted and layered the base image onto the light and dark brown card leaving a narrow border each time. I edged the final mat with the ivory lace before attaching it to the card base made from the Kraft card. Finally I stuck on the two vintage buttons from my button box.

So no colouring and some embellishments added, not my usual CAS style. My sister-in-law is a keen quilter so I thought she would like this image.

Thanks for dropping in. Take care.

Pippa

I would like to enter my card into:
Word Art Wednesday Challenge 187 - Anything goes/Family friendly
Pixie's Snippets Playground - (the lace and the buttons)
Ants in my pantry Digital Challenge 6 - Anything goes

Wednesday 10 June 2015

Summer is a comin'

Well, it's trying too, still a bit chilly in the wind but there is some sunshine at least. Deedee is sponsoring the current challenge at Crafty Gals Corner with the theme 'The great outdoors'. It maybe a little predictable but I have gone with camping for my card. We used to camp regularly when the girls were younger at a Christian Family Conference, on the Bath and West Showground just outside Shepton Mallet in Somerset. We went from tent to caravan and back to tent before a particularly wet year when the tent was packed away and has not come out again! That was the year we were situated near the lake and our neighbours had dug a trench around their tent to stop it flooding. I can still remember waking up one morning and watching a line of ducks come up from the lake, waddle across the grass and then swim up the trench before hopping out and waddling off. I never did find out where they went but they would be back the next day taking the same route!

Materials used:DSCF9011(watermarked)
Deedee's Digi Stamps - Great Outdoors
'and relax ...' stamp from stash
a white 15cm square card blank
kraft card
dark green card
stamping card
Copic pens
vintage photo distress ink
brown serviette


Method:
I printed out the image at the size I wanted and coloured it with Copics. I then matted and layered it onto kraft and dark green card. Having first distressed the edges of the card blank with Vintage Photo I stuck one layer from the serviette to it and then folded it down the middle to create an easel card. I stuck the other layer from the serviette to the inside of the card. I then made the stopper by stamping the sentiment onto a scrap of the white card, trimming it down and matting and layering it to match the main topper. Finally I stuck the topper and the stopper to the card blank.

The brown serviette I used came from a snack box from an online company and was hanging around my snippets box for a while so I think I may head over, in my woolly jumper and coat, to see if anyone is brave enough to be in Pixie's Playground!

Thank you for dropping bye. Take care.

Pippa

I would like to enter my card into:
Pixie's Snippets Playground Week 180
Inspiration Destination Anything Goes Challenge 137

Addicted to stamps challenge 148 - Holiday
Word Art Wednesday - 187

Tuesday 9 June 2015

{PIN}spirational Challenge

As a member of Deedee's design team you can opt to provide samples for the challenges she is sponsoring. This month I decided to have a go at something I have never tried before which is to make a card inspired by a picture. It just so happens that Deedee is sponsoring the {PIN}spriational Challenge, the picture provided for inspiration is:

june+9

So I had a good look through Deedee's store and found an image which I thought would work.

Materials used:
Deedee's Digi Stamps - Dog Days of Summer and Hello Spring
Stamps Away Versatile stamp set
stamping card
dark green card stock
white A5 card blank
small butterfly punch
snippet of patterned paper
Copic pens
Adirondak Black Archival ink pad

DSCF9013(watermarked)
Method:
I printed out my image to the desired size and coloured it in with the pens. I also printed out a sheet of the grassy paper from the Hello Spring set. I trimmed my image and matted and layered it up with the printed paper and the green card. I attached my topper to the left side of the card blank and stamped the sentiment onto the card on the right side. The puppy in the image has a bow in 'her' hair but as I wanted a boy to fit in with the photo I had to work out how to disguise the bow. After an unsuccessful attempt to turn it into a bone I finally decided to cover it up with a small butterfly. I punched two butterflies from a snipped of pansy paper left over from a previous project and stuck one over the bow and the other above the stamped sentiment.

My take on the picture is a role reversal but I think it will not be long until he is in the pool with dad! I chose the sentiment because in my mind I see father and son having fun together and enjoying a bit of fun play.

Thanks for dropping in. Take care.

Pippa

Sunday 7 June 2015

DOM at Deedee's Digi Stamps

The first week of the month long challenge at Deedee's Digi Stamps is already gone but there is still time to have a go. If this is your first entry you will need to purchase the DOM from the store (link below), after that as long as you keepentering you will get the next months image free. This month has summer in mind.

SAM_1728(watermarked)

Materials used:
Deedee's Digi Stamps - Diver Daniel
Digi Paper from Pixel Scrapper - The Captain Paper 363
white stamping card
white printer card
3 Fold card die
starfish die cuts from stash


Method:
I printed out a sheet of the Captain backing paper and die cut it to form the card blank. I printed out two coloured images from the Diver Daniel set and one line drawing image along with the two sentiments. I coloured in Daniel and then die cut all the elements. I decided to use the scalloped edge option to fit with the idea of waves. Finally I attached my elements to the card and added a couple of die cut starfish I found in my stash.

Thanks for dropping in. Take care.

Pippa

Wednesday 3 June 2015

Addicted to Stamps and More Challenge

Deedee is sponsoring the Addicted to Stamps and More Challenge this week and the challenge is to use markers. I had a little ATC done which fitted the bill.

Materials used:DSCF9002(watermarked)
Deedee's Digi Stamp Set - Basket of Love
Copic pens
white ATC blanks
stamping card


Method:
Having worked out the size of image needed for my ATC (Artists Trading Card) I printed it out onto the stamping card and coloured it in with Copics. I made it for a swap with the theme, Black and White and One Other Colour. Really quick to do in a hurry.

Thank you for visiting. Why not have a go at the challenge your self.

Take care.

Pippa