Tuesday 29 December 2015

Dragons Lair Designs Freebie Challenge

Every month on the Dragons Lair Designs Facebook Page there is a progressive challenge. A free image is made available and the only stipulation  is that if you request the image then you are agreeing to make a project with it for the challenge. If you do not make the project you forfeit your entry to the next challenge. This time around it was a bit of a scramble as there was not much time to do it and it was over Christmas but I managed, it was too cute an image to miss out on.

Materials used:SAM_2576(watermarked)
Free image from Dragons Liar Designs Facebook Group
stamping card
designer paper from stash

grey card
shimmer paper
white A5 card blank

Britannia dies leaf die
silver star embellishments from stash
Polychromo pencils

Copic pens
sliver pen


Method:
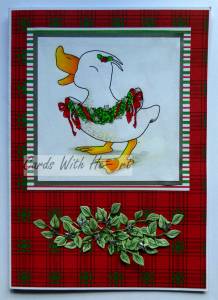
Print out the image at the required size and colour with Polychromo pencils. Cut the image to size then mat with grey card and layer onto designer paper leaving a narrow border each time.

Cover the front of the card blank with a slightly smaller piece of designer paper.


Attach the topper to the card front.

Cut several sets of leaves from the shimmer paper and colour with Copic pens. Arrange in decorative swag and attach to the card front below the image. Add a scattering of silver star.

I was trying to get my leaves to mimic the swag that the little duck/goose is holding but I did not have any ribbon narrow or light enough to add to it.

Thank you for visiting. Take care.

Pippa

I would like to enter my card into the following challenges:
Crafty Girls Creations #11
Craft for the Craic - Christmas Cheer
Digitally Sweet #145 - Winter
Simply Papercraft Challenges #20
That's Crafty! - Anything Goes

Saturday 26 December 2015

File the old and make space for the new!

As the new year approaches there are exciting opportunities waiting in the wings, some of them I already know about and some will be surprises! I have been invited to join a couple of DT teams from January, exciting times ahead.

Meanwhile Imagine That! Digis by Kris is also having a few changes in the new year so this month is the final progressive freebie challenge, I could not miss the last one!

Materials used:SAM_2557(watermarked)
Imagine That! Digis by Kris - Happy Howlidays
green and red mirri card
red glossy card
blending card
square white card blank
decorative square die
Happy Christmas acrylic stamp from stash
Copic pens
Diamond Sprinkles


Method:
Print out the image at the required size and colour with Copic pens.


Fold the card blank to make an easel card. Cut a square of red glossy card to size and attach to the fold on the front of the card blank.


Die cut a decorative edged square from green mirri card and a mat for the image from red mirri card. Cut the image down to the correct size then mat and layer it onto the red and green card before attaching to the card front.

Use the Diamond Sprinkles to high light the snow.

For the stopper die cut a matching rectangle from the green mirri card a red matt. Stamp out the greeting and cut to size. Mat and layer it all up and attach inside the card with 3d foam pads.

The little dog looks very happy to find a bone in his mail box!

Thanks for dropping in. Take care.

Pippa

I would like to enter my card into the following challenges:
Imagine That! Digis by Kris - December DOTM
Crafting From the Heart #91
Our Crafty Corner #4
A Snowflakes Promise #12
Creative Card Crew #103 - Anything Goes
Deep Ocean Challenge #113 - Anything Goes
Holly Jolly Christmas Challenge - Anything Goes Christmas
Ike'sworld Challenges #53 - Santa is Coming
2 Creative Chicks Showcase #5
Crafts Galore Encore - Merry Christmas and Anything Goes
CHNC Challenge Extra for December 2015
Crafty Time - December
Just Keep on Crafting December 2015 Anything Goes Link-up
Sisters of Craft December - Anything Goes


Wednesday 23 December 2015

From the Heart Progressive Freebie Challenge

This month From the Heart have provided a great bear and presents image which  would work well for both Christmas and December birthdays. That reminds me, it is a special little lady's 4th birthday on the 27th, better get organised for it!

Materials used:SAM_2556(watermarked)
From the Heart Stamps - Gift Stack Teddy Bear
red gold foiled star card
silver grey card
large square white card blank
decorative frame die set
blending card
Copic pens
glitter


Method:
Print image to desired size and colour with Copic pens.


Cut a large decorative frame from the red foiled card and use this to cut the image to the right size with a slightly larger mat cut from the silver grey card.

Assemble all the elements onto the front of the card blank.

Finally add glitter to the fur on the bear's hat.

I have not added a sentiment to this card yet because I am still undecided whether it will be a Christmas card or a birthday card!

Thanks for stopping by. Take care.

Pippa

I would like to enter my card into the following challenges:
From the Heart Stamps Progressive Freebie
A Gem of a Challenge #159 - Anything Christmas Goes
Crafty Friends #21- Anything Goes
Crafty Hazelnuts Christmas Challenge 260 - Anything goes as long as it's Christmas
613 Avenue #155 - Anything Goes
Lucy Sunshine Color Your World - Anything Goes


Tuesday 22 December 2015

Sugar Cookies With Sprinkles

I wish! Day 5 of the Christmas Chaos and pick a treat time so I chose  'Sugar Cookies with Sprinkles - Make your card a shape other than Square or Rectangle, 3 pieces of Bling & Ribbon' and also make it funny.

Materials used:SAM_2503(watermarked)
Bugaboo Stamps - Little Penguin Winter
Bugaboo Stamps - Digi Paper: Purple Blue Winter
acrylic 'Let it Snow' stamp
black archival ink pad

blending card
Copic pens
purple sparkly ribbon
gems
scalloped edge die
circle cutter
white square card blank


Method:
Print out the image at the desired size and colour in with the Copics then cut with the scalloped edged circle die. Stamp 'Let it Snow'  and edge the scallop with black ink.


Use a circle cutter or large circle die to cut the square card blank into a circle one, not forgetting to overlap the edge for the fold.

Print out the backing paper and cut a circle fractionally smaller than the card blank. Edge it with black ink.

Position the ribbon where you want it and stick it to the back of the circle paper before attaching it to the card blank.

Attach the topper to the card then add the gems to  the snowflake shapes.

To make sure your card stands up cut a small piece from the bottom of the back of the card to act as a rest.

Have I ever said that I love penguins, they are my favourite animal/bird and have been for years. I find I cannot look at a penguin without smiling!

Thank you for visiting. Take care.

Pippa

I would like to enter my card into the following challenges:
Brown Sugar Challenge #177 - Anything Goes
Craft for the Craic: Christmas Cheer
Digitally 'Sweet' Challenges #145 - Winter
Simply Papercraft #20 - Anything Goes
Beccy's Place: December
Your Scrapbook Place December- Anything Goes (with Bugaboo)
2 Creative Chicks #5 - Anything Goes
Sweet Stamps December - Anything Goes
Inspiration Destination #64 - Anything Goes


Monday 21 December 2015

I did do them all in time - honest!

Well you may have been wondering where I have been and why I did not finish the 'Catch the Bug Christmas Chaos' challenges. Actually I did get all seven done before the deadline but our internet went down for two days so I could not post them in time. On the bright side I still have four projects to share which will tide me over the Christmas period.

The fourth challenge was a recipe.CreateaCardXmasChaos2015

Materials used:SAM_2500(watermarked)
Bugaboo Stamps - Ornament
Deedee's Digis - Christmas Cuties  (Deedee is closing the shop at the end of the year and is having a 75% off sale)
acrylic greetings stamp from stash
black archival ink pad
white A5 card blank
snippet of red ribbon
gems
Copic pens
blending card
gold pen


Method:
Print out the ornament to the desired size onto blending card. Also print out three sheets of backing paper from the Christmas Cuties set.


Colour in the ornament with the Copics and gold pen and fussy cut it  out  then stamp the sentiment across the middle.

Cut the backing paper into 3 different size mats and layer up on the card front.

Use a shaping tool to emboss the back of the ornament to 'puff' it out then stick to the card with foam pads. Tie the ribbon into a bow and attach to the top of the ornament. Finally add two gems.

It was certainly a challenge trying to work out how to incorporate all the elements needed to meet the criteria of the challenge.

Thank you for dropping in. Take care.

Pippa

I would like to enter my card into the following challenges:
2 Crafty Girls #8 - Anything Goes
Cardz 4 Galz Challenge #12 - Christmas
Crafting With An Attitude #10 - Anything Goes

Wednesday 9 December 2015

Day 3 of Christmas Chaos

On the third day of Chaos,  Catch the Bug gave to me, an interesting colour challenge! I do recall having a go at a colour challenge before but it was a while ago.
xmaxchaos2015color
I see brown greys and dusky rose pinks in this so that is the colour scheme I have used for my card.

Materials used:SAM_2497(watermarked)
Bugaboo Stamp - Christmas SB Ornament
15 cm square white card blank
grey card
2 designer Christmas papers from stash
white stamping card
fancy edge cutting die (freebie from a magazine but I think it is Die'sire)
Copic pens
small snowflake stamp (Creative Stamping Magazine)
black archival ink pad


Method:
Print out the image to the desired size and colour in with the Copics. (I have tried to stick as close to the colours in the photo as I could, but the holly had to be green!) Stamp out the little snowflakes in black ink along the middle of the bauble.

Use the die to cut the top left corner then cut the image square from that corner. Back onto grey card cutting around all the edges. 

Cover the front of the card blank with one paper and mat the image onto another. Attach the matted image to the front of the card.

SAM_2498(watermarked)
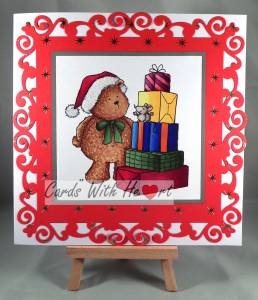
I also made a couple of ATC's using the smaller images I had printed to test the colours on.


I am now only two days behind so I may catch up in time! Thanks for popping in. Take care.

Pippa


I would like to enter my card into the following challenges:
Catch the Bug Christmas Chaos Day 3
Crafts Galore Encore - Christmas
Crafty Hazlenuts Christmas Challenge Extra
Creative Craft Cottage #53
Creatalicious Challenges #81 - Merry Christmas
The Sisters of Craft- December
A Gem of a Challenge #159 - Anything  Christmas goes

Tuesday 8 December 2015

Day 2 of Christmas Chaos

On the second day of chaos Catch the Bug gave to us a sketch! xmas2bchaos2bsketch


I have not attempted many sketches but was determined to give it a go in my effort to get as many of the challenges done as I could.

Materials used:SAM_2496(watermarked)
Bugaboo Stamps - Christmas Doodles
white card to make up a three panelled card blank
designer Christmas paper from stash
circle dies
Quickie glue pen
Copic pens
narrow ribbon
black glitter


Method:
Print out the design and a reversed image at the required size. (I only wanted to use the bell so I cropped the image first). Colour in with Copics and fussy cut them out. 

Use the glue pen to add glue over the drawn decorative parts of the bell and add black glitter.

When the glue is dry stick the bells back to back.

Make up a three panel card blank from white card (if you do not have one already made). Cut a circle from the middle panel. Cut the designer paper to size and attach to the card. 

Attach a length of ribbon through the ring at the top of the bell and use it to hang the bell in the aperture attaching the ribbon on the back of the centre panel. Add a bow from the same ribbon at the top of the bell. 

Fold the right hand panel in and attach to the middle panel to complete the card base.

Print out the words you want to use to put behind the aperture and cut with a circle die. Attach to the back inside of the card or to the insert if using one, so that it shows through the aperture.

I enjoyed making this card even though it was a bit more complicated to construct than most of my cards.

Thank you for visiting. Take care.

Pippa

I would like to enter my card into the following challenges:
Catch the Bug Christmas Chaos Day 2
Beccy's Place - December
Stamping Sensations December - Anything goes with stamp and ribbon
Artistic Inspirations #146
Come and Get It Challenges - December
Pile It On #95 - Anything Christmas/Winter
That Craft Place - Christmas


Deedee sponsoring the Clear it Out Challenge

Deedee's Digi's is sponsoring the latest Clear It Out Challenge with the theme of anything goes. For my sample I used the Wise Men set to make a card and an ATC.

Materials used:SAM_2403(watermarked)
Deedee's Digis - Wise Men
Derwent colouring paper
Polychromo pencils
silver  and gold pens
black pen
artists chalks in blues and yellows
black , cream and blue card
small greetings foam stamp


Method:
Print out the image to the size required. Colour the wise men  with pencils and the background with chalk. Trim and edge with a silver pen. Add silver and gold to the star, the middle wise man's crown and accents on the presents.

Trim the coloured image to size and mat onto black card.

Cover the front of the card blank with blue card slightly smaller in size to leave a white border around the edges. Attach the topper at the top of the card and stamp the sentiment underneath in the middle.

SAM_2401(watermarked)
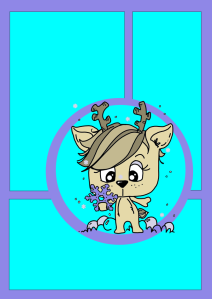
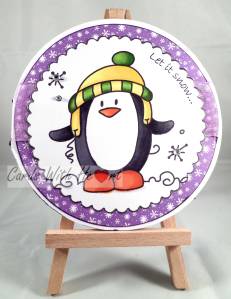
For the ATC print out the image at the correct size and colour as before. Edge the image and a cream ATC blank with a black pen and attach the image to the ATC card.

Sadly Deedee is closing down at the end of the year so if you like her images you need to get them now, there is even a 75% sale going on so what are you waiting for?

Thank you for visiting. Take care.

Pippa

 I would like to enter my card into the following challenges:
Brown Sugar #175
Creative Fingers #99
Funday Friday Challenge #117
Pattie's Creations #117
Simply Papercraft Challenges #19

Sunday 6 December 2015

A week of chaos at Bugaboo!

Bugaboo stamps have just started a week of chaos with a challenge every day for a week. This year I am hoping to get an entry in for each one so be warned it could mean more than one post on a couple of days!

The first challenge is Anything goes with a 'Here comes Santa Claus' theme. I chose to make a quick and easy ATC card.

Materials used:SAM_2493(watermarked)
Bugaboo stamp - Sign it Santa
acrylic greeting stamp
black archival ink
Stamping card
Copic pens


Method:
Print out the image at the required size, colour in with the pens then cut to ATC size.


Use black ink and the greeting stamp to add a sentiment to the sign Santa is holding then run a black pen around the edges.

I did say it was a quick project but it was all time allows. As Christmas approaches it does get busier and the past few days have been spent editing the film of our Key Stage 1 Nativity. It's quite a fiddly job lining up the right narration with the right clips in the right order but I think I have cracked it now!

Thanks for dropping by. Take care.

Pippa

I would like to enter my card into:
Bugaboo's 3rd Annual Christmas Chaos Day 1
Crafting With An Attitude #10
Crafty Girls Creations #10
Beccy's Place - December
2 Creative Chicks Showcase #5
Artistic Inspirations #146
Inspiration Destination #62

Tuesday 1 December 2015

Art By Mi Ran Progressive Freebie Challenge

Just for a change the image for this months Art By Mi Ran challenge is not harvest, thanksgiving or Christmas although it could be used for any of them!

Materials used:SAM_2488(watermarked)
Art by Mi Ran image - Apply via Facebook Page
stamping card
white A5 card blank
blue, black, red chequered card
Copic pens


Method:
Print out the image at the required size and colour with Copics.

Trim image to size then mat and layer onto blue and black card leaving a narrow border around the edges each time.

Attach topper to card base.

I have not added a sentiment to this card. The image will work for so many different occasions that I decided to leave it blank for now so that I have an emergency one to hand if needed!

SAM_2487(watermarked)
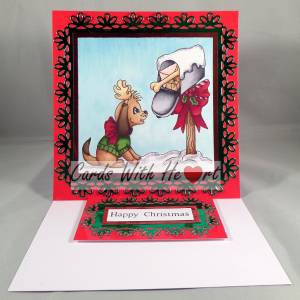
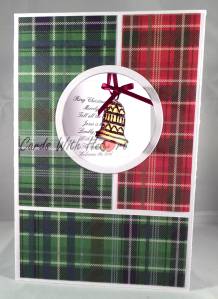
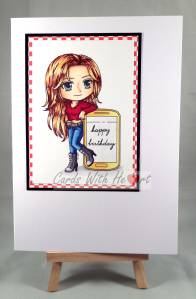
I made a second card using red chequered card for the mat. This time I took out the phone image and stamped a greeting in it's place.

Thanks for dropping in. Take care.

Pippa


I would like to enter my card into the following challenges:
Art by Mi Ran Facebook page progressive freebie
Crafty Girls Creations
Your Scrapbook Place - December
Crafting With Friends #11
Creative Fingers #98