Wednesday 14 November 2012

Weekend trip to Narnia

I would like to dedicate this post to the wonderfully inspirational Barbara Gray of Clarity Stamps who has introduced me to brayering.  Lately I have been watching her on Create and Craft www.createandcraft.tv whenever I can, which is not often enough!

This weekend I have been practicing with  my brayer and came up with a couple of ATC's.


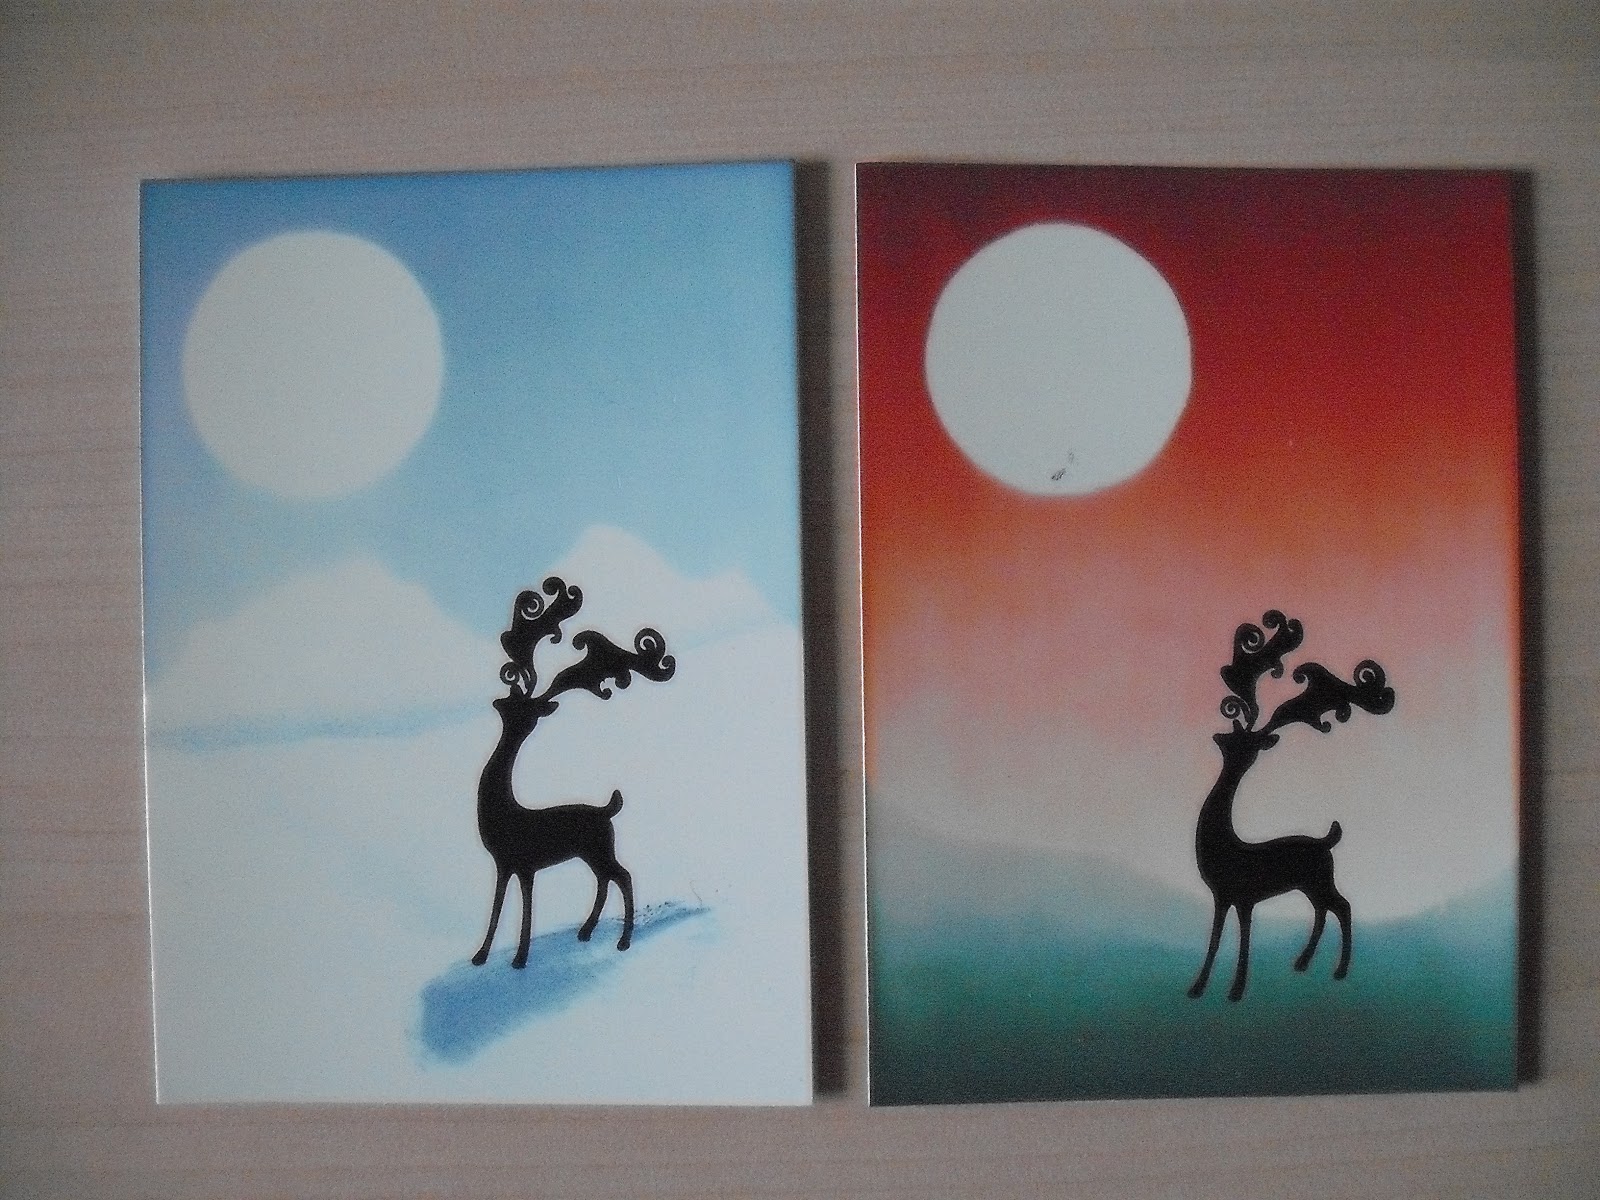
I used Adirondack Denim only for the blue one and big and juicy mountain meadow for the red and blue/green one.

The deer stamp is from the set that comes with Creative Stamping magazine.


I then decided to have a go at something a bit bigger and make a card.  So here are the steps I followed in the process!
Collecting the'ingredients'


First I gathered all the bits and pieces I thought I might need.


Plan of design


Then I made a rough plan of the design I was aiming at on a piece of copier paper.


The moon mask and snow line in place


I taped my A6 piece of Clarity card to my work mat using low tack stencil tape.  I then cut a moon mask from a post it note using an X-Cut 1' circle punch and positioned it on  my card where I wanted the lamp light to be before adding the background with Adirondack Pitch Black and Denim inks and a brayer.  The Pitch Black just makes the sky at the top darker and more dramatic.  The snow line is achieved by using a piece of torn paper and moving it down to add a couple of layers.


All brayered and the mask removed


Putting in the lamp light


Next I used another post it with a circle cut out to make an aperture which I placed over the white circle on the card and coloured using Adirondack Butterscotch and a make-up sponge.

Tree stamped edge


The lamp and trees are stamped with Adirondack Archival Black ink.  The lamp post is from the Train Create-a- Scene set by Creative Expressions and the trees are from the Pilkington Wood set.

I then removed the tape from the edges of the card and experimented with two finishing borders.  The first one has a fern-like border stamped using ink straight from the Splodge mat on the tree stamps, the second one just has a free hand wiggly line drawn with a fine black pen.


Black fine line pen edge


.I printed out the words on my computer using a free Narnia font download from the internet. The words and the picture are matted onto silver mirri card and then mounted on an easel card blank made from a snowflake patterned card from Craft Creations http://www.craftcreations.com using 3D foam pads.

Finally I added some ultra fine glitter to the trees and the tops of the snow piles to look like frost.


Thursday 1 November 2012

Hunkydory Weekend

Last weekend I actually managed to spend some time in my craft room making a few cards for upcoming birthdays.  I have only recently discovered Hunkydory's wonderful card making kits and have invested in two large collections.  The images on the toppers are beautiful and the coordinating card fantastic.  Here are the cards I put together this time around.

Birthday Card


For this card I used the backing card with a topper and greeting die cut.  The backing card is matted onto green Adorable Scorable card and I have run a piece of plain twine behind the die cuts.


An Unbirthday Card


This card again uses a piece of the backing card and a die cut topper.  The greeting is stamped onto a punched circle of card and mounted ontop of two paper flowers that have been inked with Spun Sugar distress ink.  The card base is made from pink card.  I have added little gems to the greeting and the two right hand corners. 


A Bon Voyage Card

This card I made for friends who are doing a 280 mile  long cycle ride in Uganda in aid of LINK Community Development.  This time the background is stamped with a variety of bicycle stamps and words using Vintage Photo distress ink.  I added a bow of organza ribbon with the head of a gold square brad on the centre knot. 


New Home Card


I cut a shaped card from the Hunkydory backing card using an X-cut scalloped circle die.  I also cut a smaller gold circle and embossed the edge and cut the topper with a smaller circle still. The topper was die cut in the centre so I mounted the edge using foam pads and put the centre flat on the gold mat.  I tied a bow of three lengths of different coordinating coloured paper string at the top.


Birthday Card


For this card I made the base from white card then used an embossed silver board for the mats.  The topper is mounted on coordinating purple Adorable Scorable card cut with a die.  The corners have faux card candy brads with the top right forming the centre of a black paper flower.  Another flower is added to the greeting easel stopper.  The pearl gems in the two right hand corners of the topper have been coloured pink with a Spectrum Noir pen.


It was great to have some time to play again and I hope you like the results.


Wednesday 24 October 2012

In praise of Stafford Service Station!


  I know, service stations are usually regarded as the worse place to be, overpriced and overcrowded.  However I think Stafford is a bit special.  When our daughter was at university in Lancaster, Stafford was a regular stop on the long trek up the M5 and M6 from Somerset.  The north bound side is, it has to be said, superior to the south bound side.  To show you why I think so highly of Stafford here is are some pictures of it.

Tuesday 16 October 2012

It's been a while


I have taken a break from the mammoth Christmas Card making operation to make a ‘just because’ card for my daughter who is working away from home at the moment.  I thought as I have nothing else up my sleeve, I would share it with you.

I have always fought shy of CD crafting, there is something in me which still sees it as cheating.  Apart from which I like playing with ribbon and lace etc.  So I have combined both in this card.  The images and background papers are from the ‘Jewel Britannia’ CD by My Craft Studio.  The dark plum, almost brown card is Hunkydory Adorable Scoreable and I have attached some pale pink lace behind the topper.  

It is just a quick fairly simple card for a fairy loving daughter.

Sunday 7 October 2012

A smashing time!

Smash Book and Goodies

I recently came across ‘Smash Books’ on a crafty website.  Curious to know what a ‘Smash Book’ is I did a bit of research and was hooked by the concept.  Basically it is a place to keep all those bits and pieces that usually get thrown into a draw and forgotten about.  You have probably got a drawer or box like it yourself, full of ticket stubs, newspaper cutting which caught your eye, all the things, in fact, that we collect meaning to do something with. 


First Smash Book, First Page
When a local craft shop started stocking the books and a good selection of crafty bits for it, it was too tempting to let slip so I went off and got one, plus a few of the other crafting goodies to go with it.  The result is I now have a book to act as a cross between a scrapbook and a diary, somewhere to put all the jottings and saved memorabilia that I tend to collect.  I thought I would share the first page with you; the first page is always the hardest!  Basically I used it to record when, where and how I got my first ‘Smash Book’.


Wednesday 3 October 2012

Where is the crafting?


With a title like ‘Veiws from the Craft Room you are probably wondering where the crafting comes in.  Well, at the moment every available spare moment is being taken up making the 200+ Christmas cards we need!  There is a lot of die cutting, stamping, embossing, distressing and gluing going on but not much to show you.  So I have decided to show you a card I made last year which is one of my favourites. 

The flowers are made using the MEDIUM FLOWER HEAD 0701072Aand the LARGE FLOWER HEAD 701071Astamps from Dimension Stamps.

I stamped the two flower head stamps onto velum which I had coloured by blending pink ink onto it.  I then decorated the flowers by stamping a swirl pattern on in pink and highlighting with crystal glitter.  I then made up the flowers, two large and one medium.

Another view of the top and inside panel.


Roy from Dimension Stamps has made a video which will show you how to make the flowers: http://www.youtube.com/watch?v=9W3OsWLJ5Zg

The box and tag for the card.

I used some vintage card from my stash to make and easel card base and cut the mats from contrasting card using my CraftRobo.  I inked the edges in pink then attached to my card.  I then arranged the flowers on the card and used a leaf stamp to put in the green leaves.  I then added some gems to look like dew drops and used peel offs for the greetings.


I have been meaning to make another one but to date this is the only one I have done.


Wednesday 26 September 2012

A bit of summer in autumn


St John the Evangelist
Over the weekend our church held a flower festival to coincide with Harvest.  As always our talented group of flower arrangers did us proud.  The theme this time was ‘When the saints go marching in’.  Each arrangement highlighted a particular saint, some well known others not so well known.  I thought I would share some of the beautiful arrangements with you especially as at the moment the weather is not at all summery!  My photographs do not really do justice to the wonderful colours and array of different flowers but I hope it will give you some idea.  Hope you enjoy them.


St George

St Mary Magdalene

St Nicholas

Sunday 23 September 2012

Upcycling – not an Olympic sport!


Trawling the net for something, I forget for what at the moment, I came across the term ‘upcycling’.  Unlike recycling, upcycling involves turning unwanted items into useful ones.  Having read a bit more about it I discovered that I have been an upcycler for years without realising that it had a proper name!  I must have started at an early age and my first memory of a successful upcycle was making a tennis dress for school from an old pillow case.  (I was small for my age!)

Of course working in the primary sector we make lots of things out of old cardboard packaging and plastic pots though I don’t think it qualifies as upcycling as to date I have not seen any of the children arrive at school in a new cereal packet car!


I thought I would share a couple of my recent attempts at upcycling with you.  The first is a skittles game I made for school.  The skittles are made from actimel bottles and ping pong balls, much to the annoyance of Finnegan who thought the balls were for him to play with!  They are decorated with scrap bits of paper from my paper stash.  The bag to keep them in used to be a pair of my daughters old jeans.  There is no ball in the picture because it is at school.

The second example is from an aluminium can which I coloured with alcohol inks then cut out gears using Spellbinders dies and my Grand Calibur machine.  I then used them on an ATC.  Another first for me as it is the first time I have tried out Steam Punk.

When I have managed to get some more drink cans I am going to try cutting baubles out of them as I think they would make good decorations for Christmas.

Is there anyone else out there into upcycling?  I would love to know what people have been doing with unwanted bits and pieces.

Saturday 22 September 2012

Starting all over


I blogged once.  It  was a while ago now, months, if not years have passed since then.

I blogged once.  I set up my account, and with the fresh flush of the newly converted I successfully posted my first comments.  Ok, it wasn’t exactly Nobel Prize for Literature material but it was all mine.

I blogged once.  I told the world about myself, my age, my likes, my work, my hobbies.  But then I realised that actually I was not that keen on the world knowing all that stuff about me, besides I’m not convinced the world was that interested anyway.

I blogged once, then I forgot about it.  So, you may be wondering, or then again you may not, why the change of mind.  Why this attempt to raise something interesting from the ashes of the mundane?  I’ve no idea.  Maybe it is doomed to failure like the first attempt but then maybe something will come out of it that might interest someone.

I blogged once.  I’ve blogged again.