Monday, 1 February 2016

Path of Positivity Challenge - Desire

The first Monday of each month sees the start of a new challenge over at The Path of Positivity. For February the theme is 'Desire'. It's is quite apt in our family at the moment. This summer is going to be an exciting and possibly challenging time of us. My husband will be retiring from parish ministry and so we will be moving out of the Vicarage. We recently sold our house and have just put in an offer on another a little bit further away from the parishes we are working in. One of the stipulations of the Church of England is that you cannot retire to your parish. So, naturally we will also be moving house at some point. Also at the end of August our youngest is getting married.

All these life events involve desire; my daughter desires her fiance and I expect also a good wedding day. My husband and I desire a house to turn into a home. My husband desires to retire. As for me, I desire that everything goes smoothly!

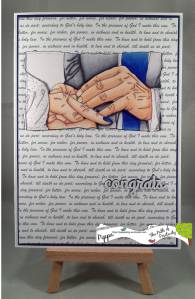
In view of possibly the most exciting of all these events, the wedding, I chose to go with that theme for my card.

Materials used:
Ikes Art - With This RingSAM_2591(watermarked)
stamping card
printer card
white A5 card blank
blue card
frame die
congrats die
Copic pens
siver glitter pen
snippets of blue and centura pearl card


Method:
Print out three copies of the image and colour with Copic pens, adding some silver spots to the lady's sleeve with the glitter pen. Cut the hands from one of the images and just the lady's sleeve from one. Layer them up using a temporary glue and cut all three layers with the frame die. Take the layers apart and then layer them up again using gel glue to add dimension.

Make up a sheet of backing paper using words from the wedding vows and printing it out in grey on white printer card. Matt onto blue card then attach to the card blank.

Die cut 'congrats' in blue and centura pearl card and stick together slightly off set. Stick the topper and the sentiment to the card front.

I went with the blue colouring because my daughter is going with blue for her bridesmaids and it is as good a colour as any!

I really enjoy the Path of Positivity Challenge, it does require a bit of thought as you have to say in what way your creation links to the theme. It does not need to be a whole essay, just a line in the link up is fine. There are two great sponsors this time and some great prizes:

  • A $10 gift certificate from Scribbles Designs, one of our guest sponsors this month, for the post or project that the DT deems most inspiring of the bunch.

  • A $15 gift certificate from Ike's Art, one of our guest sponsors this month, for a person chosen in a random draw based on all entrants.

  • One digital image from Creative Bug Digital SnapShots for each person chosen as a DT Delight.


There will also be:

  • A small selection of digital designer papers from DĂ©cosse's Dynamite Doodles for one lucky person who leaves a comment on posts published during the challenge timeframe.

  • One digital sentiment for every single person who enters the challenge.


So come on over and join us - please, a wam welcome awaits  you.

Thanks for dropping by. Take care.

Pippa

I would like to enter my card into the following challenges:
Crafty Girls Corner #56 - Anything Goes
Penny's Crafty Challenge-Blog #262 - Celebrations
Create and Inspire #38 - Anything Goes
A Bit More Time To Craft #13 - Anything Goes
2 Creative Chicks #7 - Anything Goes
Crafty Girls Creations #13 - Anything Goes
C.R.A.F.T. Challenge #348 - Love/Valentines/Anniversary
Simply Create Too Challenge #101 - Something New (I used a new image and a new die)
Lil Patch of Crafty Friends #26 - Anything Goes
Inspiration Destination #70 - Anything Goes
Melonheadz Friends - Love
Just Keep On Crafting  February - Anything Goes
Not Just Cards # 29
Sisters of Craft February - Anything Goes
Craft Your Passion #297
Crafting From the Heart #97
That Craft Place - Anything Goes
Creatalicious Challenge #84 - Love is in the Air

Saturday, 30 January 2016

The cat's wiskers

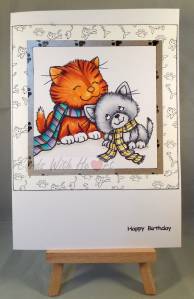
Leaving it to the last minute yet again - largely because my computer refused to load so I have been without it for a few days- well that's my excuse and I am sticking to it! What have I left to the last minite? My entry for this months From the Heart Stamp of the Month Challenge. This month's image is two adoreable cats - irrisistable bundles of mischief I think!

Materials used:SAM_2595(watermarked)
From the Heart Digi Stamp Set - Cozy Kittens
cat themed designer paper and card from stash
black peel off greetings sticker
white A5 card blank
Copic pens


Method:
Print out the image at the desired size and colour with the copics.


Trim to fit card blank then edge with black ink before matting and layering on designer card and paper.

Run black ink around the edge of the topper and attach to the front of the card blank.

Add the peel off at the bottom of the card.

Thank you for dropping in. Take care.

Pippa

I would like to enter my card into the following challenges:
From the Heart Stamp of the Month Challenge - January
Crafting From The Heart #96
Craft Your Passion Challenges #296
Love To Scrap #70 - Anything Goes
Not Just Cards - January
Our Crafty Corner
Outlawz Monday Greetings Challenge - Anything Goes
Where The HeART Is #5
City Crafter #295 - For The Love Of Pets
Ike'sworld Challenges #55 - What's the Weather?  (My take is a little cold which is why the cats are wearing their scarves!)
Crafty Sentiments Designs - Anything Goes
Creative Card Crew #105 - Anything Goes
Lemon Shortbread Challenge #7 - Anything Goes
Brown Sugar Challenge #183 - Anything Goes
SUYP  Cat Lovers Challenge #2 - Furrything Goes


Tuesday, 26 January 2016

Let's go hiking

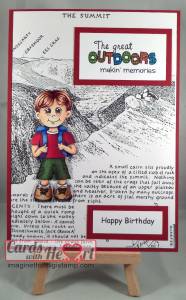
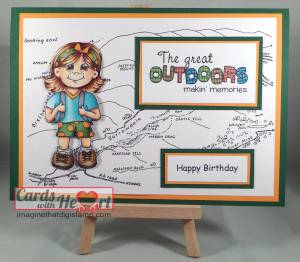
My youngest daughter and her fiancĂ© celebrate their birthdays on consecutive days this month. They are both keen walkers so when I came across the Kid's Camping set at Imagine That! Digis by Kris I knew I had to use them.

Materials used:SAM_2585(watermarked)
Imagine That! Digis by Kris - Camping Kids
blending card
red, green, orange and white card
print outs of Wainwright's walking routes in the Lake District
white A5 card blanks
Copic pens


Method:
Print out the images and greetings at the required size 2x . Colour the people with the pens. Fussy cut one of each image and selected parts from the second image to decoupage with.  Assemble the layers using gel glue and leave to dry. Trim the greetings to size.


SAM_2586(watermarked)Cover the front of the card blanks with coloured card, one red and one green to match the clothing on the people. For the girl mat the map print onto orange card and attached to the front of the card. Mat and layer the greetings onto orange and green card. For the boy attach the map print to the front of the card. Mat the greetings onto red card.

Arrange the elements onto the front of the card and when happy with the placement stick them down.

Thank you for dropping in. Take care.

Pippa

I would like to enter my cards into the following challenges:
4 Crafty Chicks #282 - Sports
Little Miss Muffet Challenge #129 - Anything Goes
Crafting With An Attitude #11 - Anything Goes
Beccy's Place - January
Your Scrapbook Place - January
2 Creative Chicks #6
Sweet Stamps - January
Artistic Inspirations #148 - Anything Goes
Inspiration Destination #69 - Anything Goes
613 Avenue Create #160 - Anything Goes
Word Art Wednesday #218 - Anything Goes

Sunday, 24 January 2016

Into the dragons lair again!

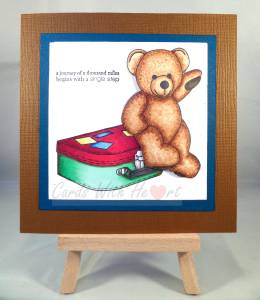
This time I am posting before the challenge finishes! The image in the Dragons Lair Designs Facebook Progressive Challenge is a lovely bear about to head off somewhere, I wonder where! It's particularly apt on a personal level because yesterday we started the process of hunting for a new home having just sold ours. It's been over 15 years since we last bought a house and boy has it got more complicated. Still I am confident the right house is out there for us to turn into a home. God has never let us down yet when it comes to having a roof over our head, even if the going has been tough at times.

Materials used:SAM_2589(watermarked)
Dragons Lair Designs - Teddy on Suitcase (available by request from the Facebook page)
acrylic sentiment stamp from stash
black archival ink pad
stamping card
Copic pens
brown and dark teal card
15cm square card blank


Method:
Print out the image at the required size. Print out  a second image of just the bear at the same size. Colour both images in with Copics. Trim the complete image to the correct size for the front of the card. Mat onto the dark teal card.

Cover the front of the card blank with brown card and attach the topper in the middle. Cut out the second teddy, shape it slightly and attach over the base teddy using gel glue.

Thanks for visiting. Take care.

Pippa

I would like to enter my card into the following challenges:
Dragons Lair Designs Facebook Group Challenge
Creative Fingers #101 - Anything Goes
Simply Papercraft Challenges #21 - Anything Goes
Crafting With Friends #12 - Anything Goes
Beccy's Place - January 
2 Creative Chicks Showcase #6
Sweet Stamps - January: Anything Goes
Inspiration Destination #69 - Anything Goes
Crafting From The Heart #95 - Anything Goes


Saturday, 23 January 2016

Love is in the air

Even if you did not have a calender and had no idea of month it is, the crafting world is always full of clues! At the moment everyone is rushing out their valentine themed crafty stuff. This card I made a while ago for the Art By Mi Ran Facebook Challenge but did not get around to sharing it. As I have been busy getting wedding invitations made and not had much time to do anything else I thought I would use it now.

Materials used:SAM_2580(watermarked)
Art by Mi Ran digi stamp - freebie for Decembers progressive challenge
stepper card die
red card

centura pearl card
floral designer paper
small chipboard hearts
gold embossing powder
clear ultra thick embossing powder
acrylic greeting stamp
Copic pens
blending card
Versamark ink pad


Method:
Print out the image onto blending card at the required size and colour with the copics. Fussy cut the image out.


Use the die and the centura pearl card to make the card base. Die cut the narrow panels from the red card and the large front panel from the floral card.  Cut a panel from white card for the back of the card. Attach the panels to the card blank.

Shape the cut out image slightly and attach to front panel with 3d glue gel.

Cover the front of the chipboard hearts with versamark ink and emboss with gold embossing powder. Follow with 2 more layers of clear ultra thick embossing powder. Attach the hearts to the front of the card.

Stamp the greeting onto the front of the card with black ink.

The little chipboard hearts were the 'waste' from a Hunkydory Christmas Book I made a couple of years ago, I knew I'd eventually get around to using them!

Thanks for stopping by. Take care.

Pippa

I would like to enter my card into the following challenges:
Crafting From the Heart #95 - Anything Goes
Craft Your Passion Challenge #295 - Anything Goes
Bunny Zoe's Crafts - January: Hearts
Not Just Cards #28 January - Anything Goes
Where the HeART Is #5 - Anything Goes
Addicted to Stamps and More #177 - Make Your Mark
Create and Inspire #37 - Anything Goes
Inky Chicks #61 - Anything Goes
Word Art Wednesday #218 - Anything Goes
Inspiration Destination #69 - Anything Goes
Little Red Wagon #325 - Fairy Nice
Mod Squad Challenge - Love Is In The Air
A Bit More Time To Craft #12 - Anything Goes
2 Creative Chicks #6 - Anything Goes
Crafts Galore Encore - January
Allsorts Challenge #347 - Valentines Day


Thursday, 21 January 2016

Frost Fairies

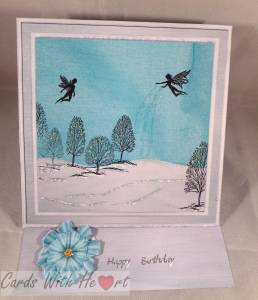
On the Dragons Lair Designs Facebook page there is a great Head to Head Challenge. For this challenge every one uses the same set to work with. This time round the set is "Snow Dayz" Mini kit. To join this challenge you do need to buy the kit, I've put the link in the list of materials below.

Materials used:SAM_2583(watermarked)
Dragons Lair Designs - Snow Days Mini Kit
white printer card
white 15cm square card blank folded to make an easel card blank
acrylic silhouette fairy stamps
acrylic winter trees stamp
black archival ink
white paint pen
iridescent glitter
silver peel-off greeting sticker


Method:
Use elements from the kit to create a background picture for the stamping and the stopper for the easel card. I used a couple of the papers and the frame. When the background and stopper elements are assembled print them out and construct the card blank with them.

Use the archival black ink to stamp out the design you want onto the papers. I used fairies and winter trees to build up a frosty scene.

Use the white paint pen and the glitter to highlight the frost on the trees and snow. I have got glitter trails coming down from one of the fairies as I wanted to convey the idea that the fairy was putting down the frost below.

Finally assemble the stopper for the easel card and put all the elements together on the card blank.


Thanks for dropping in. Take care.

Pippa

I would like to enter my card into the following challenges:
Dragons Lair Designs Facebook Head to Head Challenge
A Bit More Time to Craft #12 - Anything Goes
Allsorts Challenge Blog #346 - Girly and Sparkly 
Crafty Friends Challenge #23 - Anything Goes
Crafty Hazlenut's Christmas Challenge #234 - Cute or Anything Goes
Digi Designs Challenge Blog - Include Snow or Snowflakes
Sweet Stampin' - Things With Wings
2 Creative Chicks Showcase #6
Your Scrapbook Place - January