Monday, 18 January 2016

Path of Positivity - Prosperity Midway Post

Where does the time go? It only seems like yesterday that we were all celebrating Christmas and now here we are already half way through January. So here is my second post for the Path of Positivity Challenge.

As I intimated in my first post, I tend to think of prosperity in term of things that money cannot buy. Of course there are times when I wish I had more in the way of worldly wealth but when I start to list all the 'priceless' blessings I have I soon realise that I would rather have them than money.

I realise that the way we think of prosperity changes with life experiences. I suspect that if you offered any health person untold wealth for life in exchange for a couple of years off the span of that life they would leap at it, where as the same offer made to a patient in a hospice might receive a different response. Things become more valuable when we stop taking them for granted.

I have a confession to make, I had to give myself a good talking to this week. I had an appointment with my cardiologist and discovered that there is nothing they can do to stop the atrial fibrillation. Rather than focus on all the things I can still do I fell into the trap of feeling sorry for myself because I can no longer go on hilly rambles. When it dawned on me what I was doing I gave myself a good telling off and reminded myself that I can still walk and can still do many things that a lot of people with heart conditions cannot do.

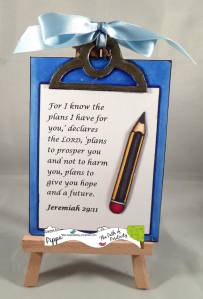
Most importantly to me is that behind everything that happens in life I believe that God is with me every step of the way and I find that very comforting in the darker times which we all face now and then. My project, a large fridge magnet, reflects that in the verse I have chosen to feature on it. I made it for a very dear friend who has had to make some life changing decisions and enters 2016 with an uncertain future. My prayer is that it will comfort her and also that you reading this will also find something in what I have shared too.

Materials used:SAM_2578(watermarked)
Glitterbabe Stamps - Clipboard
stamping card
Copic pens
gold embossing powder
clear UTEE
blue ribbon
magnetic sheet
scrap cardboard
blue acrylic paint


Method:
Insert the Bible quote onto the image on the computer. Print out the image twice. Colour in one image and colour just the bulldog clip and the pencil from the second image.

Paint the back of a piece of cardboard with the acrylic paint. Stick the complete image to the unpainted side and cut out. From the second image cut out the bulldog clip and the pencil. Cut a piece of magnetic sheet to fit the back of the board and attach.

Emboss the bulldog clip with gold embossing powder and then two layers of the clear thick embossing powder to make it firm and raised.

Attached the embossed bulldog clip to the front and after shaping the pencil slightly attach that using 3d glue gel.

Finally thread a length of ribbon through the top and tie in a bow.

Thank you for dropping in. I do hope you will consider joining us at PoP, there is still time to put in your own entry. You do not need to write a thesis, unless you want too! The only requirement is that somewhere in your post you state how your project fits the theme, especially if it is not evident in the image itself. So why not take up the challenge for 2016 and discover new things along the Path of Positivity.

Pippa

I would like to enter my project into the following challenges:
C.R.A.F.T Challenge 346 Not A Card
Crafty Ribbons Challenge #141 - Anything But A Card
Crafting With An Attitude #11 - Anything Goes
Crafting With Friends #12 - Anything Goes
Creative Fingers #100 - Anything Goes
Simply Papercraft #21 - Anything Goes
Word Art Wednesday #127 - Anything Goes

Thursday, 14 January 2016

One that nearly got away!

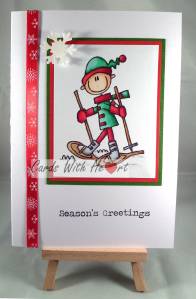
You may have noticed but my posts for Bugaboo's week of Christmas Chaos is missing one! I came across the photograph the other day so thought I would share it with you today.

Materials used:SAM_2505(watermarked)
Bugaboo Stamps - AKV Winter - snow shoe
stamping card

Copic pens
red and green card
shimmer paper
red snowflake ribbon
snowflake die
shimmer paper
acrylic greetings stamp
black archival ink pad
white A5 card blank


Method:
Print out the image,  colour in with Copics and trim to size.

Mat and layer  the image onto the red and green card leaving narrow boarders each time.

Attach a length of ribbon on the left side of the card blank then position the topper and glue in place.

Die cut a snowflake from the shimmer paper and attach to the card.

Stamp the greeting in black at the bottom of the card.

The challenge for this card was a bingo one and the image was provided as a freebie. I chose to do the line which included snowflake, ribbon and 3 layers.

Thank you for visiting. Take care.

Pippa

I would like to enter my card into the following challenges:
Through the Craft Room Door January 12-18
Addicted to Stamps and More #176 - Anything Goes
Penny's Paper-Crafty Challenge 260 - Anything Goes
ABC Christmas Challenge - A is for Anything Goes
Create and Inspire #37 - Anything Goes
The Crafty Addicts #6 - Anything Goes/Celebrations
Morgan's Artworld #1 Anything Goes
Come and Get It Challenge - Baby It's Cold Outside
Crafty Girls Creations #12 - Anything Goes
If You Give A Crafter A Cookie #35

Tuesday, 12 January 2016

All's well that ends well!

I don't know where that saying came from originally but it is one I used to hear a lot when I was younger and I thought it made a good title for today's post. This is my first post as a GDT for Imagine That! Digis by Kris.  You can find a link to her shop of wonderful images on the side bar and also a link to the currant challenge which is a colouring one. You can use any company image and you do not even have to make up a finished project - just colour it. So what are you waiting for go and take a look!

Materials used:SAM_2553(watermarked)
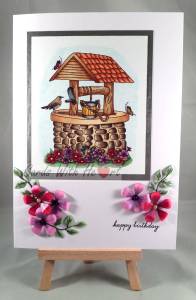
Imagine That! Digis by Kris - Well Wishes
stamping card
Copic pens
Britannia Dies - Flowers and leaves
shimmer paper
silver rose embossed card
Happy Birthday stamp from stash
pearl
gems
white A5 card blank

Method:
Print the image at the required size and colour with Copics. Trim and mat onto silver embossed card. Stick the topper to the front of the card blank.


Cut the required  number of leave sprigs and flowers from the shimmer paper. Colour to match the flowers in the image. Shape the petals and arrange the flowers and leaves on the card before sticking them down.

Colour up some white flat backed pearls and stick in the flower centres.

Stamp the sentiment in black on the front of the card.


Thank you for dropping by. Don't forget to go and take a look at the colouring challenge over at Imagine That! Digis by Kris. Take care.

Pippa

I would like to enter my card into the following challenges:
Lil Patch of Crafty Friends #25 - Anything Goes
Stamping Sensations  January - Anything Goes With A Die
Crafting With An Attitude #11 - Anything Goes
2 Creative Chicks #6 - Anything Goes
Crafts Galore Encore Challenge - Anything Goes
Your Scrapbook Place - Anything Goes
Copic Markers Europe (Facebook Group) #46 - Anything Goes
6
13 Avenue Create #158 - 3rd Annual Block Party Anything Goes/ Optional Twist Birthday/Anniversary


Saturday, 9 January 2016

Christening card

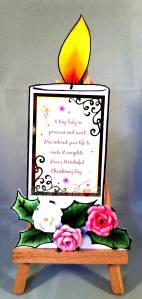
I made this card a while back for my great niece's Christening. It combines Hunkydory with stamping and die cutting!

Materials used:SAM_2484(watermarked)
Hunkydory sentiment panel from stash
Free digi stamp of candle and holly
Copic pens
Britannia dies flower die
shimmer paper
white card


Method:
Crop the image to remove the flame and some of the holly leaves.

Print image at required size positioning on the card so that the fold will be at the top of the candle, fold into a card and cut around the two sides and the bottom.

Colour the leaves with Copics.

Die cut the required number of pieces to make up the roses from the shimmer paper then colour with Copics. Make up the roses.

Cut out a flame from spare card and colour with Copics.  Cut the flame out leaving a tab at the bottom. Cut a small slit in the fold at the top of the card and insert the tab on the flame. Glue the tab to the back of the card. (It can be covered by putting an insert into the card).

Stick the Hunkydory panel onto the front of the candle. Arrange the roses at the base of the card and stick.

I think I got away with turning the holly leaves into rose leaves!

Thanks for visiting. Take care.

Pippa


Tuesday, 5 January 2016

Path of Positivity Challenge #34: Prosperity

I am absolutely thrilled to have been asked to join the DT at The Path of Positivity. Those of you who are regular visitors will know that I have been plugging this challenge for a while now.

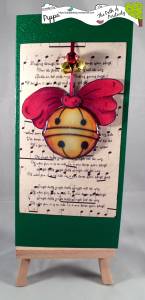
This month the theme is Prosperity and the sponsors are The Stamping BoutiqueGlitterbabe Stamps and Limited Runs. For my first post I chose to work with an image from Limited Runs Digis - Jingle Bells.

From the world's view prosperity is a matter of wealth. Every where you look the message is 'If you want something, why wait, buy now pay later.' The number of adverts on the television for loans is increasing and people get sucked into taking on loans without reading the small print where the interest rates are hidden. I saw one the other day and the interest rate was 700%! The problem is even more acute this time of year with parents wanting to buy bigger and better toys for their children without the finances to cover the cost. Come January and the bills come home to roost bringing misery to a lot of families.

Would it not be wonderful if the message of 'buy, buy, buy' were replaced with 'love, love, love'. As I get older I have come to realise more and more that prosperity is not about how much money we have or how much 'stuff' we own, it's much more to do with how much we love and are love. True prosperity is found in a loving heart, contentment and peace with God and the world.

The reason I chose the image of the bell was that it brought to mind a book by Jostein Gaarder 'The Christmas Mystery'.

Elisabet Hansen had been standing staring at the big pile of teddy bears and furry animals while her mother was buying Christmas presents for the cousins who lived at Toten. All of a sudden a little lamb shot out of the pile. It jumped on to the floor and looked around. It had a bell round its neck, and the bell started to jingle in competition with all the cash registers. . . . . . 

Perhaps the reason the lamb had come to life and run away from the big store was that it could no longer bear to listen to the cash registers and the talk about buying and selling. And perhaps that was why Elisabet was following it. She had never enjoyed shopping.

Gaarder, Jostein , The Christmas Mystery (Kindle).

If you have not read 'The Christmas Mystery' I suggest you give it a try, maybe next December. We read it as a family when our girls were young for several Christmases in a row and they loved it and still do, even though they are all grown up and moved away now. The story of Elizabet Hansen's journey back in time to the first Christmas is woven into a very special Advent Calendar and is split into 25 readings one for each day in December up until Christmas Day.

So onto my card with the jingle bells on.

Materials used:SAM_2551(watermarked)
Limited Runs Digi Stamp - Jingle Bell Set
textured green card
designer music background paper
blending card
red ribbon
small jingle bells
glossy accents
Copic pens


Method:
Print out the image twice at the required size and print the verse onto the designer paper.


Make a DL card blank from the green card. Cut a piece of the designer paper to fit the front of the card.

Colour in the bell images with Copics. Cut out one full image and just the bell and ribbon knot from the second image. Shape the second image with an embossing tool and stick to the top of the full image with 3d glue or foam pads, sandwiching a piece of red ribbon between the images.

Cover the bell with glossy accents and leave to dry.

When the image has dried thread 3 small bells onto the ribbon and tie loosely to keep them together. Attach the ribbon to the back of the designer paper and then stick to the front of the card blank so that the image is dangling.

I used this card for my husband's Christmas card so added a stamped 'Happy Christmas' to the front underneath the bell.

So why not give it a go yourself. You have until the 31st of January to make your project and link it to the Path of Positivity Challenge blog. If you need more inspiration pop along and take a look at the amazing projects from the rest of the team.

Thanks for looking  in. Take care.

Pippa

I would like to enter my card into the following challenges:
Creative Corner Challenges - Anything Goes
Jingle Belles - Something Old and Something New (old bell embellishments, new bell digi stamp)
That's Crafty! - Anything Goes
Not Just Cards #28
Happy Little Stampers - Jingle

Sunday, 3 January 2016

Catching up!

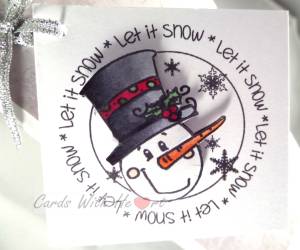
I realise that I still have not posted all the Christmas Chaos makes from my thwarted effort to get an entry in for each day. So as my craft room has been out of action for a while working at it's other job, a guest bedroom, here is one I made earlier!

Materials used:SAM_2508(watermarked)
Bugaboo Digi Stamps - Let It Snow Tag
blending card
Copic pens
white A3 card
Trimcraft Silent Night card 12x12
Crafter's Companion Big Score Board
silver ribbon


Method:
Print out the image at the required size twice and colour with the Copics. Cut one image to form a folded gift tag. Fussy cut the snowman from the second image and attach on top of the first image with 3d glue or foam pads.

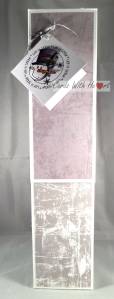
SAM_2506(watermarked)Use the A3 white card and the score board to make up a bottle box. I had to adapt the standard one because my bottle was extra tall and thinner. Cover the sides of the box with the Silent Night card.

Punch a small hole into the top of the tag and thread silver ribbon through it. Tie the ribbon into a bow and attach to the bottle box.


I made this box for my brother-in-laws Christmas present.

Thank you for visiting. Take care.

Pippa

I would like to enter my project into the following challenges:
A Snowflake's Promise #13
Creative Card Crew #103 - Anything Goes
Deep Ocean Challenge #119 - Anything Goes
Through the Craft Room Door - Dec 29-Jan 4
Crafting For All Seasons #116 - Christmas, Anything But A Card
Crafty Creations Challenges #305 - Anything Goes
Inspiration Destination #66 - Anything Goes
613 Avenue Create #157 - Anything Goes/CAS